Roger Dunham
Published December 12, 2025
Updated May 18, 2026
9 min
Building a Windows Desktop PDF App with Electron
Roger Dunham

Summary: You can build a custom desktop PDF app using Apryse WebViewer inside Electron, letting you reuse powerful web-based PDF/DOCX/Spreadsheet tools in a native desktop environment. This setup enables viewing, annotating, and manipulating PDF pages (and much more, if desired) with minimal effort. The article shows how easy it is to get started, and you can extend the app further using Apryse’s documentation and examples.
Introduction
PDFs are everywhere, from contracts and invoices to research papers and e‑books. Yet, working with them often means juggling between heavy desktop software and lightweight browser tools, neither of which fully meet the needs of developers or end‑users.
What if you could build your own streamlined desktop PDF application, tailored exactly to your workflow, using technologies you already know?
Apryse Web SDK is a powerful, yet extremely customizable web-based toolkit that allows you to quickly make Web Apps for working with PDFs, DOCX files, and Spreadsheets. You can check out a range of functionality, right now, at the Apryse Showcase.
Wouldn’t it be great if you could use the same technology for creating a desktop app?
Well, you can!
In this article we will look at how we can combine WebViewer with Electron to create a desktop app that will allow us to view, annotate, and manipulate the pages of a PDF.
We could do lots more too – redact PDFs, or generate documents from templates, or edit DOCX files and Spreadsheets – but we’ll keep it simple in this blog to show how simple it is to get started. Once you’ve seen that, check out Apryse’s documentation and videos that show how you extend the sample code.
What we will cover
- Adding WebViewer to an application
- Structure of the Electron App
- Creating a simple PDF Viewer
- Adding Drag and Drop
- Opening a PDF by clicking on it
- Starting the app by clicking on a PDF
- Creating an Installer
- Optimizing WebViewer for smaller application size
So, let’s dive in!
A note on versions
This article was written using Windows 11, Electron 38.3, WebViewer 11.9 and npm 11.5.2
You can get the source code from this repo. This example is using Vanilla JavaScript and HTML, but you could create an app using React or another framework if you preferred.
What we will achieve
We are going to create an app, with an installer that will allow you to select a PDF in three different ways:
- Select a PDF from a file picker menu.
- Open a PDF that is dragged and dropped into the UI.
- Automatically open the application when the user double-clicks on a PDF.
Adding WebViewer to the app
We are going to be adding Apryse WebViewer to our app. There are two distinct ways that we can do that:
Option 1: Using npm
WebViewer is available as a package that can be installed using npm.
npm i @pdftron/webviewer This will result in the WebViewer files being copied into node_modules.
To simplify the build process of the app, and to make the static resources available at runtime, we will copy the files that we need from node_modules into the project folder. There’s a script defined in the package.json file, copy-webviewer, that will do this for us.
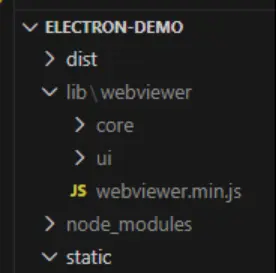
Figure 1: The location where we expect the WebViewer files to be located after having run copy-webviewer.
Option 2: Manual Download
It’s also possible to manually download the WebViewer as a zip file from the Apryse Downloads page.
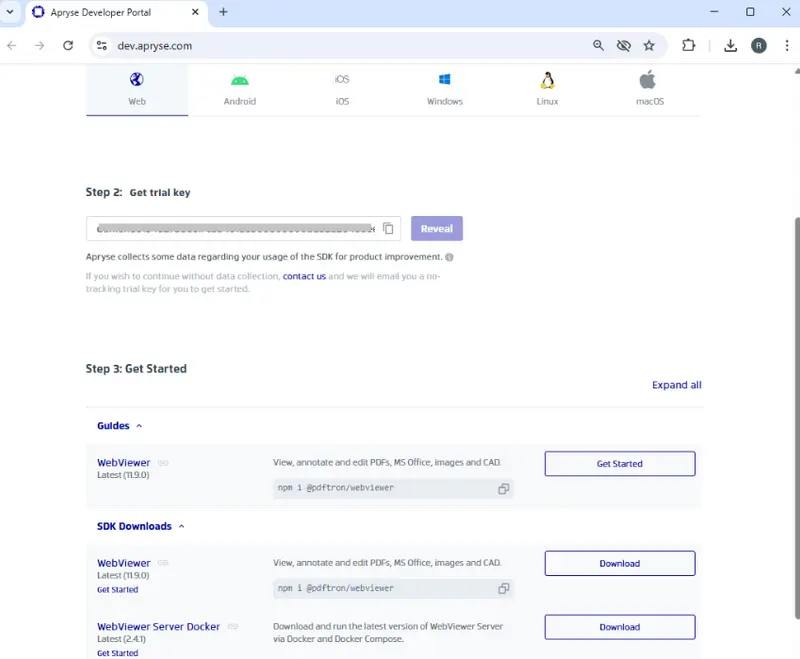
Figure 2: The Apryse download page (shown in December 2025). There are options to download different tools, as well as a text box that shows your personalized trial license key.
Once you have the zip file, unpack it, and copy the files into the same location in the project as shown in Figure 1. This option is great when you want to optimize your app.
Structure of the Electron app
There are three main files that we are going to use. Over this article, we will gradually add functionality to each of these as our application evolves.
- Main.js: The entry point of an Electron app that runs in the main process, creating and managing application windows.
- index.html: The front-end user interface file loaded into the renderer process, defining the app’s visible structure and content.
- preload.js: A script that runs before the renderer loads, safely exposing selected APIs and bridging communication between the main and renderer processes.
I’ve deliberately structured the project with the code embedded directly within index.html, rather than within a dedicated renderer file. That is only to minimize the number of files that I need to talk about. There is no technical reason to structure the project like this, so feel free to restructure the files in whatever way you prefer.
This is aimed at being an accessible tutorial, rather than one that demonstrates Electron best practice.
If you know of other, better, ways to achieve the same results, then please do so.
Evolution 1: Creating a simple PDF viewer app
We are going to start off by creating a simple app that allows you to manually select a file that is to be opened using a file picker.
The code for this is available in the branch “simple” within the git repo, and it assumes that WebViewer will be installed using npm, so run npm i to set up all of the dependencies.
At this point the main.js file is as follows:
It’s really just specifying where the other files are (and we are calling mainWindow.setMenuBarVisibility(false) so that the default Electron menu bar is hidden).
Our preload.js file is currently very simple, making the electronAPI available to our renderer.
const { contextBridge, ipcRenderer } = require('electron');
contextBridge.exposeInMainWorld('electronAPI', {
});
Finally, we have our index.html file that contains a div whereWebViewer will be mounted , a script tag that specifies where the file ‘webviewer.min.js' is located, and a script that initializes and constructs WebViewer. You should enter the license key into this.
The WebViewer constructor returns a promise, and when that resolves, the object instance is defined which is the WebViewerInstance that has been created. Currently, we are not using it, but we will do so as the project evolves.
We can run our project using npm run start.
The package.json file has been set up so that calling “start” will fire a script that will automatically copy the WebViewer files from Node-modules to the expected location, and then start the app.
There are other ways that you can copy those files – either manually, or with a plug-in.
The script will need to be modified if you are using macOS or Linux as it currently uses Windows only commands.
And here we have it, an app, that allows us to select a PDF from the hamburger menu (the icon with three horizontal lines) and then displays it in WebViewer.
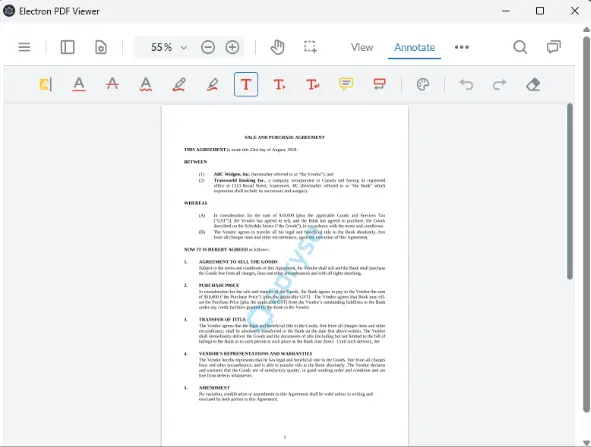
Figure 3: Our simple app running on a Windows machine. There is already a wealth of functionality available.
We can view PDFs, add annotations, fill in forms, and so on. We can also view DOCX files and spreadsheets. With just a few lines of code, we could change the behavior and allow users to edit DOCX files and Spreadsheets, or with other changes, add support for digital signatures or any of the other great things that WebViewer offers.
Note: We haven’t created a distributable artifact yet – we will get there, but let’s add more functionality first and create support for drag and drop support, so that you can open a PDF by selecting it with a mouse and dropping it onto the app.
Evolution 2: Adding drag and drop support
Adding support for drag and drop is easy and you can find the code in the branch drag-and-drop.
Within the script block of index.html, we just need to add a couple of event listeners, just as you would for traditional Windows apps – one for dragover, and the other for drop. We’re putting them into the ‘then’ block that resolves when the WebViewer constructor completes.
When a drop happens, we’re getting the file content from the drop event arguments. In reality, there could be more than one file that is dropped, and it might not be a file that WebViewer can handle, so for a production system you would want to check that. For this demo though, we are keeping things simple, and just getting the first file, which we are assuming is either PDF, or a filetype that WebViewer can automatically handle (such as DOCX, XLSX, or PNG).
We are then taking the data for that file, converting it first into an array buffer, and then into a Blob, and using that, to call instance.UI.loadDocument, passing in the filename which is used to imply what the filetype is.
Figure 4: Drag and drop in action within WebViewer.
Now we can drag lots of file types onto our app, and when we drop them, they will open in the default viewer.
WebViewer 11.9 has three view modes. These are the default one, the DOCX Editor and the Spreadsheet Editor. It’s easy to swap and choose which one you want.
Evolution 3: Opening a PDF by double clicking on a PDF
You can get the source code from the click-from-OS branch.
Let’s update our main.js code so that we can only have a single instance of the app running.
Now if the app is running and the user tries to start another instance, then the Electron event 'second-instance' will occur. In that event, we get the filename from the args that were passed to the app (there is some magic needed to wire up a double click on a PDF to fire this event – we will see that in the next evolution) and open the file. Were you to do this using macOS, then there would be other ways to get the filename.
We also need to add a new handler for window.electronAPI.onOpenPdf((path)) to the file 'index.html'.
At the moment, that won’t work because we haven’t defined window.electronAPI.onOpenPdf. We do that by updating the preload.js file to pass the message from main.js to the renderer (which is index.html).
Now with a little magic (which we haven’t talked about yet), if the app is running and the user double clicks on a PDF, then it will appear in the app.
Evolution 4: Opening the app when the user clicks on a PDF
The final part of the jigsaw is to start the app when the user clicks on a PDF, and then open the PDF within the app. You can get this code from the master branch of the repo.
There are a few more code changes needed in the three files that we are using.
We need to add extend the Electron event handler in main.js that occurs when the app is ready.
Now when the app is ready, we are checking the args that were used to start the app, and if one ends in '.pdf' we assume that arg is the filepath that should be opened.
We wait until the 'did-finish-load' Electron event occurs then send an open-pdf message (which we defined in the previous evolution).
At the moment, that message would arrive at the renderer before the WebViewer has been constructed. We therefore need to store it (in a variable called initPath), and if that variable is set when the WebViewer constructor completes, then we use it to call instance.UI.loadDocument(initPath);.
The script part of our index.html file now looks like:
That’s all the code that we need. But currently we can’t start the app (and see that our new code works), because the operating system hasn’t been told to do so.
We need to create an installer that will set up that magic.
Evolution 5: Creating an installer
In order to move from an app that runs when we call “npm run start” in VS Code, to one that is standalone, we need to build it.
The easiest way to do that is using “electron-builder”.
Electron builder will take all of the files that our app needs and bundle them together into something that can be deployed.
Electron builder is configured using the "build" section within package.json.
There are a few parts to this, so let’s look at these in turn:
appId:
A unique identifier for your application, often in reverse-DNS format.
productName:
The name of your app as it will appear to users (e.g., installer, window titles).
Files:
The list of files and directories to include in the packaged app. In our case we are using:
- "main.js",
- "index.html",
- "preload.js",
- "lib/**/*"
We’ve already mentioned the three main files. The lib folder contains the WebViewer files that we copied, including webviewer.min.js.
The main reason that I copied this file from node_modules into this lib folder is to simplify this list of files.
win:
Settings specific to Windows builds, here specifying the installer type as nsis (the ‘Nullsoft Scriptable Install System’).
fileAssociations:
Defines how the app integrates with the OS to open certain file types
In our case, we are only interested in PDFs, so this section is:
- "ext": "pdf",
- "name": "PDF Document",
- "description": "Open PDF files with My Electron PDF App"
This is how the installer sets up the ‘magic’ link between PDFs and our app which will allow us to click on a PDF to open our app.
Creating the installer is easy, we just need to call npm rundist (or if we want to copy files from node_modules npm run copy-and-dist). This takes the information from the build section, as well as the version information included in package.json to create a Setup app.
The build process takes a few minutes to run, but at the end of it we will have a dist folder that contains the Setup app and a ‘blockmap’. The blockmap is used as a way of efficiently updating the application if an earlier version has already been installed.
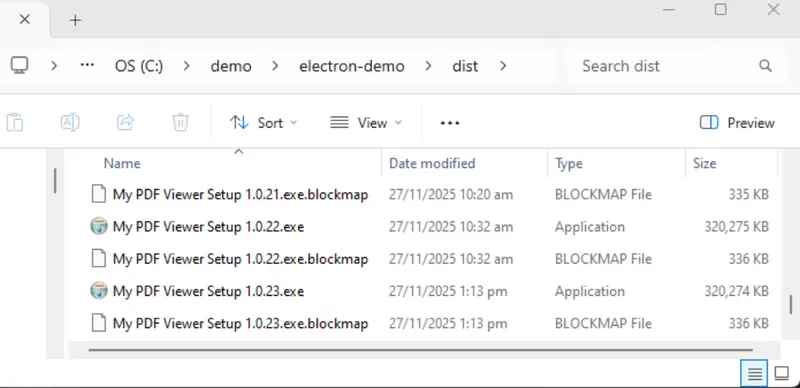
Figure 5: An example of installers created for different versions of the app.
If we run the Setup application, then it will add entries into the registry that allow the PDF file extension to be mapped to our app. You might need to manually say which app you want to open PDFs, but our app “My PDF Viewer” should be in the list of available options.

Figure 6: Windows Explorer now gives us the option to open PDFs using our app.
Creating a smaller application and installer
Currently the installer is about 320MB, partly because of Electron overhead, and partly because it has access to all of the functionality that WebViewer supports, even if we don’t use it.
If we know which are the parts of the functionality that we will use, then we can optimize WebViewer and create a dedicated set of files that exclude the things that we don’t need. This will then result in a smaller application.
Optimizing WebViewer is used to deploy WebViewer to Salesforce as a way of working around the platforms limitation on the size of file uploads.
The easiest way to optimize WebViewer is to use the download option, rather than the npm package. Let’s look at the steps:
Step 1: Download the WebViewer zip file
Head on over to https://docs.apryse.com/web/guides/download and download WebViewer. This will be a zip file.
Step 2: Extract the file contents
This will create a folder that contains all the WebViewer files, including documentation and sample.
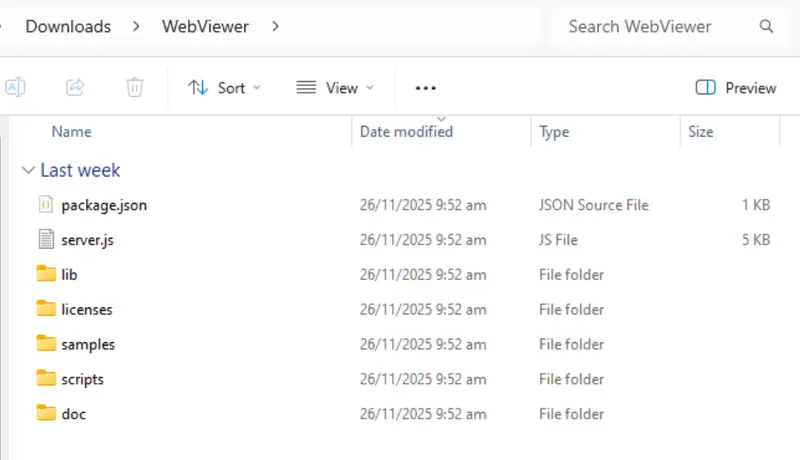
Figure 7: The files extracted from the zip file.
Step 3: Prepare for optimization by installing dependencies
Optimize uses a script that has dependencies that need to be installed. You can do that by opening the WebViewer folder in the command window or terminal and running npm i.
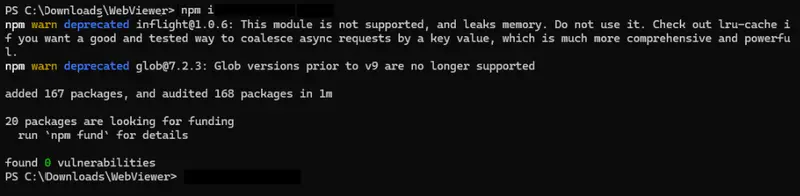
Figure 8: You will need to install some dependencies that the Optimize script requires.
Step 4: Run the Optimize script
Run the script using npm runoptimize.
This will lead you through a set of questions. In my case, I selected no for almost all of the options, but you may wish to make other selections.
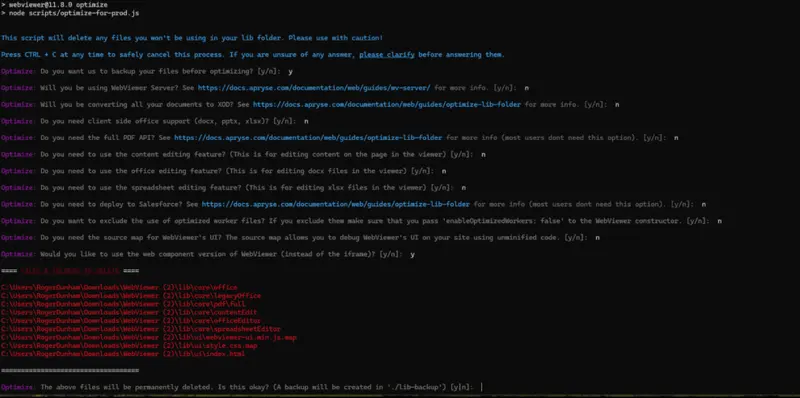
Figure 9: The output of the Optimize script.
In particular, select no for deployment to Salesforce as that would zip up the generated collection of files, which we do not need here.
Step 5: Copy the optimized files into the lib folder of our project
Once the script completes, the core and ui folders will be much smaller than previously. Copy those and webviewer.min.js into the lib/webviewer folder in the project.
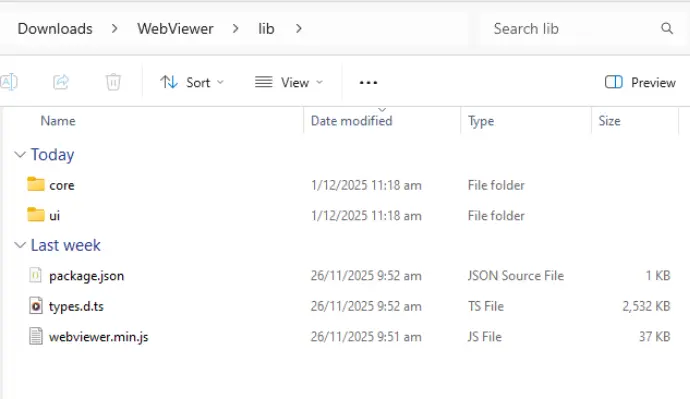
Figure 10: The extracted files after optimization.
Step 6: Create a new installer
Update the application version (in my case I increased it to 1.0.24), then run the dist script again (don’t call the copy-and-dist script since that would overwrite your files with ones from node_modules), and after a few minutes, you will have a new Setup application and blockmap.
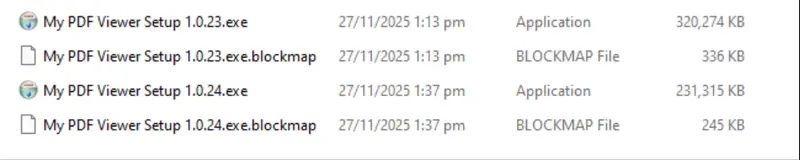
Figure 11: Optimizing WebViewer can result in a significantly smaller application.
The new Setup app is now about 90 MB smaller than previously.
Learn how to build powerful desktop PDF apps using WebViewer and Electron.
Conclusion
We’ve covered a lot in this article, not just how to create a PDF viewer using Apryse WebViewer and Electron, but also how to make it behave like a typical Windows desktop app, with drag and drop functionality and the ability to open when the user clicks on a file. We’ve also seen how we can reduce the size of the application by removing WebViewer files that we don’t use.
There’s a lot more that we could do though. With its modular UI, you can quickly customize the appearance of the app, or implement a huge range of other functionality, all with very little of your own code.
So, check out the documentation for the SDK to get started quickly. Get a trial license key and see what you can achieve.
If you have any questions, then you can reach out to us on Discord.


