Roger Dunham
Published August 07, 2025
Updated August 07, 2025
8 min
Finders/Keepers. Extracting Specific Sentences from a Contract Using Regex
Roger Dunham
Summary: Speed up contract review by using regex and the Apryse SDK to extract only the sentences that matter — like those containing “must.” A simple, fast way to turn dense PDFs into actionable content.
Introduction
So, here’s the problem.
You have a contract that is a multi-page PDF. It’s long, it’s authoritative, and it specifies things that need to be complied with in order to fulfill the contract.
Thankfully it’s possible to find each of these requirements, since each is in a sentence that contains the word “must”.
To make sure that nothing gets missed, you’ve been asked to create a spreadsheet that contains each of these sentences, so that they can be reviewed as being acceptable before the contract is signed. And as always, there is a short timescale for this, so the pressure is on.
You could, of course, search the document for the word “must” then manually copy each sentence where it is found and paste it into the spreadsheet, but that is going to be a slow and extremely dull job!
Thankfully, Apryse can save you from such tedious work. Both the Server SDK and Web SDK offer the ability to search through the contents of, and extract words or sentences from PDFs, offering a way that you can automate the process.
Generating a Simple Service Agreement Document
I asked ChatGPT to create a simple Service Agreement that uses the word “must” to show things that the parties need to comply with.
I also asked it to create some other sentences that don’t include the word “must”. The result was a plausible Service Agreement just over a page long.
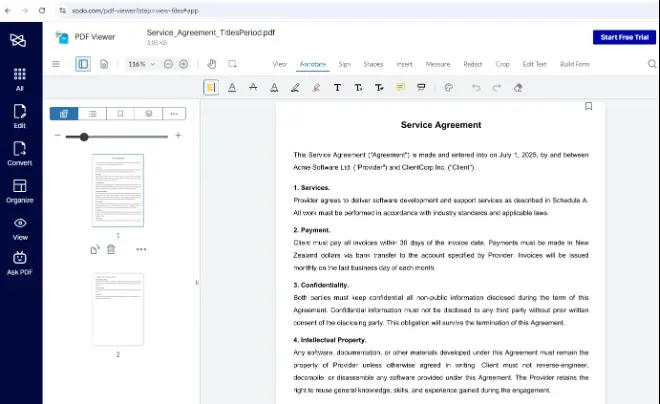
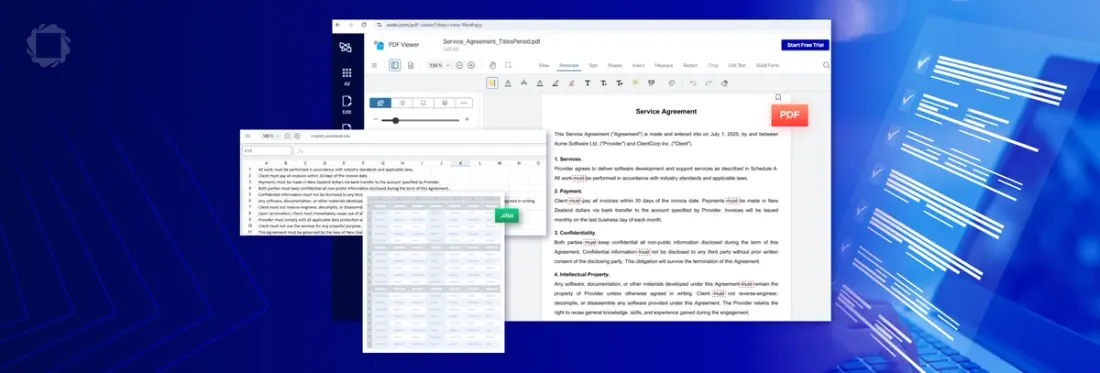
Figure 1: The sample PDF shown in Xodo PDF Viewer. Some of the sentences contain the word "must", others do not.
Xodo.com and many other tools will allow you to search the content for a specific word from the UI, so it’s easy to find that the word “must” is present 12 times in the document. With so few occurrences it would be possible to copy each sentence by hand.
However, in practice, the document that needs to be searched could be hundreds of pages long, making manual copying impractical. Although this article is going to be primarily based on the simple document, we will also, briefly, look at a much longer document.
Specifying the Search Term
While there are many UI based tools, for this article we will use the Apryse SDK directly. While simple searches are certainly supported, we want to get the entire sentence that contains the word “must”. You could write clever logic to get words both before and after the search word (and we will look at that too), and extract the sentence from there, there is a much easier way to get the sentence – using a Regex.
What’s a Regex?
A regex (short for regular expression) is a sequence of characters that defines a search pattern. It’s a powerful tool used to match, find, and manipulate text based on patterns rather than exact strings.
Regex is tricky to get started with (it is almost a programming language), but that is just a reflection of how powerful it is. There are a number of websites, such as Regex101 that will help you to put one together. Alternatively, you can ask ChatGPT, or another AI, and it will probably create one that does what you need (though as always with AI generated content, you should verify the results, as AI can get things wrong).
For this article we want to search for sentences that contain the word “must”, while excluding those that have, for example “mustard”. We also want to get everything from the end of the preceding sentence (or the beginning of the document) to the end of the sentence that contains “must”.
If we make the assumption that sentences must end in “.”, “!” or “?” then this is surprisingly easy, and we can use the following regex.
([^.!?]*\bmust\b[^.!?]*[.!?])This article isn’t meant to be an introduction to regex but it’s useful to have a vague idea of what this means, by breaking it into four parts:
- [^.!?]* means any number of characters that are NOT one of the characters that indicate the end of a sentence
- \bmust\b means the word “must” (we’ll talk about case in a minute)
- [^.!?]* means (just as before), any number of characters that are NOT one of the characters that indicate the end of a sentence
- [.!?] means any character that indicates the end of a sentence
Awesome, that’s a neat little search pattern. It’s not perfect but it will do for what we want. (It assumes that a dot can never appear in the middle of a sentence, which could be a problem if you had numbers in the document, but we will live with that for now.)
So, let’s use that regex to extract the content.
Searching PDFs using a Regex
The Apryse SDK supports many common languages including Java, C++ Go, Python and JavaScript. For this example, though, I will be using C#.
The code is based on the Text search sample, which you may want to check out. I’ve made some changes to it, though, in order to search for our regex.
There’s a little set up to do (which isn’t shown) – you need to initialize the PDFNet library, passing in a license key (you can find how to do that in the full sample code), and you will need to terminate the library when you are finished.
For our purposes though, the following is the important part -
The essential parts are that we are:
- creating a new PDFDoc object from our file (which has the hard-coded name of "Service_Agreement.pdf”)
- creating placeholder variables for page number, result string, ambient string and highlights (we’ll talk more about those in a moment)
- setting the search mode, so that is knows to expect a regex
- defining what we want to search (which is our regex)
- calling “txt_search.Begin”, specifying the page range to search (values of -1 indicate the entire document)
- looping through the document calling txt_search.Run until we get to the end of the document
- when we find a result (ResultCode.e_found), we are writing the result to the console
The method txt_search.Run returns a code that shows whether a match was found, a new page was found, or the end of the document was found.
It also has a number of placeholder parameters that may have been set – the obvious one is the second one, which we called result_str, which contains what was found.
So, let’s run that code with our sample document. After a few moments we get output in the console, with each line being a sentence that contains the word “must” (which is exactly what we wanted).
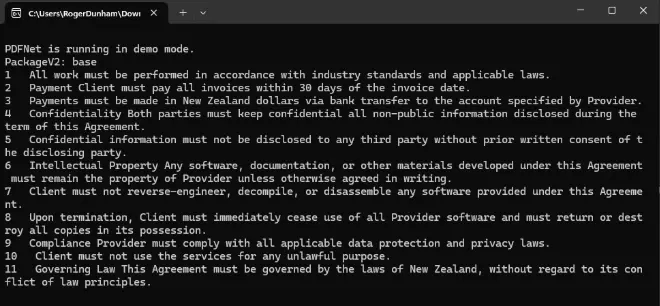
Figure 2: The output of the code - the entire sentences that contain the word "must".
You can see that that we found 11 sentences. However, we noted earlier that there were 12 occurrences of the word “must” in the document – that’s because sentence 8 has the word twice in the same sentence, and we have correctly detected it as a single sentence. Awesome!
We could have also reported the page number where each sentence was found. We won’t do that yet, but we will use that information later in this article.
Making the Search Case Sensitive
A common problem when searching text is case – sometimes you want the word to be found regardless of case, and other times you don’t.
The default behavior is TextSearch is not case sensitive – as such it would find sentences that include both “must” and “Must”.
If you want to enforce case-sensitivity, then you can do that by specifying that within the mode using TextSearch.SearchMode.e_case_sensitive.
Int32 mode = (Int32)(TextSearch.SearchMode.e_reg_expression|TextSearch.SearchMode.e_case_sensitive);Note, that even if the search is specified as case-sensitive, regex can still override that by using “(?i)” - that is typical behavior found in almost all regex implementations.
Extracting Words or Characters Either Side of the Search Result – The Ambient String
Sometimes it might be useful to have a little context around the result – what were the words before and after the text that was found?
Once again, Apryse has your back, by allowing you to specify TextSearch.SearchMode.e_ambient_string in the mode.
Int32 mode = (Int32)(TextSearch.SearchMode.e_reg_expression|TextSearch.SearchMode.e_ambient_string);When this is done the function Run will populate not just the result_str, but also the ambient_str (otherwise that value will be empty).
We’ll see an example of that in action in a moment, but before we do, we also need to specify the maximum number of words and letters to be returned before, and after, the result string. This is done using four different methods, each of which takes a number as an argument.
- SetAmbientWordsBefore(10);
- SetAmbientLettersBefore(90);
- SetAmbientWordsAfter(10);
- SetAmbientLettersAfter(40);
Note, that what is actually returned will be the lesser of the values of words and letters which you have specified, which can be a little confusing.
Let’s modify our code as follows:
When we run that code, we still get the same result string as we did in the earlier example, but the next message, which is the ambient string, contains additional text.

Figure 3: You can get just the search results, or that plus text before and after it ("The ambient result").
In this example, we got 10 words returned before the search result, but only 7 words afterwards – that is because those 7 words were limited by the specified 40 character limit.
Getting the Location of the Search Results
We’ve seen how we can get the actual search results back, and potentially text before and after them. It’s also possible to get the location of the words that have been found.
Once again this is done by updating the mode, in this case to include TextSearch.SearchMode.e_highlight.
Int32 mode = (Int32)(TextSearch.SearchMode.e_reg_expression| TextSearch.SearchMode.e_highlight);Now when the search is run, the Highlights parameter will also be populated. You can then get the contents for each match by iterating through the Highlights object’s contents. It’s a little gnarly to get the coordinates out, so I won’t include all of it here, but you can find it in the sample code.
Now if we run the code again, we get to see the search result, the page where it was found, and the location on the page where the text was found.

Figure 4: If “highlights” is specified in the search mode, then you can get the location of the search results.
This even works if the search result is spread over multiple lines, as is the case for the 4th string that was found.
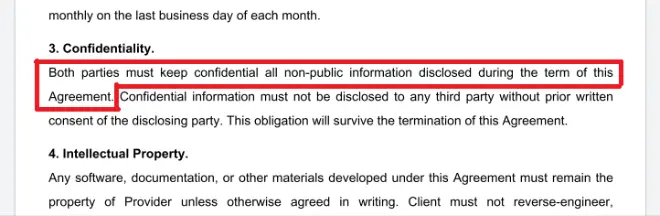
Figure 5: Even though the sentence is split over two lines, Apryse has given us the information as to where the search result is on the page.
What you do with that information is up to you, you could for example create a screenshot of the page where each result was found. The Apryse SDK really does open up a world of opportunities.
Viewing the Results in a Spreadsheet
So far, we have just logged the results to the console window.
As a next step you could log them to a text file or export the results to a third party app such as SmartSheet using its API.
You could also convert the data to JSON and use it to generate a new DOCX document from a template.
However, for this article we will create a spreadsheet that contains the data.
Once again Apryse is there for you. You could create a spreadsheet from a template using Fluent, but for now we will create the spreadsheet on the fly using the LEADTOOLS libraries. In this example I’m just creating a new row, with a single cell, for each search result, but the library allows you to do far more complex spreadsheet creation.
We can now open the document in any spreadsheet tool that supports the XLSX format, whether that is Microsoft Excel, or the Spreadsheet Editor within the Apryse Web SDK.
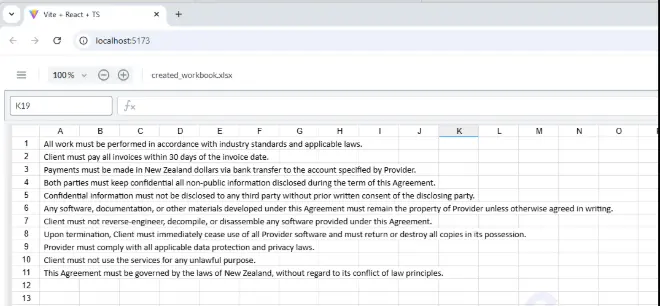
Figure 6: A spreadsheet containing all of the sentences that contain the word "must" from our sample document.
Wow! That’s awesome – using only Apryse tools we have taken a PDF, extracted content from it, created a spreadsheet and displayed it.
You could then go through each item and verify that you understand the requirements. You could even add a link, based on the page number and location that we logged earlier, that would take you back to the relevant point in the PDF where the search result is located – having to create that by hand would have been completely impractical.
How Fast is the Search Process?
So far, we have just looked at a two-page document, but what about a longer document?
As a quick test, let’s search for all of the sentences that contain the word “must” in the PDF 1.7 specification – that’s more than 1300 pages long.
All we need to do to process this new document is change the name of the PDF that we are searching through and run the code again.
After a few moments a new spreadsheet is created with more than 850 search results found.
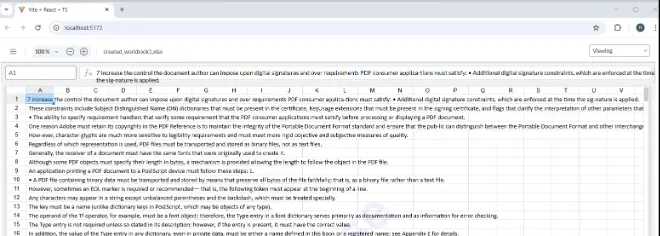
Figure 7: The result of running the code against a much larger document - the PDF 1.7 specification.
That’s a lot of results and on my computer, it took just 658ms (less than 1 second) to search through the document, and another 220ms to create the Spreadsheet.
As we saw earlier, you could find and copy those sentences by hand, but with awesome performance like this, why would you?
Next Steps
We have seen several aspects of Apryse technology in this article – the Server SDK, the Spreadsheet Editor, and the LEADTOOLS library for dynamically generating spreadsheets.
So, what are you waiting for?
Get yourself a free trial license and try things out for yourself. There’s a wealth of documentation and a Discord channel where you can get help if you need it.


