Kevin Herschbach
Technical Content Writer
Published January 30, 2026
Updated May 18, 2026
13 min
How to Use a PDF Generation SDK for Creating Invoices
Kevin Herschbach
Technical Content Writer

The ability to dynamically generate professional invoices from structured data is essential for businesses of all sizes. The challenge lies in creating a maintainable system where business users can update invoice layouts without touching code, where data flows seamlessly into templates, and where the output looks perfect every time.
Template-based PDF generation solves this problem by separating your data from your document design. With the right SDK, you can define invoice layouts in familiar tools like Microsoft Word, then programmatically populate them with real-time data.
In this tutorial, you'll learn how to generate professional invoice PDFs using a template-based PDF generation SDK for invoices with Apryse WebViewer. You’ll take an invoice layout, populate it with structured data in a JavaScript application, and generate a polished PDF; without hardcoding layouts or touching design logic in code.
To achieve this, you'll follow these steps:
- Set up your project
- Create the HTML and CSS
- Implement the invoice generation
The result will look like this:
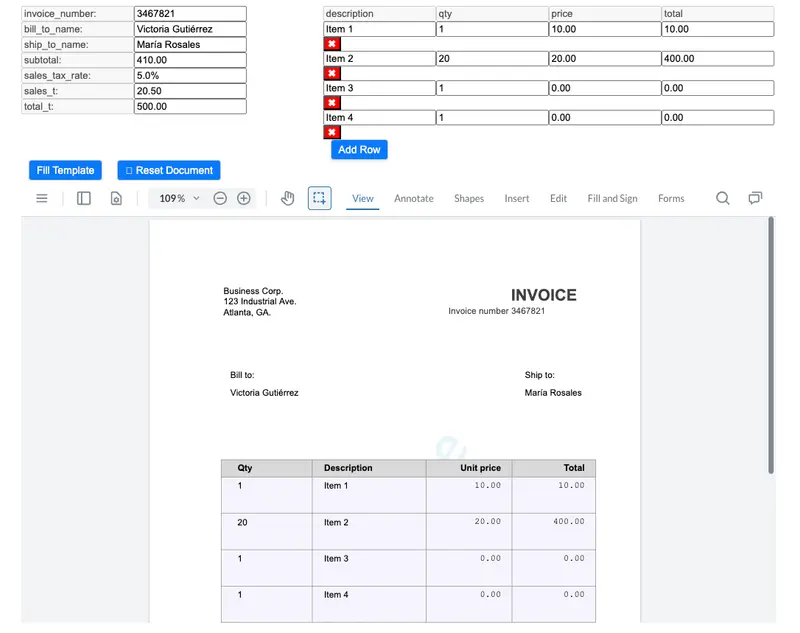
The invoice's text fields are automatically populated with the data entered into the web form
Prerequisites
In this demonstration, you'll use npm as your runtime environment and package manager to install WebViewer SDK v11.10.0. This SDK version is compatible with Node.js 8 through 24.
You can check your installed Node.js version by running node --version.
Step 1: Set Up Your Project
In your project directory, create a package.json by running npm init -y, then install the WebViewer SDK.
npm install @pdftron/webviewerIn your project root, create a new directory public with a sub-directory lib that in turn contains a sub-directory webviewer.
mkdir -p public/lib/webviewerNext, in node_modules/@pdftron/webviewer/public, locate the directories core, ui, and the file webviewer.min.js. Copy them into your newly created directory public/lib/webviewer.
cp -R node_modules/@pdftron/webviewer/public/core node_modules/@pdftron/webviewer/public/ui node_modules/@pdftron/webviewer/webviewer.min.js public/lib/webviewer/Your public directory's structure should now look like this:
public
└── lib
    └── webviewer
        ├── core
        		└── ...
        ├── ui
        		└── ...
        └── webviewer.min.js
Step 2: Create the HTML and CSS
In the public directory, create a basic index.html that imports webviewer.min.js. You'll extend the code in the next step.
Also in the public directory, create an index.css file to apply some styling:
Step 3: Implement the Invoice Generation
Now you'll create an interactive invoice generator. It takes input from a web form filled out by the user and automatically injects those values into a Word document (.docx) template. It then generates an invoice from that template, which the user can download as a PDF.
To implement this, you can copy the sample code from the documentation and use it inside script tags in your index.html file's body. Make sure to generate a free trial license key from the same page first, which will be added to the sample code automatically.
⚠️ One important thing to change is the path to the WebViewer assets you copied earlier. Instead of path: '/lib', it should say path: '/lib/webviewer' to reflect your directory structure.
Also note that the sample code uses the template file invoice_template.docx. Feel free to take a closer look at its template keys to better understand their relationship with the data they'll be populated with.
After implementing the sample code, your final index.html will look like this:
Let's break down the code.
Global Variables
element: Grabs the viewer divdocumentViewer: Will hold the WebViewer instance (starts as null, gets set later)sampleData: Will store all the invoice data (numbers, names, items)templateApplied: A flag to track whether the template has already been filled (starts false)defaultDoc: URL to the invoice template
Initializing WebViewer
WebViewer({ ... }, element): Creates a new WebViewer instance.then((instance) => { ... }): Runs after WebViewer finishes loadingloadTemplateDocument(): Immediately loads the default template
Loading the Template
async: Makes this function asynchronous so it can wait for the document to loadawait documentViewer.loadDocument(...): Loads the DOCX file from the URLtemplateApplied = false: Resets the flagsampleData = { ... }: Creates default invoice datagenerateInputFields(): Creates the input form based on this data
Filling the Template
Generating Input Fields
This is the most complex function. Let's break it into smaller pieces.
Setup
- Empties both divs before creating new inputs
- This enables regenerating the form when items are added/deleted
Processing Each Field
Object.keys(sampleData).forEach(key => {- Loops through every property in
sampleData keywill be: "invoice_number", "bill_to_name", "items", "subtotal", etc.
Handling Array Fields
if (Array.isArray(sampleData[key])) {
sampleData[key].forEach((item, index) => {- Checks if the field is an array (only "items" is)
- Loops through each item (index 0, 1, 2, 3...)
Creating the Header Row
- Only runs for the first item (
index === 0) - Creates disabled input fields showing column names: "description", "qty", "price", "total"
- Adds a line break
<br>after the header
Creating Data Rows
- Creates 4 inputs with IDs
- Example for item #1:
items_0_description(value: "Item 1")items_0_qty(value: "1")items_0_price(value: "10.00")items_0_total(value: "10.00")
Adding Delete Buttons
- Creates a button with an ✖ symbol for each row
- When clicked:
splice(index, 1)removes that item from the arraygenerateInputFields()rebuilds the entire form (now with one fewer row)
- Adds a line break after each row
Handling Simple Fields
- For each simple field like
invoice_number:- Label input (disabled):
- Shows "invoice_number: " as a label
- Disabled so the user can't edit it
- Value input (editable):
- ID:
invoice_number- Pre-filled with the current value
- The user can edit this
- Line break: Moves to next line
- Label input (disabled):
Add Row Button
- Creates an "Add Row" button
- When clicked:
- Generates a random quantity (1-20)
- Adds a new item to the array with default values
- Rebuilds the form to show the new row
- The button is disabled if there are already 10 items (prevents infinite rows)
Creating the UI Layout
- Sets up the container
- Sets up the "Fill Template" button
- When clicked, runs
fillTemplate()to generate the invoice
- Sets up the "Reset Document" button
- When clicked, reloads everything from scratch
element.insertBefore(controlsContainer, element.firstChild);- Puts the controls above the document viewer
insertBefore(new, existing)inserts the new element before the existing one
Test Your Invoice PDF Generator
Now go ahead and test the app.
npx http-server -a localhostAt the top, you can see the web form to be filled out by the user. The data entered there will populate the template keys in the invoice document below when you click on the "Fill Template" button.
To download the invoice as a PDF, click on the hamburger menu in the top left of WebViewer and select "Download".
The document templates take the data from the web form and populate the invoice fields with it
Learn how to automate invoice recognition and data extraction in C# using template-based workflows.
Conclusion
In this tutorial, you've integrated PDF generation for invoices using the Apryse WebViewer SDK's template feature.
However, template-based PDF generation is not restricted to invoices. You can use any data in JSON format to generate any kind of PDF by defining your own template keys. Take a look at the SDK documentation's Data Model page for more details.
To explore more of what the Apryse SDK has to offer, check out its documentation and the various samples. Begin your free trial or contact our sales team to get started.


