Roger Dunham
Published July 03, 2026
Updated July 03, 2026
8 min
From Paper to Patient Records: Turning Handwritten Forms into Structured Data
Roger Dunham

Summary: Handwritten patient intake forms create bottlenecks in healthcare, causing slow data entry, high error rates, and costly delays. This guide demonstrates an automated workflow using Apryse SDK and Intelligent Character Recognition (ICR) to convert handwritten documents into structured, database-ready data. The solution chains Form Field Detection, inclusion zones, and ICR to extract text, enabling secure, browser-based validation via Apryse WebViewer.
Introduction
Despite decades of digital transformation in healthcare, handwritten patient intake forms are still everywhere. Clinics, hospitals, and specialist practices rely on paper for speed, familiarity, and compliance. Manually typing handwritten forms into databases is slow, error‑prone, and costly, and it delays access to data that clinicians and administrators need to act quickly.
In this post, we’ll walk through an end‑to‑end workflow that transforms a handwritten medical patient form into clean, structured, database‑ready records automatically, and with confidence. Along the way, we’ll lean on the Apryse SDK to handle much of the heavy lifting around document processing and recognition, and we’ll use Apryse WebViewer to provide a secure, browser‑based UI that supports review and validation where human judgment is needed.
By the end, you’ll see how combining automated recognition with targeted human review, powered by a document SDK and WebViewer from a single vendor, bridges the gap between paper and digital systems.
The Ideal Solution: A Fully Digital PDF Form
For this article, I created a simple medical form as a Word document.
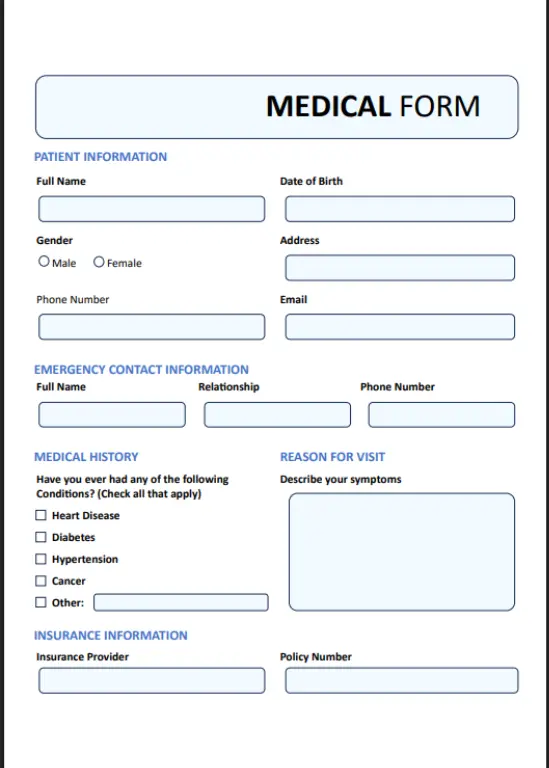
Figure 1: The form that will be used in this article.
I converted that to a PDF which could be then used to build a fully digital form, fillable on a PC or mobile device with the data directly stored into a Database, offering a quick and efficient solution.
The Reality: Printed Forms with Handwritten Answers
But even if you have a beautiful online form, some people will still want to print it out and fill it in by hand. For this article, I got my colleague, Julie Love, to do that.
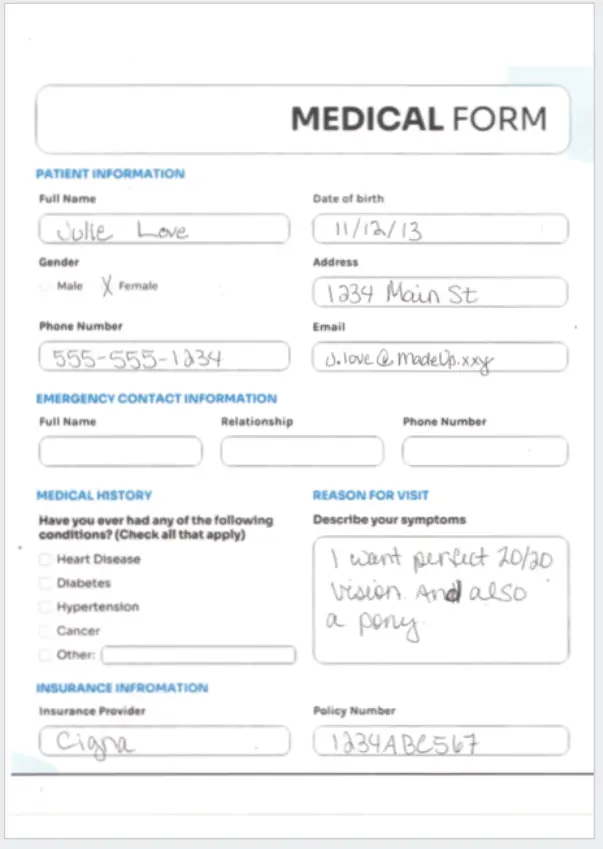
Figure 2: The completed handwritten medical form.
So now we need to work with both digital and paper forms!
Apryse has your back with a range of tools that can help with its Smart Data Extraction (SDE) functionality. Smart Data Extraction isn't a single tool. Instead, it offers many data extraction engines.
Ultimately, we will use the AI powered Key Value Data Extraction to identify which data on a form is associated with specific text.
That sounds exactly like the thing we need, but that Key Value extraction doesn’t work with scanned documents.
If the document had just been printed, then we could have used OCR to extract the text, but we also have handwriting, so we need something special—The Apryse ICR (Intelligent Character Recognition) module which was released in April 2026.
There are a few other steps that we need to do, and we’ll see in this article how we can chain various aspects of Apryse functionality together to extract handwritten text and store it in a database.
A Word on Versions
This article was written using Apryse 11.12. The code samples used Node 24.15.0 running on Windows 11, but similar results can be achieved on other platforms, and with other programming languages and Node versions.
Step 1: Scan the Form
Before we can work with the document, we need to scan it. I did that using the default settings on my scanner which results in a PDF containing a JPG image scanned at 300. JPG isn’t ideal for text since it is a lossy format, but it is a common default option.
There are many things that need to be allowed for even at this stage: the user may have printed the document to a paper size different from that intended (A4 instead of Letter size for example), scaled it, or printed it with borders. They could also have scanned it upside down.
Production code needs to cater to these scenarios. I haven’t done so here in order to keep the essence of the code as simple as possible.
Step 2: Prepare for ICR
OCR works well for printed text, but handwriting requires ICR, which uses different recognition models. Apryse released the add-on ICR (Intelligent Character Recognition) handwriting recognition module in April 2026. You will need to download that from the Apryse website.
We could perform ICR on the entire document, but there is no need to as we are only interested in the parts of the form where the user entered text. We already know what the rest of the form says as we created it.
We can therefore use inclusion zones to specify just those parts of the document that contain content that is of interest.
Apryse WebViewer allows you to measure the location of each field that is of interest, but that would get tedious, and there is a better way.
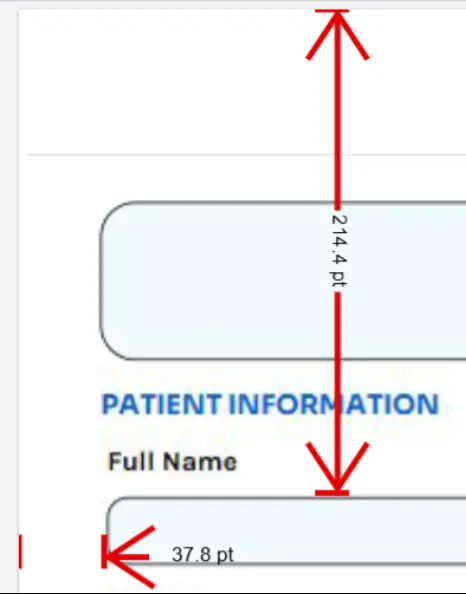
Figure 3: You can calculate the location of each field manually. WebViewer supports that.
Rather than doing this manually, we can use Form Field Detection, another part of the Apryse Smart Data Extraction (SDE) module.
Once the Apryse SDK and the SDE module have been installed, detecting fields is easy.
await PDFNet.DataExtractionModule.extractData(‘scanned.pdf', 'form-fields.json', PDFNet.DataExtractionModule.DataExtractionEngine.e_Form);The function creates a JSON file that contains the location, confidence level, and type of each of the detected fields.
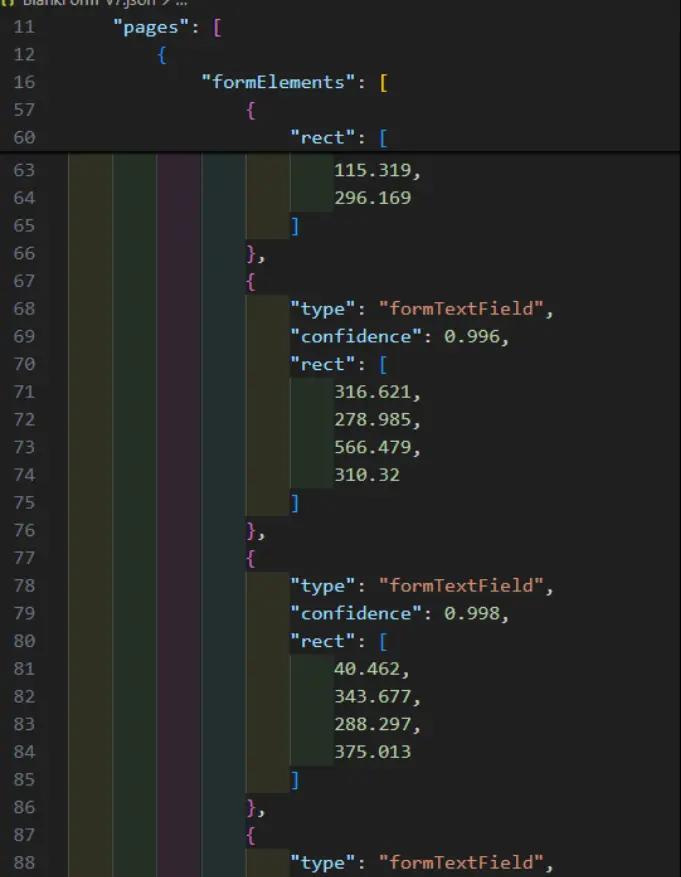
Figure 4: Part of the extracted data, showing where fields were detected and the confidence that it was correctly detected.
It’s hard to visualize that data, so let’s look at the Apryse Showcase Field Detection sample (which uses that functionality under the hood) to show the location of detected fields.
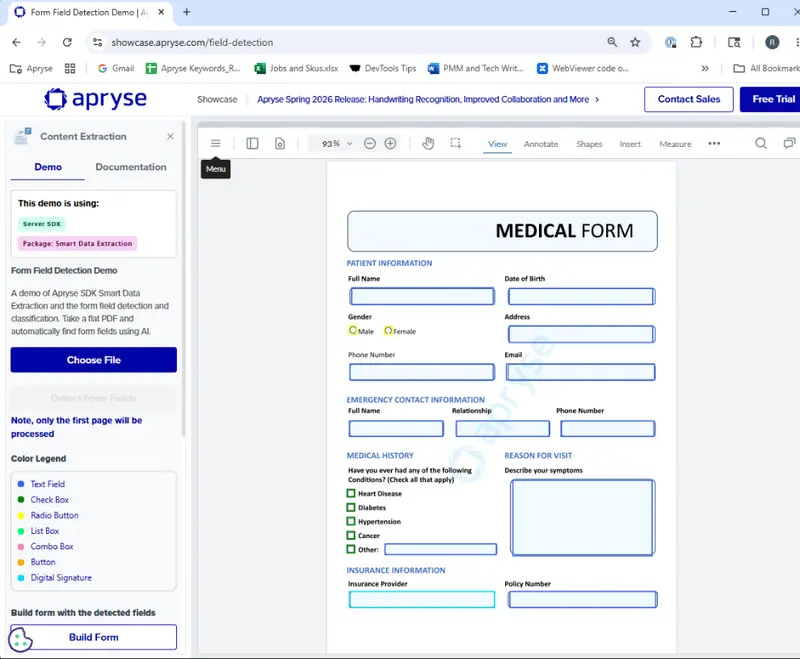
Figure 5: Smart Data Extraction has automatically detected the location of all of the fields from which we want to detect data.
We can then use that JSON To create a set of inclusion zones.
Step 3: Creating Inclusion Zones
We can’t use the JSON directly within the ICR module, but it is easy to transform it to give an array of “inclusion zones” that we can use.
The form field module reports locations measured from the top-left of the document but for historic reasons PDFs are typically measured from the bottom-left. We therefore need to subtract Y locations for the fields from the height of the form.
If the file was scanned upside down, then more complex processing is needed to allow for rotation, but we will skip that here.
My code only deals with fields on the first page of the PDF but could be extended to work with multi-page documents. You could also extend the code to ignore any fields that were not detected as designed to hold text.
Step 4: Run ICR
We are now ready to extract the handwriting from the parts of the form that are of interest.
It takes a little while to run, and when it is complete, a hidden ICR text layer is present in the PDF. At this point, the file won’t look any different, since the ICR text layer isn’t visible, but you can search within, or select, the hidden text with a PDF Viewer.
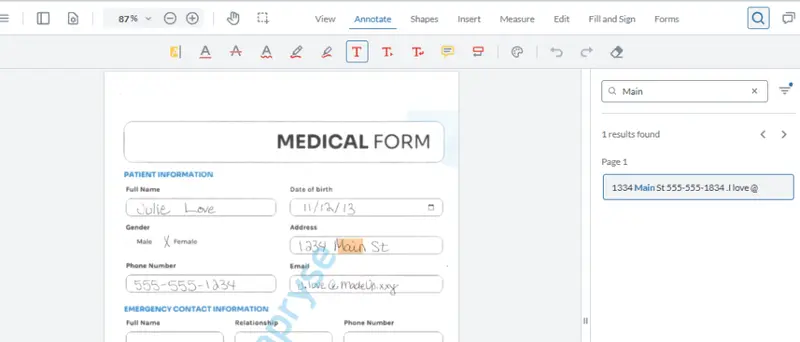
Figure 6: Following OCR, the handwritten text is searchable.
That’s great progress, but the data is still in the document, and we want to get it into a database.
There are two ways that we could get the data from the document.
Option 1 (Not recommended): Add Names to the Form-field.json File Then Export ICR to JSON
So far, we are the embedding the ICR’d text back into the PDF, but it’s also possible to export it as JSON.
//set up options as before
const json = await PDFNet.OCRModule.getOCRJsonFromPDF(doc, options);
The JSON includes the recovered text and its location, so we could work out which data goes with which field.
Currently though, the locations don’t have field names, so if we update the form field JSON to include a field name, then we can match the extracted data to each field name.

Figure 7: If we add names to the form-field.json file then we can work out which text relates to which field.
That gives us the information that we want but we are left with two problems:
- How can we avoid the manual step of adding field names?
- How do we QA the data (and fix it up)?
Let’s look at an alternative option that solves both those issues.
Option 2: Use Smart Data Key Value Data Extraction
The Smart Data Extraction module includes the ability to detect key/value pairs. That’s great for getting values from invoices for example, but we can also use it here.
Key Value Data Extraction doesn’t work with scanned text, and we chose to only include the form fields for ICR, the rest of the document is still scanned. We could OCR the rest of the form, but a better option is to apply the extracted ICR JSON into a clean template PDF (which we used when we did form field detection earlier).
await PDFNet.HandwritingICRModule.applyICRJsonToPDF(docOut, json);Now we have a crisp looking document, even though the ICR is still hidden.
Figure 8: You can apply the JSON created by ICR into a different document and it will be invisible but can be accessed for key value pair detection.
Key Value Data Extraction doesn’t need the ICR layer to be visible in order to extract data from it, so we have everything that we need.
We could stop at that point. We have data from the form and can store that in the database.
But there is a problem. We have to blindly trust that ICR correctly extracted the text and ICR is not totally accurate.
How can we verify and fix up the data?
You could write custom code to run sanity checks on the JSON, but what if there was an integrated UI solution?
An Integrated Solution for UI Based Validation
Currently, the ICR data is hidden. Under the hood, that is because it is transparent (opacity = 0). The Apryse SDK, however, lets us change the Graphics State of low level elements within the PDF to make hidden ones visible. We can even give them a specific font color (I chose red).
Read more about the details of how to see the content of a hidden text layer.
If we do that, we end up with a document that shows the ICR’d text, and we can see exactly what was recovered.
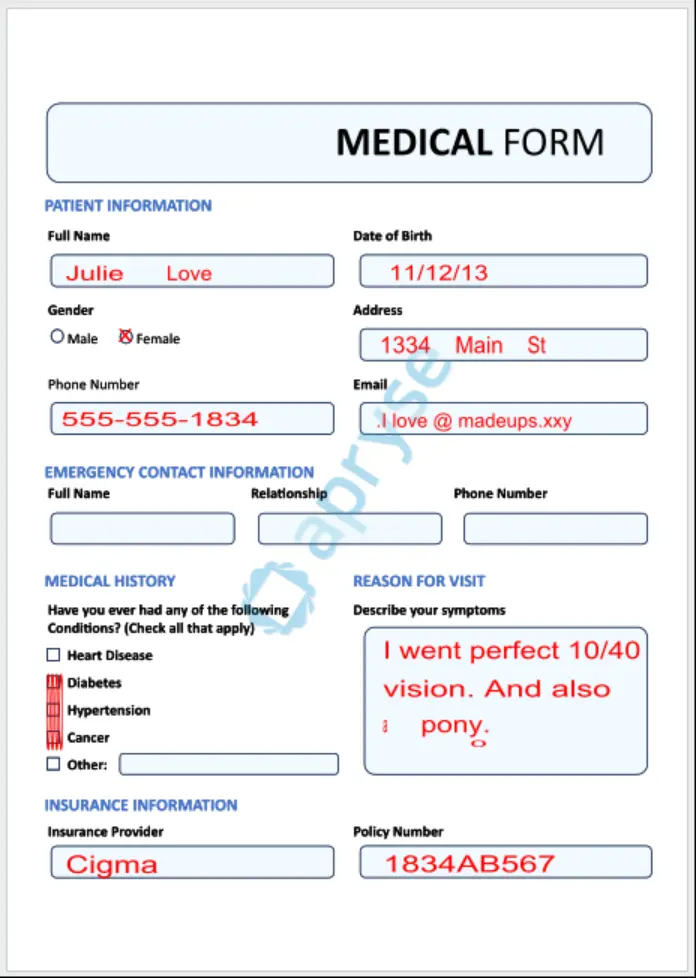
Figure 9: The ICR'd text made visible. I chose red, but you could make it any color you prefer.
There are some errors, but we can fix those up within WebViewer via its Content Editing functionality.
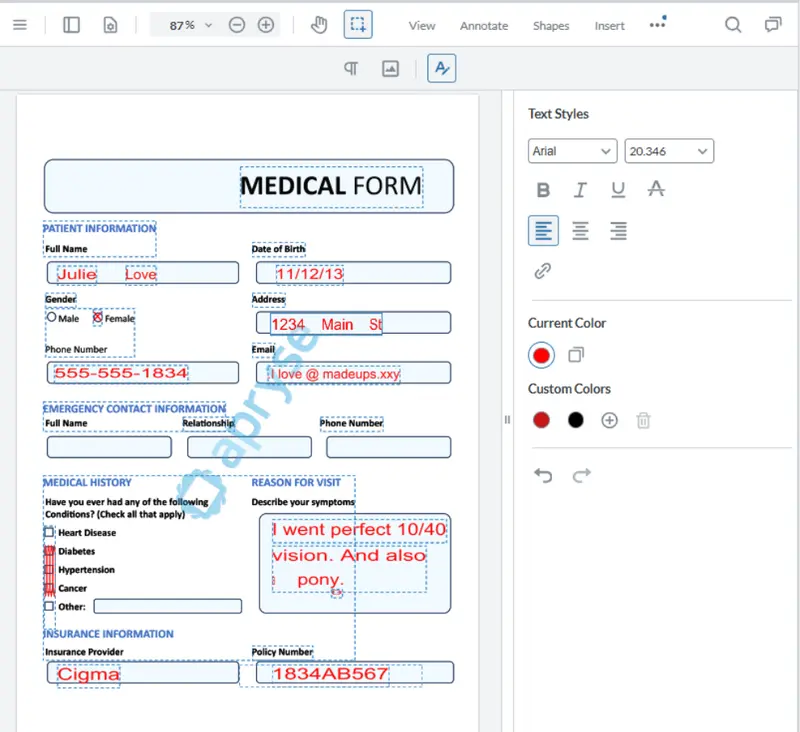
Figure 10: The ICR output can be edited using WebViewer to fix any errors or even change the font color back to black.
Once you have made the necessary changes, we can run Key Value Data Extraction or use the Key Value Data Extraction demo on Apryse Showcase.
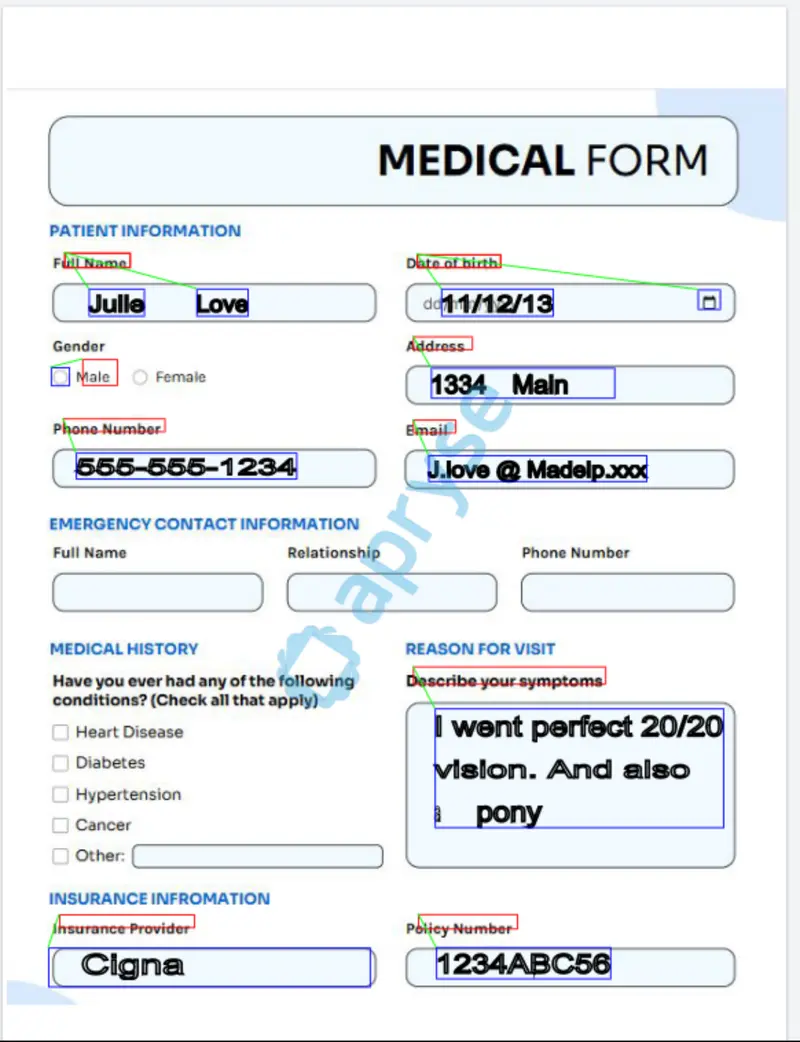
Figure 11: The edited ICR output with the font color changed to black.
The Extraction engine was able to match field names with the associated values and create JSON that describes the data.
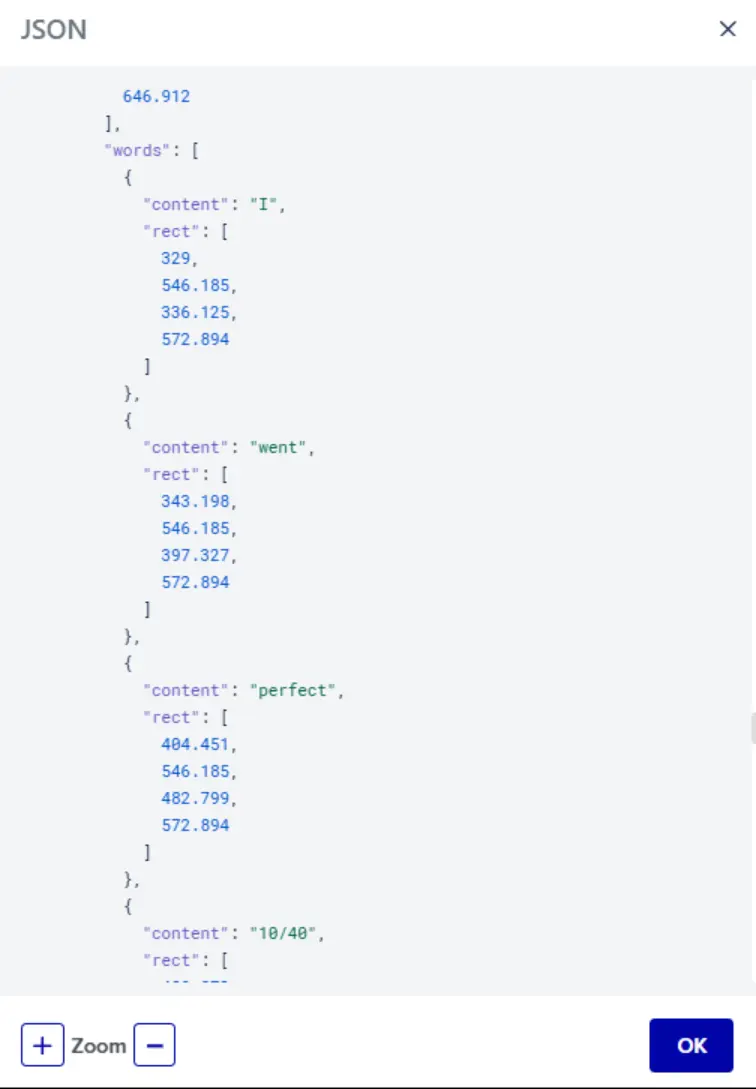
Figure 12: Typical output from the Key Value Data Extraction demo on Showcase. You can do the same processing on your own server.
The JSON structure detects each word separately, so we need to combine those together to get the key and value data.
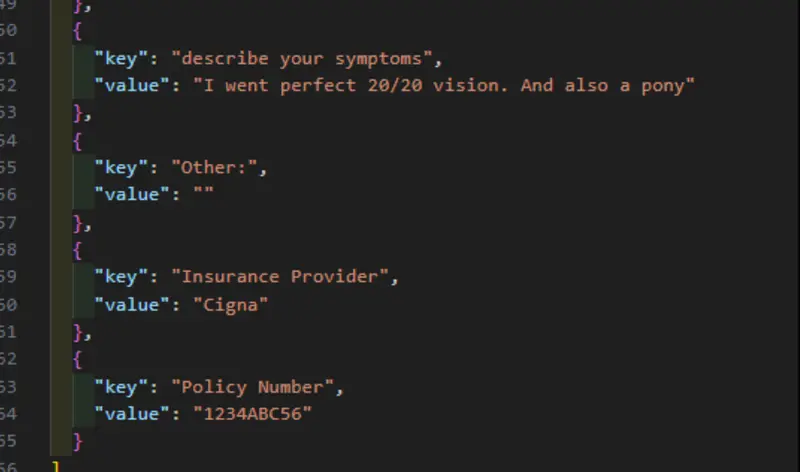
Figure 13: The JSON output can be easily processed to give the key and value data exactly as we need.
You can now store that data in the database, in exactly the same way as you would with data taken directly from a digital PDF form.
Wrapping Up
This is a complex workflow, but it illustrates how you can chain Apryse functionality together to solve complex real-world problems. Having both a Server and Web SDK means this can be done with just a single vendor.
For the article, I’ve used a mixture of server-side code, and demonstrations using the Apryse Showcase, but everything that we have seen can be done entirely server-side (or with WebViewer) on-prem. You keep control of data residency, which is essential when dealing with PII, whether that is names, addresses, medical information, or who wants a pony.
If you have any questions, you can reach out to us on Support channel.
If you have any questions about this blog, or there are other blogs that you would like us to write, then please contact us at blog-feedback@apryse.com.