Isaac Maw
Technical Content Creator
Published January 28, 2026
Updated May 18, 2026
5 min
How to Create a JavaScript PDF Editor
Isaac Maw
Technical Content Creator
When your web app requires PDF editing capability, a JavaScript PDF Editor SDK is what you need. Whether you’re using a frontend framework like React, Angular or Vue, or a backend JavaScript framework such as Node and Next.js, providing robust PDF editing functionality, web applications for processing insurance forms, health records, engineering documents, or document submissions gives users a better, more unified experience.
In this article, you’ll find answers on how to choose the right JavaScript PDF Editor solution, and how to get started with our solution, WebViewer SDK.
Prefer a Video Tutorial? Watch How to integrate Apryse WebViewer in JavaScript, React, Vue, Angular, and More
Approaches to Integrating a JavaScript PDF Editor
Developers may consider open-source libraries, commercial SDKs and managed API services to meet PDF editing needs. Let’s look at some key considerations for each of these options.
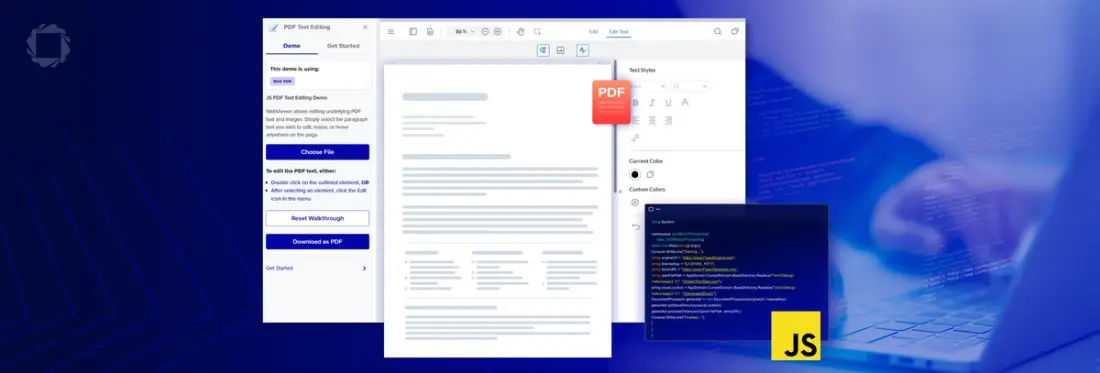
Check out the Apryse SDK PDF Editing Demo
What Features does a JavaScript PDF Editor Need?
Should you choose to build your PDF editor with an open-source library, an SDK, a commercial API? To find the right fit for your project, consider the feature requirements of your project, such as:
- Core editing capabilities
- Text editing
- Annotations (highlight, underline, comments, shapes)
- Form creation and filling
- Advanced features users expect
- Redaction
- Digital signatures
- OCR and searchable text
- Page manipulation (rotate, delete, reorder)
- Technical requirements
- Fast rendering
- Accessibility
- Mobile and touch support
- Security and compliance
PDF SDK Comparison: Apryse vs Alternatives
Compare document SDK features, including features such as editing, annotation and forms, below.
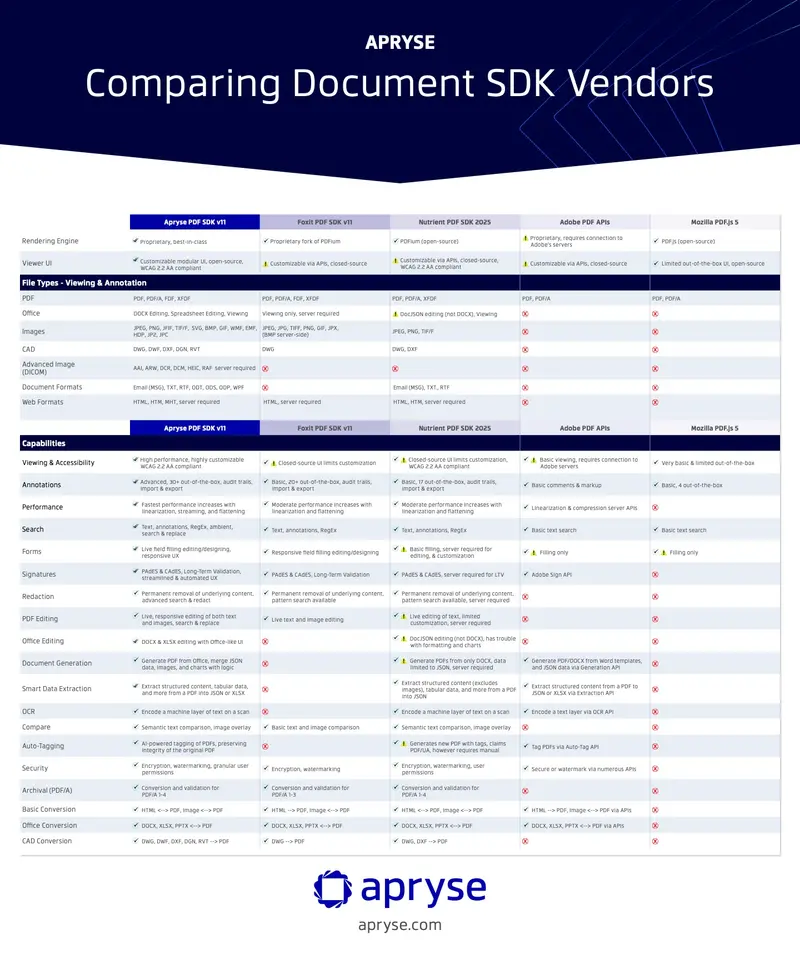
Apryse offers the best PDF Editing Solution.
Not All Open-Source PDF Viewer Libraries Support PDF Editing
As a JavaScript developer, you’re probably familiar with PDF Viewer libraries such as PDF.js and PDF-Lib. However, not all PDF viewing or rendering libraries support WYSIWYG editing. For example:
- PDF.js: Designed primarily for PDF rendering. If you already use PDF.js for rendering PDFs, you’ll need to use another library for editing.
- PDF-Lib: supports programmatic PDF editing, such as adding text, images, and form fields. It’s great for automated workflows, but doesn’t include a UI or viewer, so you’ll need another library (such as PDF.js) for WYSIWYG editing.
- EmbedPDF: built for PDF rendering, but doesn’t support editing. It does support merging/splitting documents, editing metadata, attachments and pagination but not editing PDF document content such as text.
Managed API vs SDK for PDF Editing
Using an API to embed a well-known PDF software solution such as Adobe into your web app may seem appealing based on familiarity, ease of integration, and features. However, using an API comes with drawbacks that make an SDK a preferable solution for some use cases.
| Managed PDF API | PDF SDK |
|---|---|---|
Customer Data | Passes through third-party servers | Never leaves your environment |
Potential for Downtime | PDF capabilities dependent on third-party server uptime. | If your platform is running, your PDF code is running. |
Endpoint authentication | Every action will check credentials, such as number of remaining API credits. This creates additional workload and potential interruptions. | PDF capabilities are fully integrated and licensed to your application, with no external dependencies. |
Customization | You’re stuck with the software’s UI, though in the case of Adobe, it’s already a familiar UI for most users. | Tweak toolbars, add or remove buttons and modals, adjust branding and colors as needed. |
Does That API Have Apryse Under the Hood?
It’s worth noting that because Apryse is a trusted document SDK, some PDF software solutions that offer this type of API may use Apryse SDK to provide their document processing functionality anyway.
What Makes Apryse SDK the Best Choice for PDF Editing?
While there are many options available to developers to implement PDF editing in a JavaScript web app, only Apryse offers:
- faithful, high-fidelity rendering
- WYSIWYG, WCAG 2.2 Level AA accessible interface
- Full suite of editing tools, including content editing, layout, images, annotations, and manipulation, such as merge or split PDFs
- Reliable, secure codebase with regular updates
- Extensibility via additional document processing capabilities built-in
- Support for a wide range of languages and frameworks, as well as backend or frontend processing
Try WebViewer SDK for Your JavaScript PDF Editor
For robust WYSIWYG editing with high-fidelity, WCAG 2.2 accessible rendering and easy extensibility for additional document features down the line, try WebViewer. It's built to run in the browser for easy integration with a number of JavaScript frameworks.
Here’s how to get started with your free trial. Visit the documentation page for step-by-step guide, sample code and your trial license key. You can use the links on this page to find the integration steps specific to your framework.
Prerequisites
To integrate WebViewer via NPM, you’ll need to install Node and npm, create a folder for your project, open a code editor like Visual Studio Code, and get your Apryse trial key by following the documentation link above.
1. Integrate WebViewer into your project
Run the following command on the command line from your project directory to install WebViewer into your project:
npm i @pdftron/webviewerThis will download the assets required to use WebViewer.
2. Create public folder
1. Create a folder in your project named public where we'll store the code as part of your project.
2. Within the new public folder, create a file named index.html.
3. Copy static assets
1. Create a subfolder within the new public folder you created and name it lib/webviewer.
2. Next, copy specific static assets required for WebViewer. The static files to copy are located in node_modules/@pdftron/webviewer/public in your project and are as follows:
- core
- ui
- webviewer.min.js
3. Paste the select files you copied to the new lib/webviewer public location that will be served via HTTP/HTTPS.
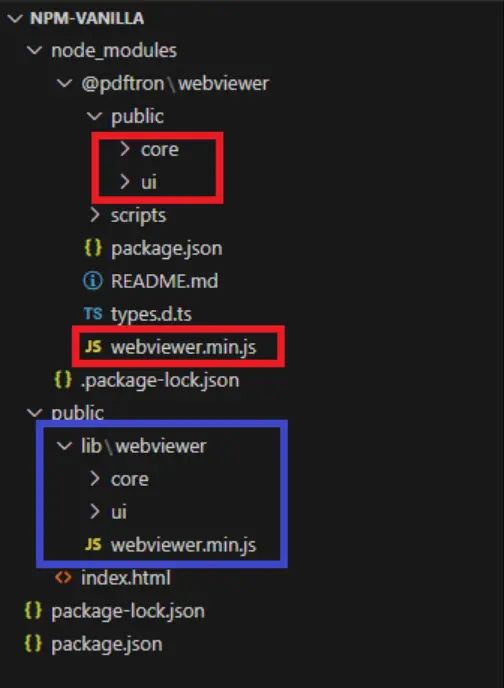
The project files and folders (in red) that you need to copy into your project (in blue).
4. Add HTML
Copy the HTML below and paste it into your index.html file in your project. Two essential things to take note of in the HTML are that:
The script tag must reference the path of the JS file you copied into the public folder you created.
The div element viewer id is where WebViewer will be mounted. In this example it also contains styling elements for the viewer, though you could do so using CSS if you prefer.
5. Add JavaScript code
Next, you'll copy and paste in the script tag that includes the WebViewer constructor.
Copy, then paste the script below into the index.html file in your project after the div and before the close body tag.
Add the relative location of where you pasted the static files core, ui, and webviewer.min.js, using the path parameter.
Add your own license key in place of 'YOUR_LICENSE_KEY'. If you've created your license key and you're logged in, your key is already in the code below.
Specify an initial document to open when WebViewer starts using the initialDoc parameter.
Specify the id of the element where you want WebViewer to be mounted. In this case, that's viewer.
Starting in version 11, WebViewer instantiates using a web component instead of an iframe by default; however, both methods are available. See this guide for more information. In this article, web component details are provided.
For example, if you copied the static files into public/lib/webviewer, your code would look something like this:
6. View PDF in WebViewer UI
After you've saved all of the files, you'll serve the webpage so you can see the WebViewer UI and the PDF you included to open in WebViewer. We'll use http-server to view the webpage in this example.
Run the following command on the command line from your project directory to run http-server which is a simple web server.
Click the localhost link created in your terminal to view the WebViewer UI and PDF file locally.
npx http-server -a localhost7. Writing Page Content to PDF
Now that you have WebViewer up and running in the browser, you can use this sample code to check out the PDF editing capabilities:
Find more information about PDF editing features in our documentation.
Conclusion
There are a lot of options available to developers for building PDF editing capability. However, many of these options compromise on essentials like high-fidelity rendering, advanced editing features such as headers, footers and images, and dependencies.
Choosing Apryse SDK sets your application up for success, now and into the future as your document processing requirements grow.
To learn more about what Apryse WebViewer can do, check out the PDF Editing demo.
Learn about the top JavaScript PDF Viewer SDKs and choosing one that’s tight for you.
If you have any questions, contact us.


