Garry Klooesterman
Senior Technical Content Creator
Published June 05, 2025
Updated May 18, 2026
5 min
Building a PDF Viewer Using Next.js
Garry Klooesterman
Senior Technical Content Creator
Next.js has risen in popularity due to its numerous features that build on top of the React.js framework, such as SSR (server-side rendering). Since SSR is enabled by default for a Next.js project, it can be tricky to import and use libraries, such as Webviewer, our JavaScript PDF and Office file viewer.
If you're looking to add a library that allows you to open PDF files in a Next.js application — look no further. This guide will give you straightforward steps to add a PDF viewer to your Next.js app. The same viewer will also let you open DOCX, XLSX, and PDF files, sign, review/approve, redact, and more. (And you won’t require any Office software or MS Office licenses.) WebViewer also supports PDF Portfolios allowing users to view, edit, and manipulate PDFs that bundle together Word docs, Excel sheets, CAD files, and other file types.
WebViewer’s robust customization and accessibility features enable you to easily create a powerful and compliant Next.JS PDF viewer.
Interested learning more about WebViewer? Check out our comprehensive Buyer's Guide blog.
The source code for this project is available in our GitHub repository. You can also view our Next.js get started guide, which includes a YouTube video tutorial.
How to Get Started
To get started, all you need is Node.js installed. That's it.
Feel free to skip ahead if you’re already a Next pro, or clone the Github repository mentioned earlier.
Install Packages for the Next JS PDF Viewer
Once you’ve installed Node.js, open up your terminal and type in the following to install create-next-app globally. It’s also available via npmjs.
npm install -g create-next-appNow navigate to where you want the project to be created. Create and configure your project using the following command in a terminal of your choice.
npx create-next-app@latestFor this example, we stick with the defaults. If you get stuck with any of the steps, you can check out the official Next.js documentation. Navigate into your project directory and open it with your preferred code editor.
Add WebViewer
We will now modify our Next project to add WebViewer as a component. We’ll go through each file and modification in sequence.
Install the Apryse WebViewer Package
Ensure you are in the root of your project directory. Then run:
npm i @pdftron/webviewerCopy Static Assets for WebViewer
Next, we copy the static assets required for WebViewer to run. There are two ways to do this: manual and automated.
For the manual approach, locate the static assets containing WebViewer inside node_modules/@pdftron/webviewer/public and copy them to a location that will be served and publicly accessible. In Next.js, this will be the public folder. For organization, you can also create a folder called 'webviewer/lib' and place these static assets in there (for reference, view the folder structure below).
For the automated approach, modify the package.json to add the following code to download WebViewer as a dependency to our project. To do this, find the scripts section inside of package.json and add postinstall, download-webviewer scripts that will download WebViewer:
By default, the WebViewer downloader will download and extract all the necessary files to public/lib. This is normally where we want them to be. However, if you would like to change the directory to — for example — public/webviewer/lib, you can do so by adding:
"download-webviewer": "npx @pdftron/webviewer-downloader --webviewerLocation ./public/webviewer/lib"Note, it has to be inside of the public folder to preserve the folder structure. WebViewer is smart at only requesting resources when it needs to. Now, run npm install again to trigger the script and add these static assets to your project.
Also, if you clone the GitHub project and run npm install, this process is automated using the script copy-webviewer-files.js, which is a slightly different automation approach than the above, but it achieves the same result (i.e., copying static assets).
You can also download a sample PDF here and place it in a folder called /files (inside of the public folder). This is required for the next step. By now, your project structure should look something like this:
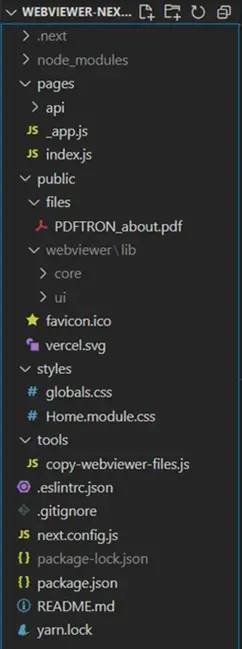
Figure 1: Next.js PDF Viewer project structure.
Add WebViewer into the Component
Now we're ready to add WebViewer into our component. Ensure that the path property in the constructor points to where you copied the static assets from earlier (in the public folder).
Create a file called components/WebViewer.jsx and add the following code:
Then, we can import our component and use it elsewhere in our app by adding the following code to the file page.jsx.
Here’s how the above code works:
The viewer variable references a DOM element, which we'll use later to initialize WebViewer.
Next, inside the useEffect lifecycle method (which gets called when the element is mounted) we call the WebViewer constructor and use the passed-in properties. Note that this is where we also import the WebViewer library, as it needs to know that the component exists first (before import) to avoid ReferenceError: window is not defined. This is because Next.js uses server-side rendering by default, which you can read more about on the official Next.js website.
When WebViewer is initialized, it returns an instance of WebViewer that can be used to call a number of useful APIs for document creation, manipulation, annotation, collaboration, redaction, and more.
Learn more about WebViewer’s comprehensive functionality by diving into the documentation. In addition, WebViewer is capable of loading files from a URL, blob, file system or base64 data.
Lastly, the style option helps us apply custom CSS like width and height on the viewer’s div element which WebViewer gets mounted on.
Note: For more customization, our WebViewer Modular UI provides modular and reusable components you can use to change the default WebViewer UI or create a new one from scratch. The WebViewer UI also meets WCAG 2.1 AA accessibility standards to ensure an inclusive experience.
Run Your New App
We can now run our app by using:
npm run devOr, if you have yarn installed:
yarn dev“Next” (pun intended), to view your app navigate to http://localhost:3000. That's it!
Conclusion
In this blog, we showed you how to add Apryse's WebViewer using create-next-app in a few, relatively straightforward steps, to create your very own Next JS PDF Viewer that will also open DOCX and XLSX files and do a whole lot more.
You can download the complete working sample here on GitHub.
Then, to get started with Apryse WebViewer, start a free trial. You can also check out WebViewer documentation. There, you’ll find details on WebViewer’s many supported features and on how to customize the WebViewer UI to your desired look and feel. If you are working with other frameworks, you can also learn how to build a Nuxt.js PDF viewer.
If you have any questions about integrating Apryse into your Next project or want to learn more about our complete PDF SDK, please feel free to contact us. We’ll be more than happy to help!


