Roger Dunham
Published July 10, 2026
Updated July 14, 2026

7 min


From Data to Destination: Making GoToR Links Smarter with WebViewer
Roger Dunham

Summary: Learn how to add custom data to PDF GoToR links using Apryse WebViewer, enabling automatic text highlighting across linked documents. This tutorial shows developers how to store rectangle coordinates as annotation metadata, retrieve them on click, and render highlighted RectangleAnnotations to create smarter, more interactive PDF navigation than desktop tools like Adobe Acrobat offer, complete with practical TypeScript code examples.
Previously, in this series of articles, we have seen how we can work with and create GoToR links using Apryse WebViewer. We have seen how we can work around the “by-design” restriction of the browser to open arbitrary files, to create a more secure and flexible solution than is available for desktop apps such as Adobe Acrobat. We’ve also seen how we can create links using the UI in a simple intuitive way using two instances of WebViewer and a custom button.
In this article, we will go to the next step, and add custom data to our links, and show how we can use that to not just go to a page in a specific PDF but also to highlight specific blocks of text. Something that is not available for desktop apps.
And we’re going to do this by adding just a little more functionality to the code that we already have.
Functionality We Have Already Used
We have already seen:
- How to create two instances of WebViewer side by side
- Have different UI configuration for each WebViewer
- Identify the selected page and file in WebViewer
- Find the Quads for selected text in WebViewer
- Create a Rect than encloses the selected text
- Use that data to create a GoToR action on a link annotation
It sounds like we have almost everything that we need!
You can get all of the source code for this series of articles from this GitHub.
The code for this article can be found in CreateWithRect.tsx which illustrates how to add custom data, and ShowRect.tsx which illustrates how to display it.
Getting a Rectangle That Encloses the Selected Text in the Target PDF
We’ve already seen how to get the quads that enclose the selected text in a PDF using Core.documentViewer.getSelectedTextQuads().
We used that mechanism, followed by converting it into a rectangle that enclosed the array of quads to decide where the link should be placed in document in the left-hand WebViewer.
We can use the same mechanism to get the location of text that is selected in the target document.
All we need to do is add the following to the onClick handler for the custom button that we created in the previous blog.
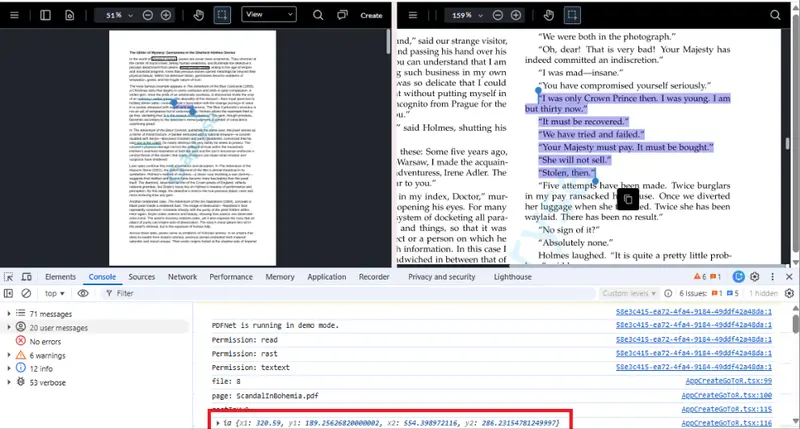
Figure 1: With a tiny change in the code, we can now get the Rect that encloses the selected text in the right-hand WebViewer.
But how are we going to use that? Enter Custom Data.
What is Custom Data Within an Annotation?
Short answer, anything that you want it to be!
Longer answer, “custom data” is arbitrary metadata that you can attach to an annotation. Data that WebViewer itself doesn’t use, but that you can store and retrieve later.
Custom Data can be pretty much anything that you can convert into a string, you just need to specify a key and the value.
For example, you can add the value ‘abc123’ with a key of ‘dbid’ as follows.
annot.setCustomData('dbId', 'abc123'); What you do with that custom data is up to you, but being able to work with the Apryse Web SDK gives you huge flexibility.
You can use custom data to
- Link annotations to backend data (e.g., comment IDs, user IDs, etc.)
- Store workflow state (e.g., "reviewed": true)
- Tag annotations for filtering/search
- Save nonstandard properties not covered by XFDF spec
In our case, we are going to store the rectangle that encloses the selected text.
Adding Rect Information to the Annotation
We already know the location of the Rect that encloses the selected text, so we can just add that to the link when we create it. I could stringify the Rect, but for now, I will explicitly set the values for left, right, top and bottom.
We could also, if we want, store the original quads that we received from getSelectedTextQuads(), but I’m choosing not to at the moment (but I will in the next article).
That’s all we need to do in order to add the location data when creating the links. Why not run the code and try adding some annotations with rectangles to your own PDFs?
Now, let’s look at how we can consume that custom data.
Extracting and Using the Custom Data from Annotation
We can get the custom data from a link or any other type of annotation by calling getCustomData and specifying the key for the data that we want.
In our case we stored the Rect information as four separate keys (“x1”, “x2”, “y1” and “y2”) so we can extract those and recreate the Rect location as follows:
The second article in this series showed how to work with links using two WebViewers side by side, so we already know how to open a document and navigate to the correct page.
The details of how you display the text that was selected are up to you. In my case, I’ve created a specific type to hold the Rect and page number, and I’m storing that in a state variable that I’m calling “selectedRect”.
I’m then using a useEffect that fires when the selectedRect changes.
The essential parts here are that we are creating a RectangleAnnotation based on the Rect that was stored in the link annotation. I’ve chosen to give it a red border with a semi-transparent fill, but you may prefer to style it differently.
The new annotation is then added to the annotationManager that belongs to the right-hand WebViewer (which is wv2Instance).
That’s it.
Now if we run the code, when we click on a custom GoToR link in the left-hand WebViewer, the code will not just navigate to the correct page, but also show the text that was selected:
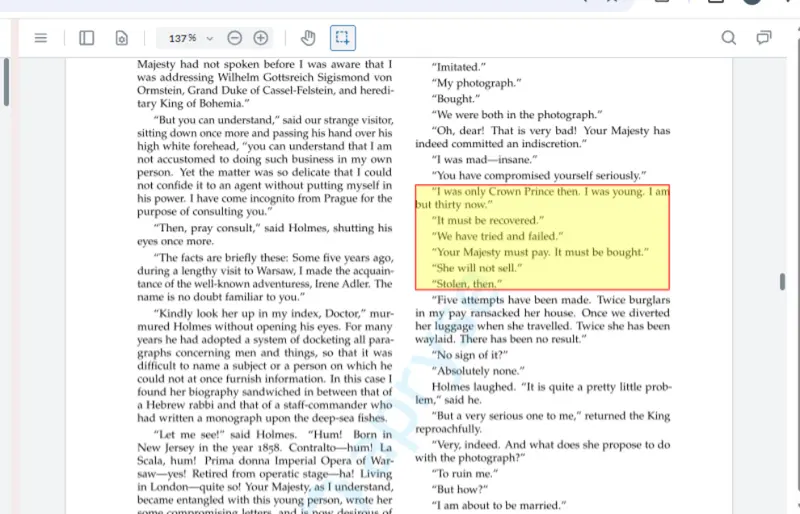
Figure 2: Clicking on the custom GoToR link that we just created now highlights the text that was selected when the link was created. This is done using custom data that was stored with the link.
When you combine this with the features that are built into WebViewer, such as the thumbnail view, this adds a whole new level of value to the document.
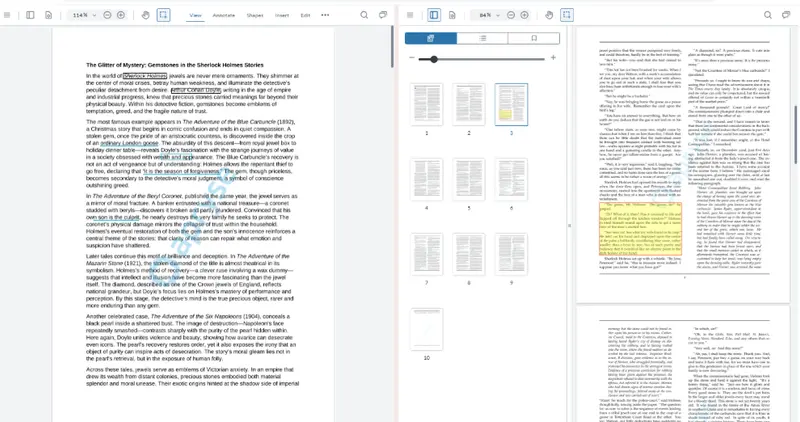
Figure 3: We can now click on a link on the left-hand PDF, and it will take you to the correct page and highlight the exact text in the right-hand document. You can also see from thumbnails where the section relates to the rest of the document.
What About Using Our PDF in Desktop Tools?
Even though we created the GoToR link with custom data, it can still be used in a desktop app such as Xodo PDF Studio, or Adobe Acrobat. While the rectangular annotation won’t be shown (that requires our custom code) the correct page will still be navigated to (provided that the target document is available).
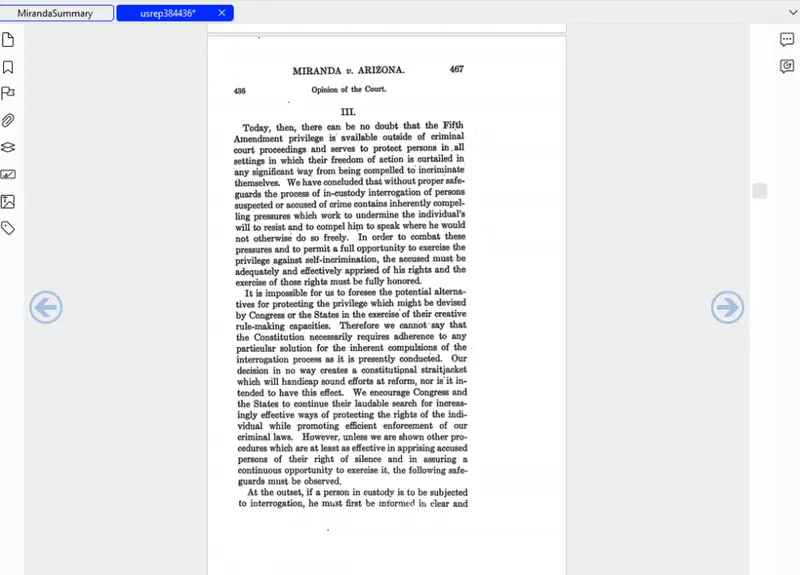
Figure 4: If we use our PDF with custom GoToR links in a regular PDF viewer, then you will still be taken to the correct page (if it supports GoToR actions). What it won’t do is highlight the code that was originally selected. That is the added value that WebViewer is giving.
Wrapping Up
We’ve shown one way that you can create links in one document that creates a RectangleAnnotation that takes you to the exact line, on the correct page, in another document.
There are other ways that you could do this with the Apryse SDK, and feel free to try those out. For example, you could use a TextHighlightAnnotation. The Apryse Web SDK offers many solutions.
Of course, you could just keep things simple and do it by hand, get WebViewer to open the page, then use the content of the link to search for the text on that page. That might work, but since the original document may have been scanned, and even the best OCR is imperfect, it could be an unreliable solution, and there might of course be multiple places where the search text was found.
Seriously, though, why would you want to search for text when it is so easy to create a solution that allows you to highlight what you need?
So far, we have kept things simple in order to give a taste of what is available, but there is much more that you could do:
- Extend the code to highlight rectangles that don’t relate to text. Perhaps just part of a diagram. That would be impossible to do using “search”, yet Apryse WebViewer offers a way.
- Add custom code to control where a document is loaded from. Perhaps a database or file server, rather than a local file or URL improving data security.
- Add more security by using Apryse DRM system so that only people with a specifically configured version of WebViewer can open your files.
If that wasn’t enough, WebViewer also offers a huge range of built-in functionality.
So why not check out the Apryse Showcase? You can see for yourself right now how WebViewer offers page manipulation, redaction, semantic text comparison, and support for digital signatures to name just a few.
Imagine how the built-in functionality, coupled with your custom code, will allow you to develop highly customizable solutions that are tailored to your specific workflow.
Don’t take my word for it, get yourself a trial license and try things out for yourself.