Garry Klooesterman
Senior Technical Content Creator
Published May 28, 2026
Updated May 28, 2026

9 min


JavaScript PDF Signing: A Developer's Guide to Digital Signatures in the Browser
Garry Klooesterman
Senior Technical Content Creator
Summary: This blog details three approaches to PDF signing (visual, e-signature with audit trails, and cryptographic digital signatures) emphasizing the need for a secure client-server split to avoid exposing private keys. It covers production certificate management for compliance with standards like ESIGN and eIDAS, ensuring long-term validation (LTV) and document integrity. Also included is sample code for implementing digital signatures using Apryse SDKs.
Introduction
If a product manager asks you to build PDF signing into a web app, you need them to define exactly what they mean before you write a single line of code. On the web, signing is a catch-all term for three completely distinct technical approaches. Get it wrong, and you'll either over-engineer a simple internal button or tank a security audit on legal contracts.
Three Tiers of PDF Signing
It can be confusing as some of the dev blogs mix these up. Let's separate the realities:
Visual Signature Annotations: This is just drawing paths on an HTML5 canvas or uploading a transparent PNG of a signature to place at specific page coordinates. It has zero cryptographic value. Anyone with a basic open-source PDF modifier can strip it out or move it around in seconds.
E-Signatures with an Audit Trail: Think DocuSign or Xodo Sign. You aren't necessarily running private key crypto operations inside the PDF file itself right away. Instead, a central web application orchestrates a workflow. It tracks user logins, fires webhooks, records IP addresses, and appends a separate, tamper-evident audit log to the contract package.
Cryptographic Digital Signatures (PKI): The enterprise compliance standard. Digital Signature uses Public Key Infrastructure. The engine hashes the raw document bytes and encrypts that hash using a private key unique to the signer. It cryptographically seals the file binary. If someone modifies a single character or pixel post-signing, the verification check fails.
When Do You Use Each Method?
Don't overcomplicate things if you don't have to, but don't cut corners on legal requirements either.
Internal approvals: If you just need a manager to sign off on an internal expenses sheet or a low-risk project status report, a visual annotation is completely fine. It's fast, free, and lightweight. You let them draw using the UI, save it as a stamp annotation, and flatten the document layers to make it a permanent part of the page.
Customer contracts, agreements, and NDAs: These need more tracking and are where you use an e-signature workflow with an audit trail to satisfy US ESIGN Act and UETA frameworks. It's not usually a good idea to build the email tracking, identity verification, and audit logging databases yourself. Developers integrate a dedicated REST API like Xodo Sign to handle the heavy legal orchestration through backend webhooks.
Regulatory, financial, and legal records: These require the highest security. For government filings, prescription tracking, or cross-border contracts under European eIDAS rules, you need full cryptographic digital signatures. You must ensure absolute non-repudiation.
Why Client-Side PKI is a Risk
Frontend devs frequently run into trouble here. They find an obscure crypto polyfill or a tool like node-signpdf and try to pull a .pfx or .p12 digital certificate directly into browser memory to sign the PDF client-side. This is not recommended as it is a massive security risk.
Exposing private keys to the client's browser leaves them vulnerable to XSS attacks, malicious extensions, or memory scraping. If that private key is stolen, your entire corporate identity or root trust chain is compromised.
Ensure Security by Splitting the Process
To do this safely, you have to separate your user interface from your cryptographic key access.
Frontend UI: The user opens the file in a viewer, creates their visual signature, and places a signature field on the layout. The application captures these coordinate specs and sends them to your backend API.
Backend Server: Your server loads the document binary and references the target coordinates. It pulls the private certificate from a secure Hardware Security Module (HSM), an environment variable, or a cloud Key Management Service (KMS).
Cryptographic Seal: The server calculates the document byte-range hash, encrypts it with the private key, injects the signature container into a formal /SignatureField dictionary within the PDF, and passes the finalized file back to the browser.
Code Walkthrough: JavaScript Signature Annotations with Apryse WebViewer
This example sets up a simple signature annotation in WebViewer using JavaScript. It allows you to specify your signature by drawing or typing it or uploading an image. Then you can place the signature anywhere on the PDF.
Here’s our sample invoice we need to add a signature to just to confirm we’ve seen it. No need for an encrypted digital signature on this one.
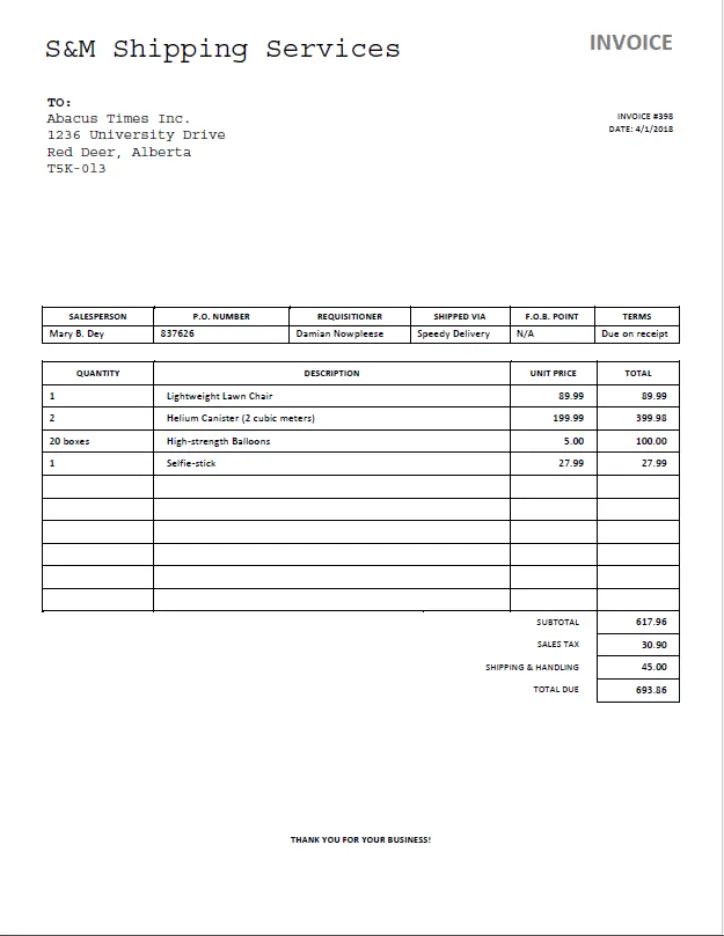
Figure 1: Our sample invoice we need to “sign” for good measure.
We’ll download and set up WebViewer for a simple PDF viewer.
Now that we’ve done that, we can move on to this example.
Let’s create our index.html file.
Now we’ll add the following JavaScript code in a <script> tag for the signature annotation tool. Add this code right after the closing <div> tag and before the closing <body> tag. Like this:
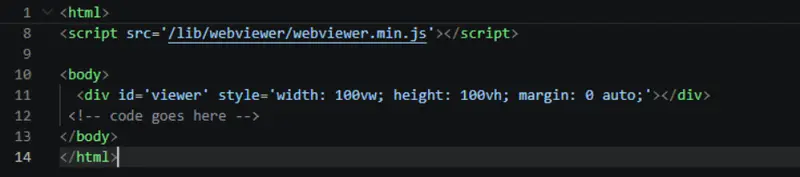
Figure 2: Where to place the code.
If we run our page now using the following command, we’ll see our browser with the invoice PDF loaded and a pop up asking us to create a signature.
npx http-server -a localhost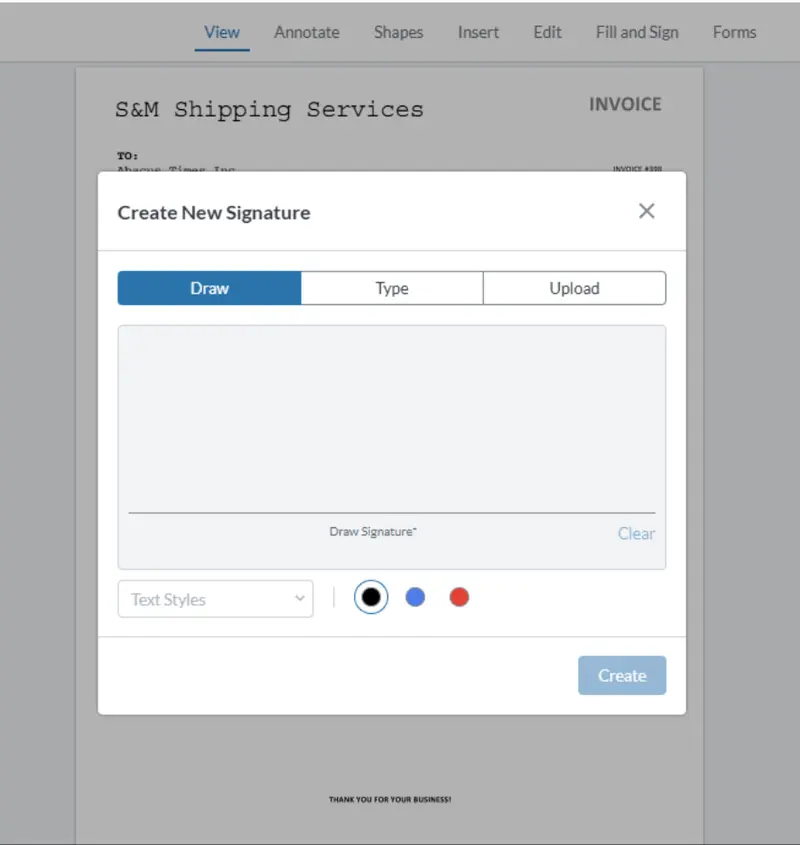
Figure 3: The signature annotation box with options for how we want to apply a signature.
Now we can scribble a signature, click Create, and place it anywhere on the page.
Here, we can see my lovely signature added to the bottom of the invoice.
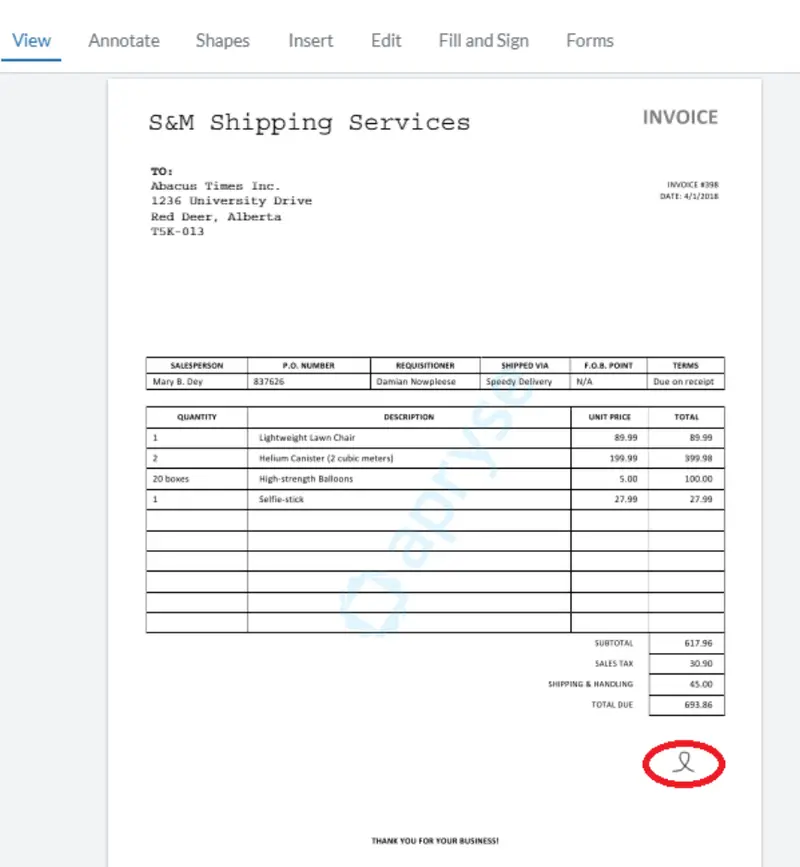
Figure 4: Invoice with signature added.
That’s great, but how do we embed this signature into the file? To do that, we can flatten and save the PDF with the signature embedded. This doesn’t mean it can’t be altered or that it’s encrypted, but it does serve as a simple signature added to a page.
So, let’s add some more code to handle this. First are the style and code for a button.
Here is the style code to add somewhere in the <head> tag. This button will sit on top of the WebViewer layer.
And we need to add the code for the button itself. We’ll do that as the first line after the opening <body> tag.
<button id="myBtn">Flatten & Save</button>The last part we need to add is the code to make the button work. It will flatten the PDF and allow us to save the file. We’ll add this to the .then(instance) section right before the }).catch(err =>{ line.
If we save and run our index.html file again, we can see the same signature annotation box but also a new Flatten and Save button.
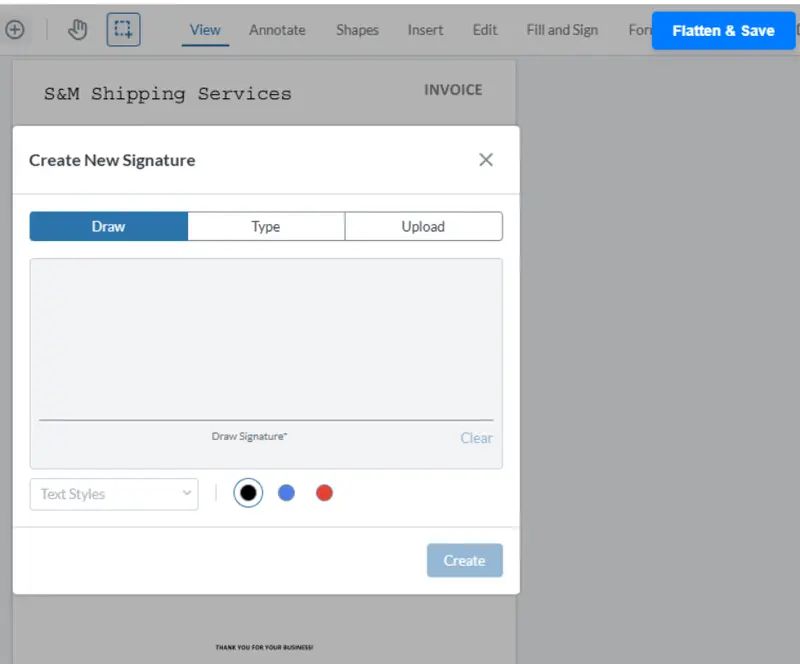
Figure 5: The signature annotation box and a new button to Flatten and Save the PDF.
After adding a signature and clicking Flatten and Save, we can save the file, which now looks like this.
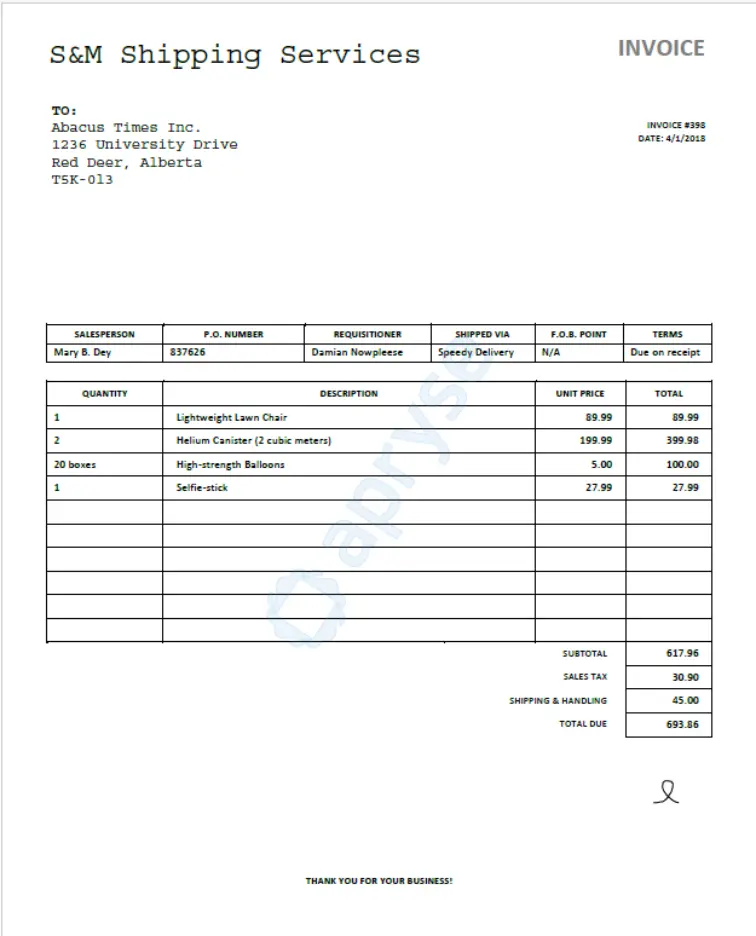
Figure 6: The final version of the invoice with our signature embedded.
Managing Certificates in Production
A digital signature is only as valid as the trust network behind it.
If you are just writing test scripts, use OpenSSL to create a temporary self-signed certificate. It's free and checks your code logic. But when you open the file in a standard app like Adobe Acrobat, it will produce a warning saying the "Signer's identity is unknown" because your machine isn't part of their trust store.
For production, you must purchase a certificate from an authority on the Adobe Approved Trust List (AATL) or the European Union Trusted Lists (EUTL). That's how you get the trusted green checkmark when users download the file.
About long-term archiving… Standard certificates expire. If a legal contract needs to remain verifiable 20 years from now, your server signing code must enable Long-Term Validation (LTV). The server handles this by reaching out to OCSP or CRL verification servers at the exact time of signing and embeds that live validation proof directly inside the PDF signature payload. Even if the CA goes out of business a decade later, the file remains historically verified.
Verification Mechanics
How does a receiving party know the file is legitimate? The verification engine is built into the PDF standard itself.
First, let’s look at how a digital signature works.
Document Hashing: The software runs the document through a specialized mathematical process called a Hash Function and creates a string of data called a Hash or Digest.
Signature Creation (Encryption): The signer uses their private key to encrypt the document hash, which is now the digital signature.
Packaging and Embedding: The digital signature and the signer’s Digital Certificate containing the matching public key are embedded into the PDF.
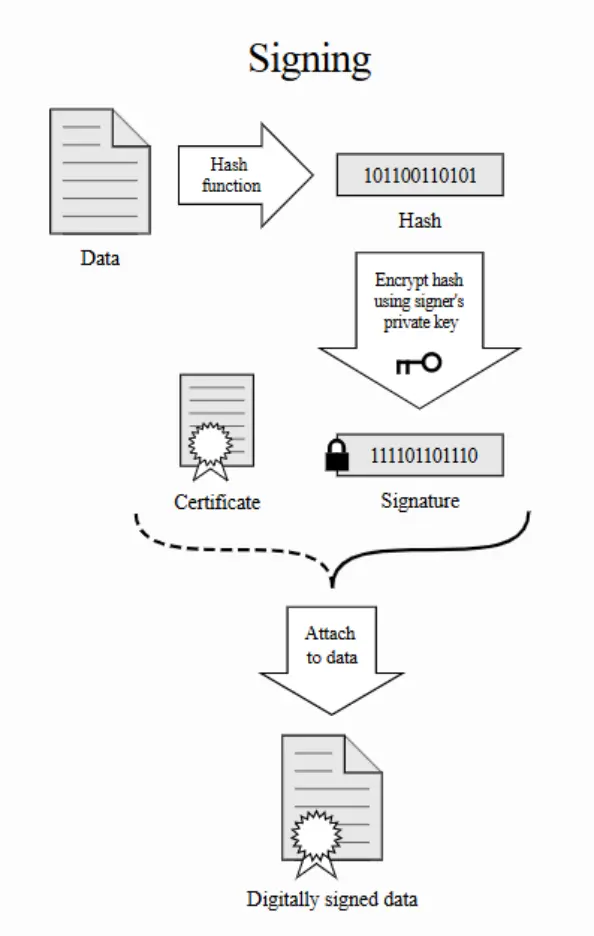
Figure 7: The digital signature signing process.
Verification: When someone opens the signed document, the software runs the current document through the exact same hash function, creating Hash A. It then uses the signer's public key from the embedded certificate to decrypt the digital signature block, revealing the original hash (Hash B).
The software then checks if Hash A and Hash B match. If yes, then we can say the data has not been altered and the digital signature is valid. If a single byte was altered, the check fails instantly and flags the digital signature as invalid.
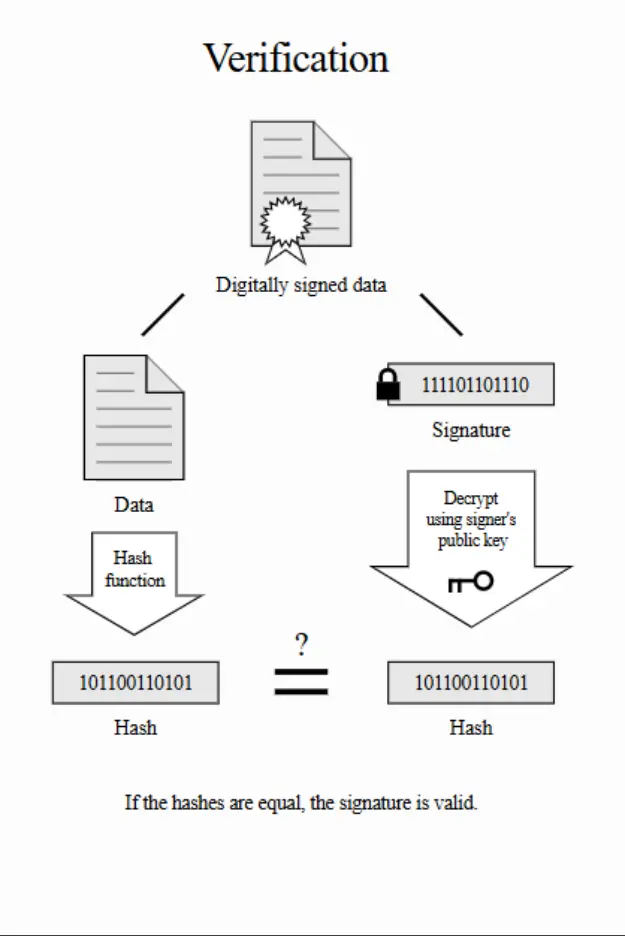
Figure 8: The digital signature verification process.
Code Walkthrough: Create and Validate a Digital Signature Server-side Using Node.js
For the first part of this example, we’re going to create a self-signed certificate using OpenSSL. In the second part, we’ll digitally sign the PDF using Node.js on the server side to keep the process secure by not potentially exposing our private key. Lastly, we’ll validate the digital signature.
Let’s get started.
Create a Self-Signed Certificate
1. Install OpenSSL. OpenSSL is a tool you can use to create a self-signed certificate. It’s available for Windows, macOS, and Linux. There are other tools as well, such as Java KeyTool, but we’ll use OpenSSL this time.
2. Generate a Private Key. This private key is required to encrypt your signature and ensure no one can pretend they are you.
Note: Keep this private key secure.
Use the following command to create the key:
openssl genpkey -algorithm RSA -out private-key.pemThis command generates a private key and saves it into the file private-key.pem.
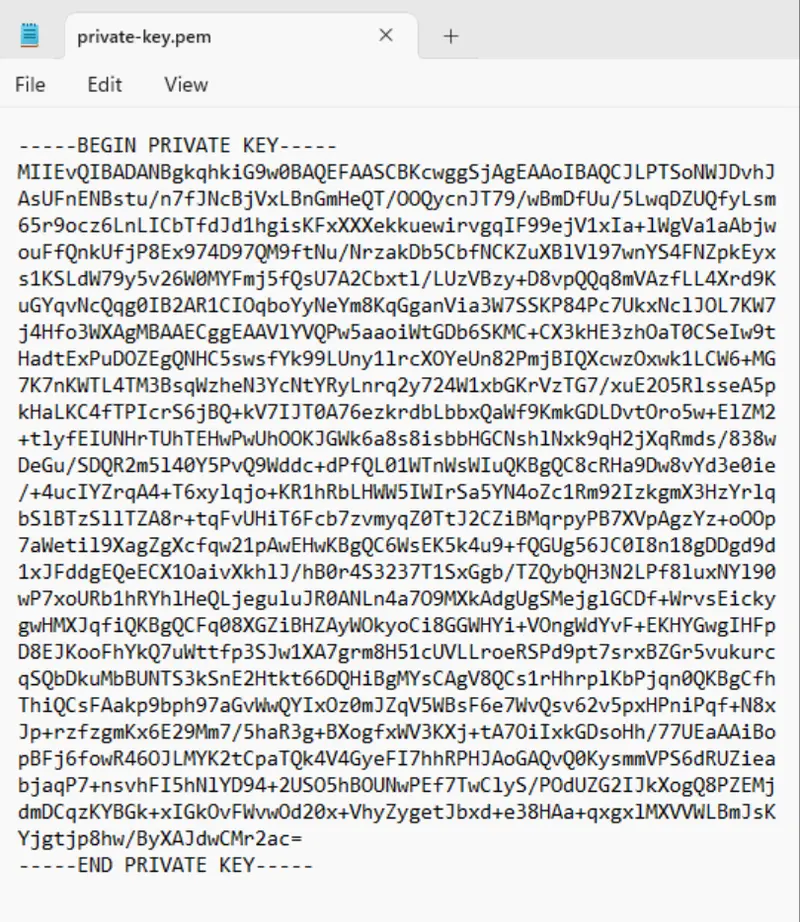
Figure 9: Our private key file. Even sharing this image means that it is now compromised.
3. Create a Certificate Signing Request (CSR). We’ll create a Certificate Signing Request (CSR) which contains the details about who needs the certificate. It also has the public key that will be included in your certificate and is signed with the corresponding private key.
openssl req -new -key private-key.pem -out csr.pemThe req command takes the private key and then asks for various pieces of information, such as country, state, organization, and common name.
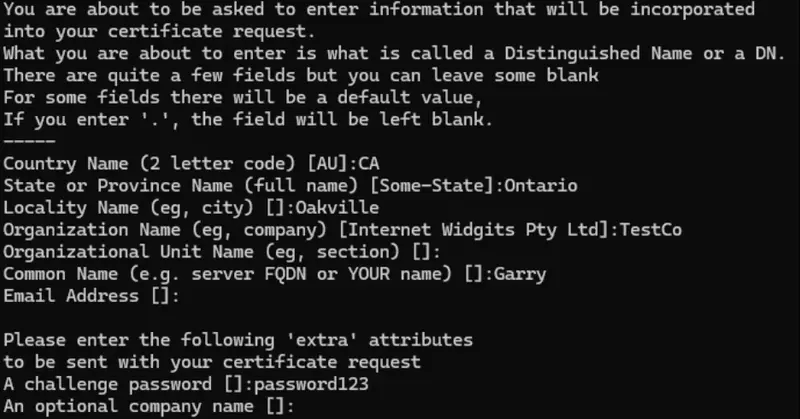
Figure 10: Additional information this command asks for to create the CSR.
And now we have a new file called csr.pem, which looks like this.
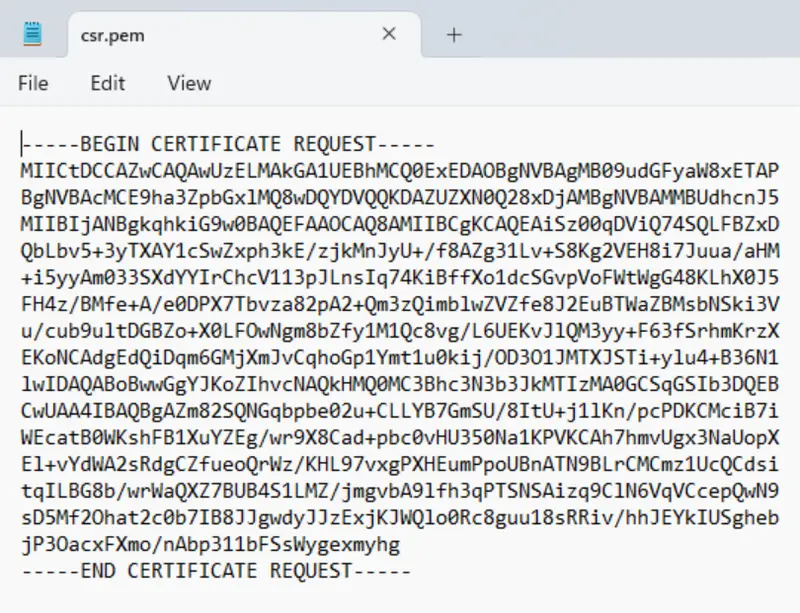
Figure 11: A typical CSR file.
4. Generate the Self-Signed Certificate. Now we generate the self-signed certificate using the CSR and our private key to create the certificate.pem file.
Note: Every certificate has a validity period, specified in days. We’ll set this one for 2 years (730 days).
openssl x509 -req -days 730 -in csr.pem -signkey private-key.pem -out certificate.pemThe resulting certificate that is generated contains the information we entered when we created the CSR.
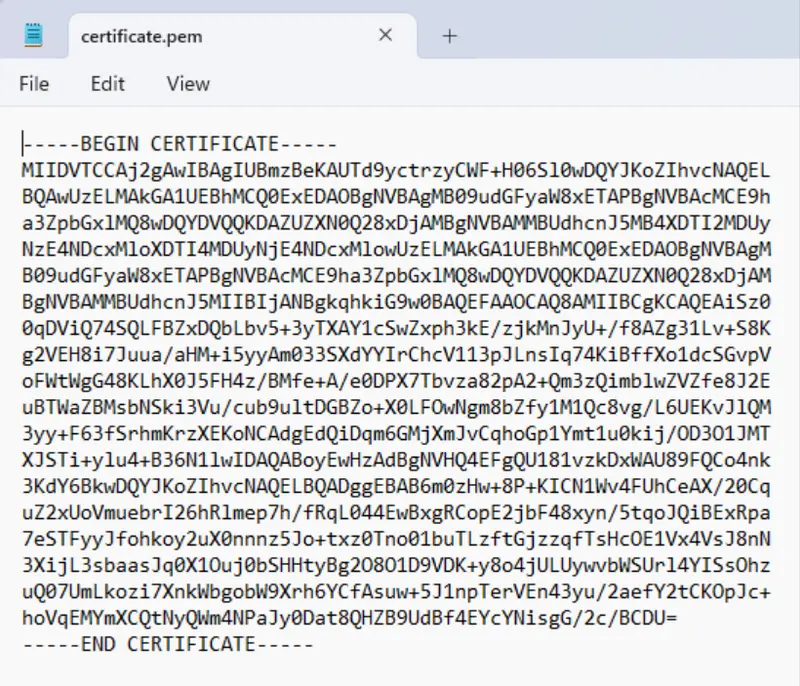
Figure 12: The certificate.pem file.
5. Create the .pfx and .cer Files. We’ll now create the .pfx file using the following command:
openssl pkcs12 -export -out certificate.pfx -inkey private-key.pem -in certificate.pemWe’re asked to set a password for the .pfx file, which is used when the certificate is imported into other apps. In this example, we’ll use “password123!”.
Note: Keep this password secure. It protects the private key and the certificate in the .pfx file.
To create the .cer file, use this command:
openssl x509 -inform PEM -in certificate.pem -outform DER -out certificate.cerNow we have all the files we need to digitally sign a PDF with a self-signed certificate.
Digitally Sign the PDF
With the files we’ve just created for our self-signed certificate, we can now set up our invoice that we signed earlier for a cryptographic digital signature.
This process happens server-side using Node.js so as to not expose our private key in the browser.
If you don’t already have the Apryse Server SDK installed, you can follow this guide to get set up.
In the same project folder we created the files for the certificate, copy the Invoice-signed-flattened.pdf file we created earlier. We’ll also create our index.js file with the following code:
A few things to note about this code. You’ll need to:
- Add your own license key in place of “YOUR_LICENSE_KEY”
- Set the paths and filenames for the various files, such as the PDF to sign, the output file, and the .pfx file.
- Specify the password used when the .pfx file was created.
We then run the code with the command:
node index.jsNow that that’s done, we have our digitally signed PDF. I’m using Xodo PDF Studio to open the PDF and check out the signature.
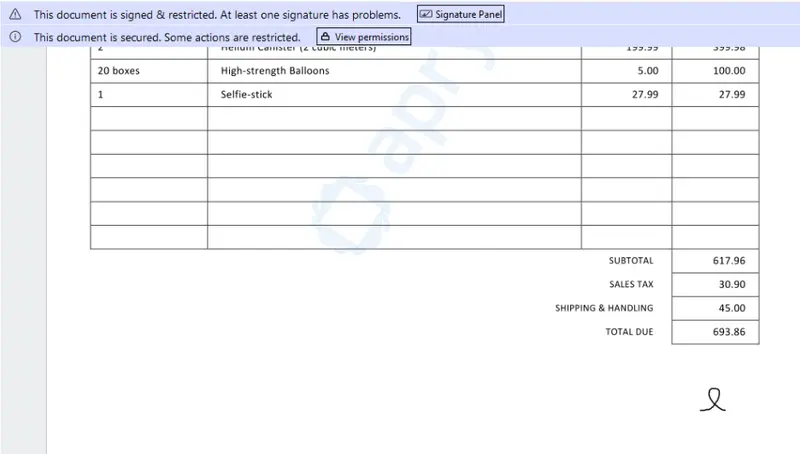
Figure 13: Our sample invoice with a digital signature applied using a self-signed certificate.
We can see a warning at the top saying that there is a problem with the signature. If we open the Signature Panel, we can see that we get this message because we used a self-signed certificate and that it’s not from a trusted source, and for this example, that’s ok.
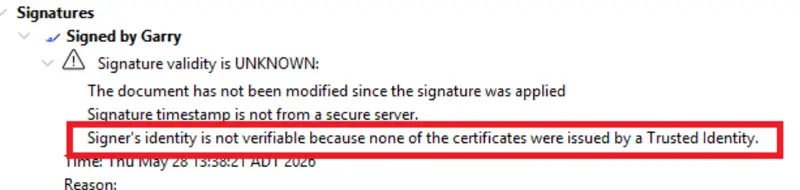
Figure 14: The signature panel tells us that there is a problem with the certificate used since it’s not from a trusted source.
Verify a Digital Signature
For the last part of this example, we’ll verify the digital signature.
We’ll continue with Xodo PDF Studio for this part. Since the issue with the signature in the previous part was that the self-signed certificate is not from a trusted source, we can fix this by importing our certificate to make it a trusted source.
First, we’ll click Trusted Certificates from the Secure menu at the top of Xodo PDF Studio.
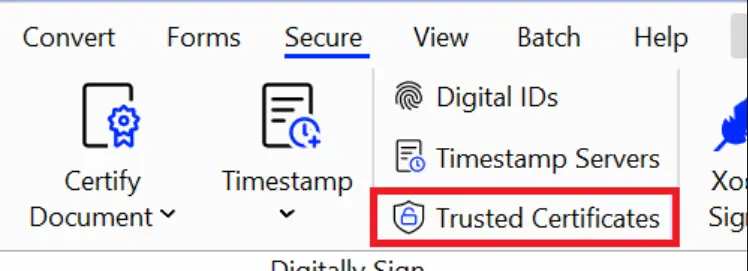
Figure 15: Menu showing the Trusted Certificates option.
That opens a window showing the current trusted certificates.
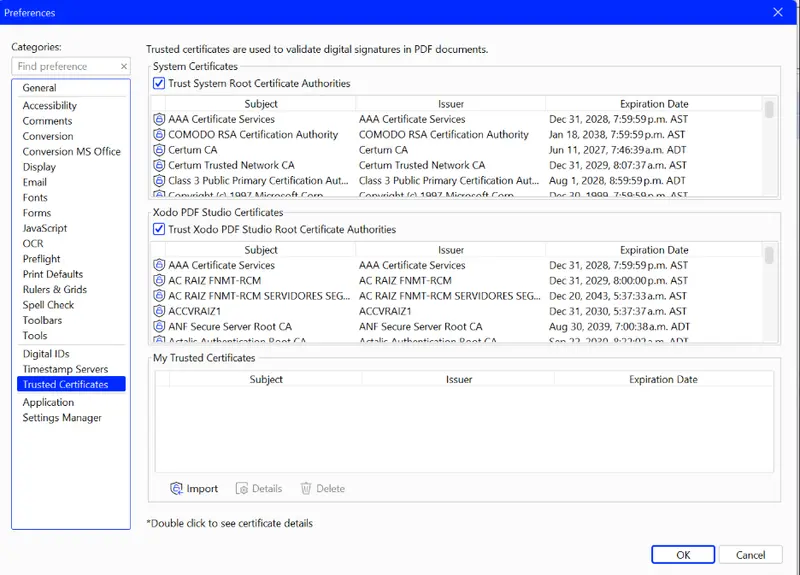
Figure 16: A list of trusted certificates in Xodo PDF Studio.
To add our certificate to the list, we’ll click Import and select the certificate.cer file we created earlier.
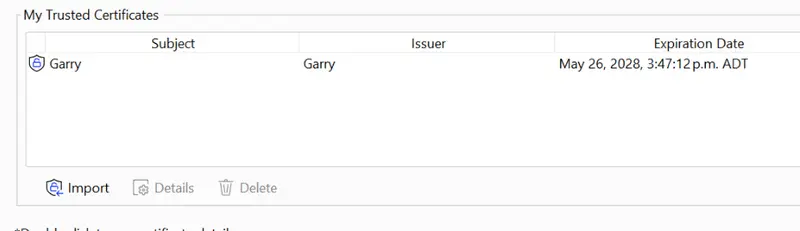
Figure 17: Our self-signed certificate is now listed in the My Trusted Certificates section.
Now that our self-signed certificate is in our trusted certificates list, we can go back to our PDF and see what’s changed.
We can see that the signature is now verified.
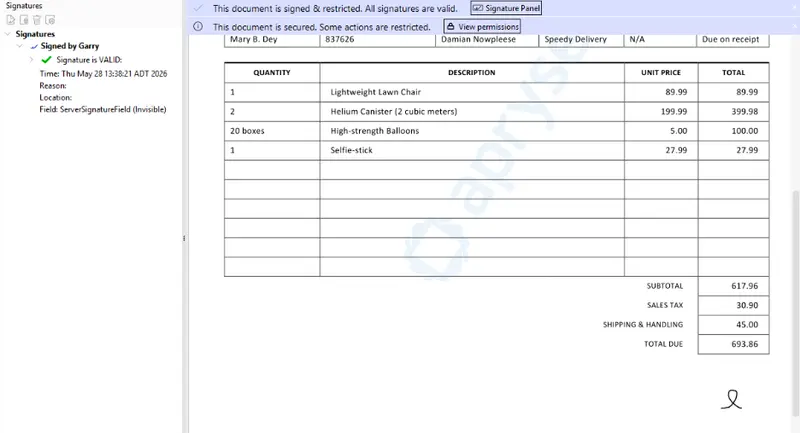
Figure 18: The signed PDF now shows that the signature is valid.
We can also check out the permission panel to see what actions are restricted. Here we can see that the PDF can’t be edited.
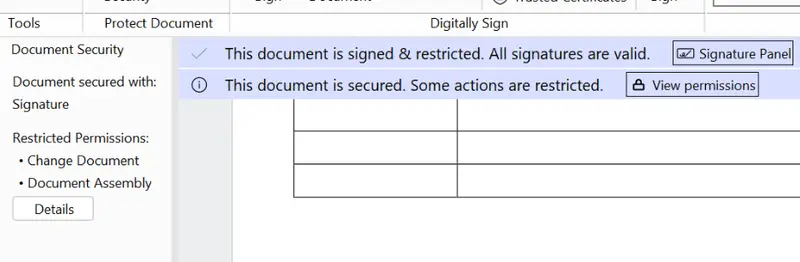
Figure 19: The permissions panel showing that the PDF can’t be edited.
We’ve just completed this example where we’ve:
- Created a self-signed certificate and all related files.
- Digitally signed and encrypted our sample PDF.
- Verified that it’s been signed but not with a certificate from a trusted source.
- Added the certificate we created to the list of trusted certificates.
- Confirmed that the digital signature is now valid based on our newly trusted certificate.
- Explored what permissions are restricted for this PDF now that it is signed with a cryptographic digital signature.
FAQ
Can I sign a PDF purely on the client side without a server?
Technically yes using specific JavaScript crypto wrappers, but it's an operational risk. Don't put raw signing keys or certificates on the frontend where malicious extensions can extract them.
What is the difference between certified and signed?
Certification is applied by the original author to lock down the file structure and define exactly what post-actions are allowed (like form filling). Signing is just a field-specific approval step.
How are ESIGN, eIDAS, and UETA different?
It's geographical. The US framework (ESIGN/UETA) is loose and technology-neutral. It mostly cares about capturing intent to sign and audit records. Europe's eIDAS is rigid, requiring specific technical tiers (Simple, Advanced, Qualified) with strict hardware identity validation requirements.
Conclusion
Pick your signing approach based on your legal and volume constraints. If you just need visual tracking, keep it on the client side. For contracts, look into a webhook-driven workflow API like Xodo Sign. If you are handling sensitive, regulated documents at scale, use an enterprise server SDK, like Apryse SDK, to set up a secure client-server split that keeps your private keys completely locked down.
Apryse SDK allows you to add digital signature and many other robust features like redaction, annotation, and document conversion. To explore the features for yourself, you can start a free trial or try out our demo.
If you have any questions, contact us for support.
Suggested Reads
- Blog: How to Implement Digital Signatures using Apryse WebViewer
- Blog: Digitally Signing a PDF using a Hardware Key – Part 1 – Setting up the YubiKey
- Blog: Digitally Signing a PDF using a Hardware Key – Part 2. Using the Apryse SDK and C#
- Guide: Developers Guide to Digital Signatures and Document Authentication