Setting Default Values for WebViewer Annotation Tools
By Roger Dunham | 2024 May 16

8 min
Tags
webviewer
ui customization
javascript
annotation
Summary: Fine tune your WebViewer annotation experience. Programmatically control default annotation styles, hide unused features, and specify user interactions with ease. Apryse WebViewer empowers developers with granular control over the annotation experience.
Introduction
The Apryse WebViewer is a JavaScript-based tool that runs in your browser, enabling you to perform a wide range of document tasks like view, annotate, and edit PDFs and DOCX files.
The UI is extremely customizable – in fact, since it is open source, you can change it in whatever way you wish by forking the source code. It is not always necessary to fork the repo, since there are many UI customizations that you can perform straight out of the box.
In this article, we will look at the options that are available when adding Free Text annotations to a PDF. We will see how we can choose our own default values, remove some options that we don’t need, and even lock down the UI so that the user is restricted to specific options that we define.
While this article is about Free Text annotations, the knowledge can be used to allow you to modify the options for other annotation tools that are also part of the UI.
A Note on Versions
This article was based on WebViewer 10.9 so everything is correct at the moment. But if you read this article long after it was written, it is possible that behavior of WebViewer may have changed as we continue to develop and extend the functionality.
Default Behavior
The Classic UI, which is the default UI shipped in 10.9, contains a set of annotation tools that have predefined options set for each annotation type.
Typically, you can control the display properties of the annotation – both for the text itself, plus the stroke and fill of the box in which the text is displayed. You can do this in the case of Free Text annotations or the appropriate properties for other annotation types.
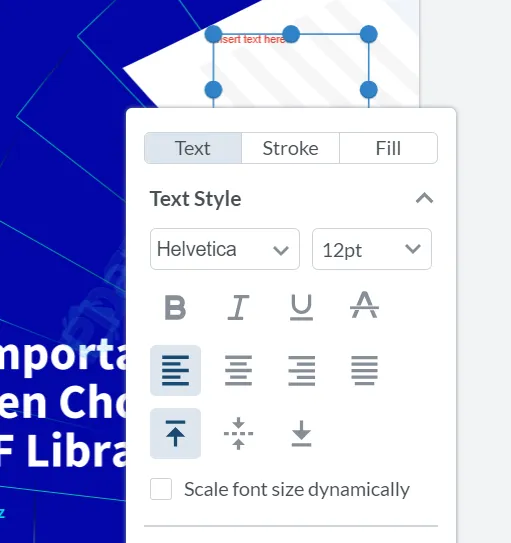
Figure 1 – The dialog that allows you to choose styles for a Free Text annotation
This means that at runtime, the user can, straight out of the box, make lots of choices and get the look of the annotation they want. For example, they can choose red text, cyan background, and a cloud outline.

Figure 2 – An example of a Free Text annotation illustrating some of the available options
You might, of course, want to restrict the options the user can choose (seriously, red text and cyan background?) or even limit them to just the default settings you specify. We will look at how to do that later.
The default behavior is that if you make changes to the style for an annotation when you create it, those settings will become the new default when you create the next annotation. That’s great and will save you lots of time.
However, since you may want to have several “standard” styles, the classic UI gives you four separate buttons for most annotation tools, allowing you to configure each button with a set of your choices and swap quickly between them. Modular UI also supports up to four buttons, but the number present is configurable.
Before you go any further, check out the annotations sample at the Apryse Showcase. In fact, while you are there, be sure to check out other parts of WebViewer’s huge range of functionality.
Figure 3 – The Apryse Showcase illustrating the presence of four options for each tool
Beyond Out-of-the-Box
We’ve seen that there is some great functionality available as soon as you start to use WebViewer. But what if you want to make life easier for your users? Perhaps they will never want to use Helvetica, so having it as the default font is not helpful.
Updating the Defaults
It’s actually very straightforward to update the default values used for the annotation tools – all you have to do is get the tool object and call setStyles, passing in the new configuration.
The following snippet, for example, changes almost all the default properties of the Free Text annotation tool. Normally, you wouldn’t make as many changes as this, but I’ve taken the opportunity to illustrate how to set the boldness, italics, underlining, and strikethrough.
documentViewer.getTool('AnnotationCreateFreeText').setStyles( ({

 StrokeThickness: 5,

 StrokeColor: new Annotations.Color(0, 0, 255),

 TextColor: new Annotations.Color(0, 0, 0),

 FontSize: '20pt',

 Font: 'Carlito',

 Opacity: 0.5,

 TextAlign: 'right',

 TextVerticalAlign: 'bottom',

 RichTextStyle: {

  0: {

   'font-weight': 'bold',

   'text-decoration': 'underline, line-through',

   'font-style': 'italic',

  },

 }

}));
You may need to clear your cache after you make changes, otherwise the previous values may still be used. Normally, having the previous values remembered is great, but it can be extremely confusing when you are getting used to WebViewer and making changes in the code.
Now when you edit a document in WebViewer and add an annotation, the default options will have changed.
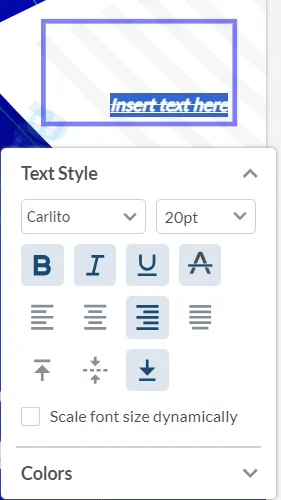
Figure 4 – By changing the code used to set up WebViewer, the initial values that are shown for the annotation properties have changed. The default font is no longer Helvetica.
You can see the results after adding an annotation. In our example, the new annotation is aligned bottom right, rather than top left (which was the original default), and it is also bold, underlined, italicized, and with strikethrough.
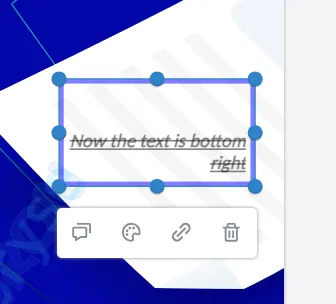
Figure 5 – An example of how a new annotation looks, having modified the default options
Setting Default Values for the Other Tools of Each Type
So far, we have just set the default values for the first Free Text annotation tool. As mentioned earlier there can be up to four instance of each tool type. So what about the other ones?
Setting the values for the other instances is straightforward – just use the tool name followed by the number of the tool: 2, 3, or 4.
For example, we can extend the example code that we already looked at, by setting the styles for the other Free Text buttons – now we have different colors, fonts, and sizes for each tool button.
documentViewer.getTool('AnnotationCreateFreeText2').setStyles({

 TextColor: new Annotations.Color(255, 0, 0),

 FontSize: '10pt',

 Font: 'Times New Roman',

});


documentViewer.getTool('AnnotationCreateFreeText3').setStyles({

 TextColor: new Annotations.Color(0, 0, 255),

 FontSize: '14pt',

 Font: 'Carlito',

});


documentViewer.getTool('AnnotationCreateFreeText4').setStyles({

 TextColor: new Annotations.Color(0, 255, 255),

 FontSize: '16pt',

 Font: 'Liberation Serif',

});
Now when we refresh WebViewer we see that our four Free Text buttons are black, red, blue and cyan. If we were to create a new annotation with them, we would find that the font size and face had also been updated.
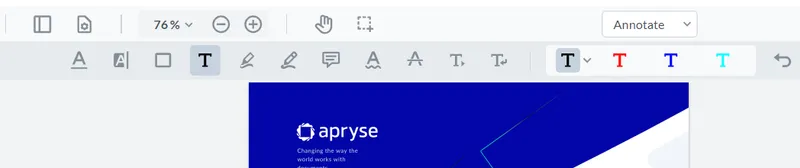
Figure 6 – The result of updating the default properties for all four Free Text annotation buttons
Controlling Which Properties are Available in the Pop-up
Now let’s look at removing some of the options from the pop-up. For example, we could remove the range of colors that are available, or remove fonts that we will never use.
The standard method within WebViewer for controlling what is available is to use instance.UI.disableElements and instance.UI.enableElements, as well as a list of dataElements.
First, let’s limit the number of colors the user can choose to just seven.
This is done by using setColorPallet for the specific tool. The following code specifies the colors to be used for the Free Text annotation tools. Note that the tools can be specified by either by the enum or the name such as AnnotationCreateFreeText.
instance.UI.setColorPalette({

 // @ts-ignore

 toolNames: [Tools.ToolNames.FREETEXT],

 colors: [

 '#DDDDDD',

 '#9de8e8',

 '#A6A1E6',

 '#E2A1E6',

 '#EF1234',

 '#FF8D00',

 '#FFCD45',

  ],

});
Now when the dialog opens only the specified colors are available.
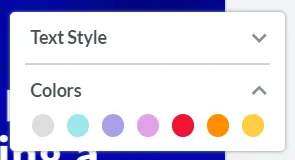
Figure 7 – An example of restricting the number of colors that are available in the dialog
We can take customization further by removing some of the options from the pop-up. In this case, four of the fonts and the italic and strikethrough buttons.
instance.UI.disableElements([

 'dropdown-item-Helvetica',

 'dropdown-item-Arimo',

 'dropdown-item-Roboto',

 'dropdown-item-Liberation Serif',

 'freeTextItalicButton',

 'freeTextStrikeoutButton',

]);
Now when we add (or update) a Free Text annotation, the pop-up has fewer options.
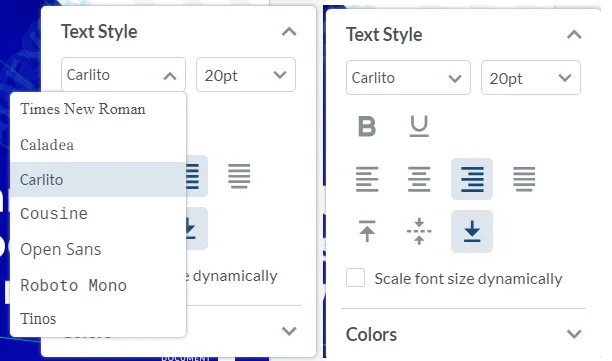
Figure 8 – Two views of the Text Style pop-up. The list of fonts has been restricted, and the underline and strikethrough options removed.
Whenever you are configuring WebViewer you will need to be able to find the dataElement property of the object that you wish to use. This can be tricky if the object is in a pop-up that disappears as soon as you try to use the debugger.
One way around this is to enable “Emulate a focused page.” This prevents the pop-up from closing as soon as it loses focus.
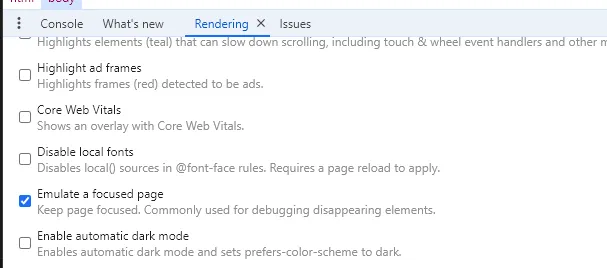
Figure 9 – Enabling “Emulate a focused page” will help you get dataElement attributes for objects in pop-ups.
Removing All the Options
If you want to take controlling the UI one step further, it is possible to completely disable the pop-up for specific tools.
For example, we can use the following code to entirely hide the dialog that appears when creating a Free Text annotation.
   instance.UI.disableElements([

    'richTextPopup'

   ]);
This will mean that only the default options that were specified for each instance of the tool will be available. However, there are use cases where that could be extremely useful. Using the code snippets from earlier, I can now create four types of annotation – each with a specific font, color, and size – but not with any other style.
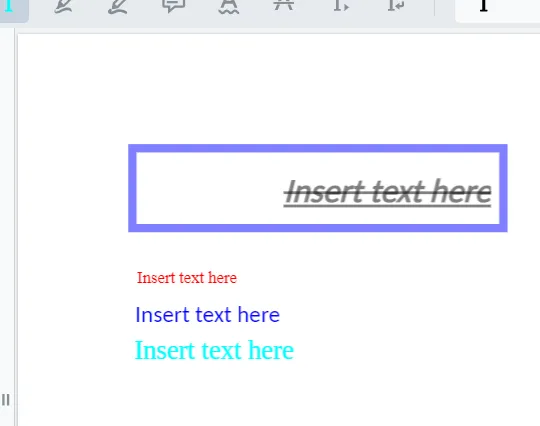
Figure 10 – An example of the four default text annotations that have been given custom default values
What About the Modular UI?
The WebViewer Modular UI is an alternative way of creating the UI, allowing it to be rapidly customized using configuration rather than lots of code. Typically, there is only one instance of a tool, but it is possible to add up to three more.
Specifying the default font and other properties is the same as for the classic UI, so everything you have learned is still valid.
As an example, let’s remove all of the toolbar buttons except for the four Free Text annotation ones. While the UI is now very locked down, we can still add annotations just as before.
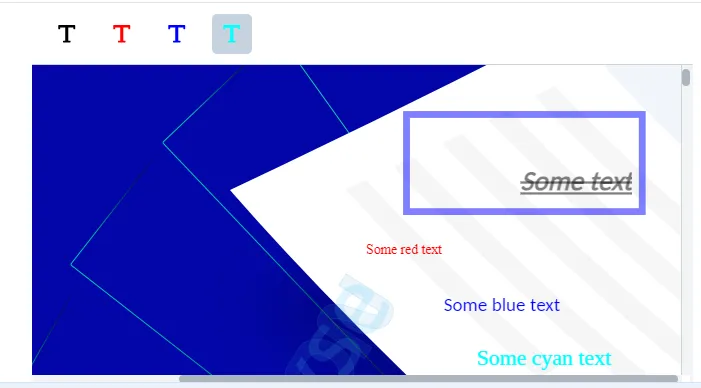
Figure 11 – An example of using Free Text annotations from the Modular UI
We still have the functionality that we want, and a way to deliver it rapidly.
Conclusion
Apryse WebViewer was already a powerful tool – but now you also know how to control and customize the way that annotations look. What you have learned for Free Text annotations is a great basis for the other annotation types.
But WebViewer does much more than just annotations – it also supports text editing in PDFs and Word documents, CAD drawing display, measurement, redaction, and much more.
There’s documentation for all of the SDKs, not just for annotation tools, so be sure to check them out if you want to get started quickly.
If you run into any problems, you can also reach out to us on Discord.
Tags
webviewer
ui customization
javascript
annotation

Roger Dunham
Share this post


