How to Assemble a Document from Multiple PDFs using TypeScript, React and Apryse WebViewer
By Roger Dunham | 2024 May 10
9 min
Tags
webviewer
react
typescript
document assembly
Summary: This blog explores the creation of document assembly tools using TypeScript and React. Document assembly involves dissecting PDFs and merging them to form a new document, incorporating data and logic to customize content. The process enables users to assemble and generate legal contracts, financial reports, or HR packages, leading to streamlined workflows, and increased efficiency.
Introduction
Back in 2020, we released a video that shows how to use multiple instances of Apryse WebViewer to assemble, and then download, a new PDF using user-chosen pages from existing files.
It’s a great video and many people have watched it. However, since 2020 Apryse WebViewer has become even better. It is now version 10.8 (compared to 7.0 when the video was created). Apryse tries extremely hard to not create code-breaking changes, but sometimes it is necessary. There have been a few breaking changes over the last four years, so the code required an update.
I also used the opportunity to convert the code into TypeScript, and to use Vite rather than Create React App.
In this article, we will walk through the code, see how it works, and show how it can form the basis of your own document processing solutions. The code isn’t “production ready” and isn’t intended to be – it is solely there to illustrate available functionality.
Getting the Source Code
The source code can be found at https://github.com/PDFTron/webviewer-document-merge.
If you are brand new to WebViewer, I recommend looking at this video, or any of the “get started” guides for JavaScript, React , Angular, Vue or other frameworks.
Overview of the Project
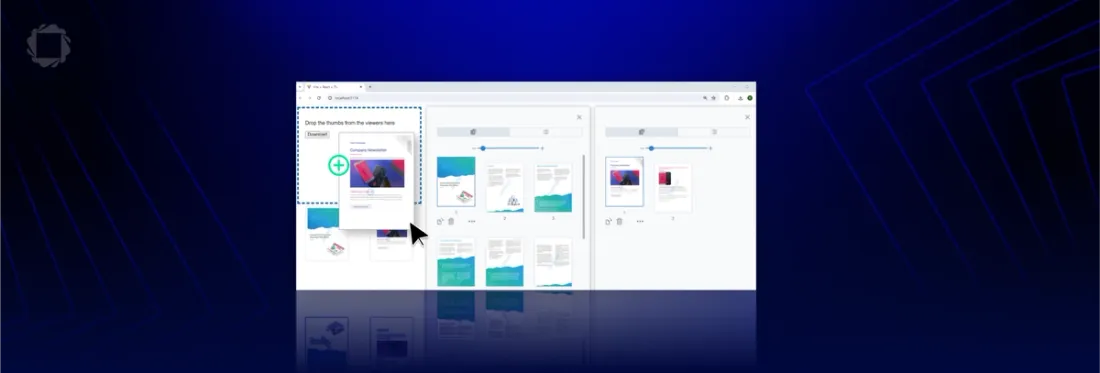
The app allows you to specify two different documents – which can be PDFs, DOCX files, PNG, and so on. You can then move pages around within each document, move pages from one document to another, or drag pages into a brand-new document.
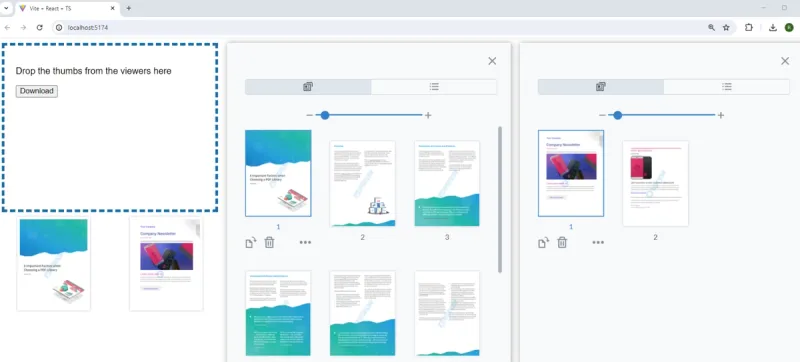
Figure 1 – The working app. You can drag pages from one document into another, or into the new document at the left-hand side.
Many of the samples on the Get Started with WebViewer page involve creating a WebViewer directly within the app component. But in this project, we will create two React components called Viewer and Dropzone. The app then creates one Dropzone and two Viewer components and uses CSS to style them.
Let’s look at each of these components in turn.
The Viewer Component
The code used for the Viewer component is essentially the same code used in many of the samples. The important part, both here and in the samples, is a useEffect which is called just once when the component loads.
useEffect(() => {

    WebViewer(

      {

        path: 'lib',

        initialDoc: docToLoad,

        loadAsPDF: true,

      },

      viewer.current as HTMLDivElement,

    ).then((instance) => {

      instance.UI.enableFeatures([

        instance.UI.Feature.MultipleViewerMerging,

      ]);

      instance.UI.disableElements(['documentControl']);

      instance.UI.openElements(['leftPanel']);

    });

  }, []);
In many of the samples, the instance object that is returned when the WebViewer initialization promise resolves is not used. In this code, however, we will use it since it allows us to easily modify the UI get access to the Apryse SDK functionality.
In the sample code we are:
- Enabling the feature MulitpleViewerMerging. This allows us to drag thumbnails from one instance of WebViewer to another, or onto a different component. This option is not enabled by default, in which case thumbnails can only be moved within the same document. You can also use enableFeatures to enable many other features, for example, a file picker.
- Disabling the element documentControl. This element allows the user to specify page ranges as a method for selecting multiple thumbnails (as an alternative to selecting them with the mouse). This element is enabled by default – which is often exactly what you want – but is not needed in this example. You can use disableElements to remove an elements that we don’t want
- Opening the element leftPanel. This panel, despite its name, is full of functionality – it contains the thumbnails, but it could also contain bookmarks, layers, and digital signatures. Using the method openElements means that the panel will be open when the app starts, rather than the user having to manually open it.
Note: In the screenshots (and the video), the panel fills the entire width of the WebViewer instance. This is fortuitous but is occurring due to CSS rules and the default browser width – rather than specifically coded behavior. If a very wide browser window is used, the main pane of the WebViewer will also be shown.
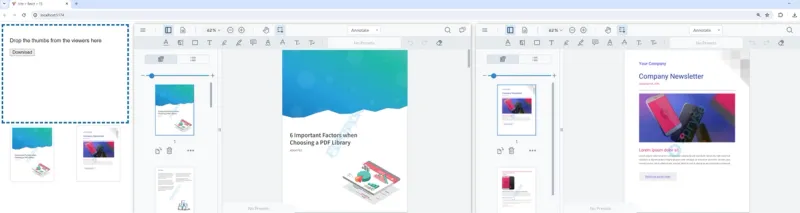
Figure 2 – If a very wide browser window is used, the responsive thumbnail panel will not fill the entire width of WebViewer.
The functionality is still the same, but the appearance will be slightly different.
That’s it! The WebViewer is ready to work, with almost no extra set up needed – just as you would hope from such an awesome productivity tool.
The Dropzone Component
The Dropzone component contains much more code than the Viewer component, since it cannot directly leverage the WebViewer UI and needs to have its own code.
It renders a Div containing an OnDrop event handler, a download button for the new document, and a view of the thumbnails.
return (

    <div>

      <div

        className="dropDiv"

        onDrop={ev => {

          onDropEvent(ev);

        }}

        onDragOver={ev => {

          ev.preventDefault();

          ev.dataTransfer.dropEffect = 'move';

        }}

      >

        <p>Drop the thumbs from the viewers here</p>

        <button onClick={mergeDocuments}>Download</button>

      </div>

      <div className="list"}>

        {thumbArray.map((thumb, i) => {

          // @ts-ignore

          return <img key={i} src={thumb.toDataURL()} />

        })}

      </div>

    </div>

  );
We will come back to the Thumbnail list later and see how it gets populated.
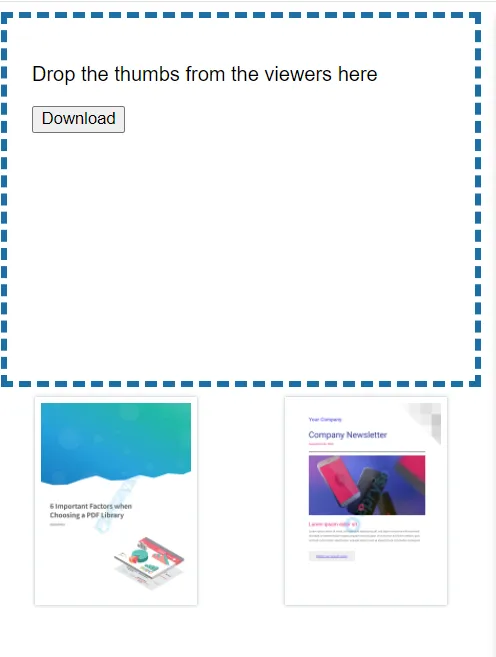
Figure 3 – The Dropzone component after two pages have been dropped in
For now, let’s look at the drop event which occurs when the user drags a thumbnail onto the Dropzone.
  const onDropEvent = (ev: DragEvent<HTMLDivElement>) => {

    ev.preventDefault();

    const viewerID = ev.dataTransfer.getData('dataTransferWebViewerFrame');

    const webViewerIframe = window.parent.document.querySelector(

      `#${viewerID}`,

    );

    if (!webViewerIframe) {

      console.warn('Could not find instance of WebViewer');

    }


    const extractedDataPromise =

      // @ts-ignore

      webViewerIframe?.contentWindow.extractedDataPromise;

    if (!extractedDataPromise) {

      console.warn('Could not retrieve data from +instance of WebViewer');

    }


    // @ts-ignore

    extractedDataPromise.then(docToMerge => {

      // @ts-ignore

      addDocument([...docs, docToMerge]);

    });

  };
The code is a little obscure, so let me explain – the drag event holds the viewerID of the WebViewer element where the drag started. The HTML document is then searched for that element. If found, the extractedDataPromise is retrieved.
When extractedDataPromise resolves the selected page, docToMerge is added to docs – a collection of the pages that are wanted in the new PDF. As such, the docs array is the basis of what will ultimately get exported.
However, the export might not happen for a while, so it’s useful to show the thumbnails for the pages that in the docs state variable.
This is achieved with a useEffect that fires when the docs collection changes.
  useEffect(() => {

    if (docs.length >= 1) {

      const loadDocumentAndThumb = async () => {

        const doc = await core.createDocument(docs[docs.length - 1]);


        //prior to 8.3 , the method loadThumbnailAsync was used.

        doc.loadThumbnail(1, (thumbnail: any) => {

          // @ts-ignore

          addThumbToArray([...thumbArray, thumbnail]);

        });

      }

      loadDocumentAndThumb();

    }

  }, [docs]);
Within the useEffect, if there is at least one document in the list, then a Core.Document called doc is created for the last item in the list. Once created, the thumbnail for doc is added to the thumbArray – a state variable that contains the list of thumbnails.
Changes in thumbArray cause a Dropzone return function to be called, which will then contain an image for each thumbnail.
 <div className="list" ref={fileListRef}>

        {thumbArray.map((thumb, i) => {

          // @ts-ignore

          return <img key={i} src={thumb.toDataURL()} />

        })}

      </div>
Note: The code, as written, expects that the array docs will only ever increase in size – so getting the last item when a change occurs is correct. However, if you extend the code to allow pages within the new document to be reordered, or removed, you will need to update the function to support that. If implementing page reordering and removal is important to you, you can use a third WebViewer instance and let Apryse do the hard work for you.
An important feature that we have not yet discussed is the line.
const doc = await core.createDocument(docs[docs.length - 1]); It’s very easy to say we use core to create a Document – but what on earth is core?
We saw earlier in this article that when the WebViewer instantiation function completes, a promise is resolved, giving us access to the instance object.
If we have that, we can get hold of instance.Core. When working with WebViewer this is what you would normally do in order to have access to a whole new world of functionality.
However, in the Dropzone component we don’t have access to that instance object. While it could be passed in as a prop using a callback from Viewer, for the sake of this example we will use an alternative approach. Index.html has the following script specified.
<script src="/lib/core/webviewer-core.min.js"></script>Once this is available, we can access core using:
const core = window.Core ;

core.setWorkerPath('/lib/core');
Note: if setWorkerPath is not correct, the code will not work – so this is a good place to start if you run into issues.
In WebViewer 7.0 this property was called CoreControls – the renaming of this object (and a change in where the code was located) was a breaking change.
The final part of the code handles creating, then downloading, the new PDF when the user presses the button in the Dropzone.
  const mergeDocuments = async () => {

    if (docs.length > 0) {

      const doc = await core.createDocument(docs[0]);

      let i;

      for (i = 1; i < docs.length; i++) {

        let doc2 = await core.createDocument(docs[i]);

        await doc.insertPages(doc2);

      }


      const data = await doc.getFileData();

      const arr = new Uint8Array(data);

      const blob = new Blob([arr], { type: 'application/pdf' });

      downloadBlob(blob);

    }

    addDocument([]);

  };


  const downloadBlob = (blob: Blob) => {

    const a = document.createElement('a');

    document.body.appendChild(a);

    const url = window.URL.createObjectURL(blob);

    a.href = url;

    a.download = 'merged-file.pdf';

    a.click();

    setTimeout(() => {

      window.URL.revokeObjectURL(url);

      document.body.removeChild(a);

    }, 0);

  };
This has similarities to the useEffect used to create thumbnails.
core.CreatedDocument is used to create Core.Document objects for each element in docs.
The first one is called doc, and the subsequent ones are created then appended to doc, so that eventually doc contains the pages for all elements.
Finally, the resulting document is converted into a blob and downloaded.
Start creating your React-based app with Vite and enable seamless PDF viewing and editing. Dive into our tutorial now!
Conclusion
The example we have worked through demonstrated just one aspect of WebViewer – the ability to drag thumbnails of pages from one document into another, and to generate an entirely new document.
It’s a great illustration of what can be achieved with the Apryse Web SDK. As awesome as WebViewer is by itself, there is even more functionality available. It can also be used to annotate and manipulate pages, edit PDFs and DOCX files, apply redaction, work with digital signatures, and many other options – almost all of which are performed entirely within the browser, offering security.
When you are ready to take the next steps, check out the documentation. If you need help to get going, head over to the Discord channel and ask our super-helpful Solution Engineers.
Tags
webviewer
react
typescript
document assembly

Roger Dunham
Share this post


