Roger Dunham
Updated November 08, 2024
4 min
Advanced Document Generation Options
Roger Dunham

Summary: Follow these steps to automatically generate documents using a DOCX based template and JSON data. This can be done server-side using Server SDK, or client-side using WebViewer. Take advantage of SDK flexibility to automatically update dates and optimize this time-saving workflow.
Introduction
The Apryse SDK is a super-powerful toolkit for working with PDFs and other document types. Among its huge range of document processing functionality is the ability to add annotations or apply redactions or easily convert between different document formats.
The SDK also allows you to automatically generate documents using a DOCX based template and JSON data, and that is what we will look at in this article. This document generation can occur either server side using the SDK directly, or client side using Apryse WebViewer running in the browser.
Recently I’ve written about how you can easily do this using JSON data derived from a RESTful API - but in that example I needed to preprocess the JSON file so that nested data and dates would be displayed the way that I wanted them.
In this article we will look at how we can use the data, in the form that it’s received, and specify date formatting, null handling and nested data within the template.
There is, of course, a trade-off in doing so. In the previous article the template was extremely simple, with data-wrangling being applied to the JSON data. Moving data processing into the template requires more skill in template creation but simplifies the pre-process data-wrangling.
The report that we are going to generate is intended to look as similar as possible to the one used in the previous article. That report related to the blogs and videos that were created by Apryse in August - but it could have been about any kind of data - and the report includes summary data, then details for each blog and video that was created.
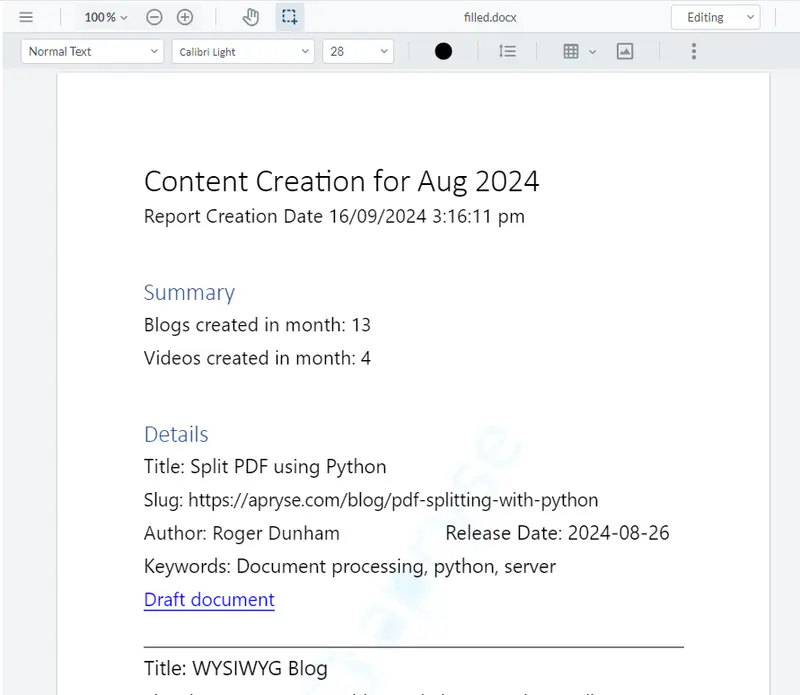
Figure 1 - The report that we are trying to create.
Structure of the incoming JSON data (almost)
The original data was generated by Asana (a Project Management tool) via its RESTful API. It contains information that relates to each item, whether it is a blog or a video. Some of the data values, such as “completed_at” are standard, and others, such as “Author” and “Slug” (the path to the final blog) are custom fields, and returned as subitems of the object “custom_fields”.
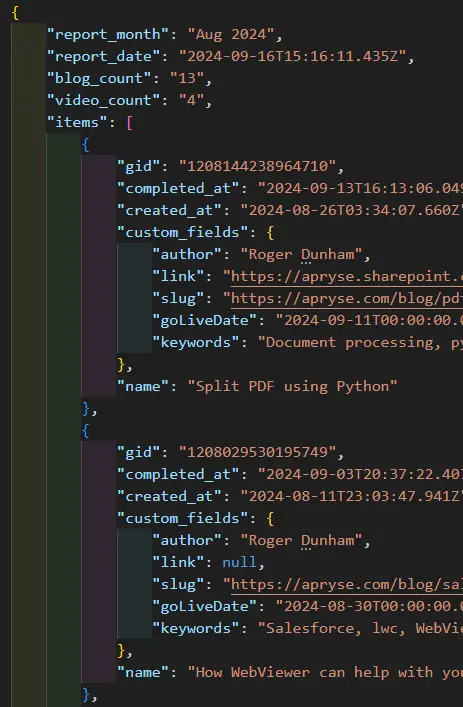
Figure 2 - Typical incoming data.
I confess that I’ve cheated a little with the custom_fields. The actual data structure is a little trickier than this, and we will use it later in this article, but first let’s work with slightly simpler data - custom_fields with key:value pairs - and learn how to write a template using those, before moving onto the harder data format.
If you are familiar with Asana, you will notice that I’ve also performed a little pre-processing to get the “report_month”, “report_date”, “blog_count” and “video_count”, which are not directly returned from the Asana API.
There are three issues that mean that we cannot use the incoming JSON data directly to create a report in the way that we want.
- The various date fields (“Report_date”, “completed_at”, “created_at” and “goLiveDate”) contain both the date and the time, (e.g. 2024-09-13T16:13:06.049Z) but in the report we don’t want that level of detail. As an example, we just want “created_at” to look like 2024-09-13.
- Some of the values, for example “link” in the second record are null.
- Much of the data (for example “author” and “keywords”) are stored as sub-items of custom_fields, and aren’t accessible in the way that was used in the previous blog.
Let’s look at those issues in turn.
Handling dates
The report that we created in the previous blog had two different formats for dates, neither of which match the incoming data.
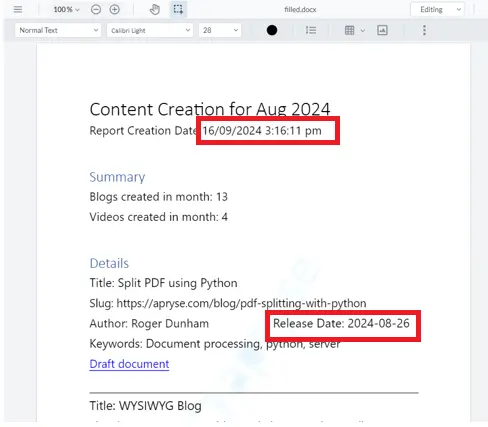
Figure 3 - The original report - showing two distinct date formats.
That’s not a problem - you can get the data the way that you want it using the function {{format_date(report_date, '<some format>')}}
where <some format> follows the date format rules for Excel.
So, in our case we would use the following:
Report Creation Date: {{format_date(report_date, 'dd/m/yyyy h:mm:ss AM/PM')}}

Release Date: {{format_date(created_at, ”yyyy-mm-dd”)}} 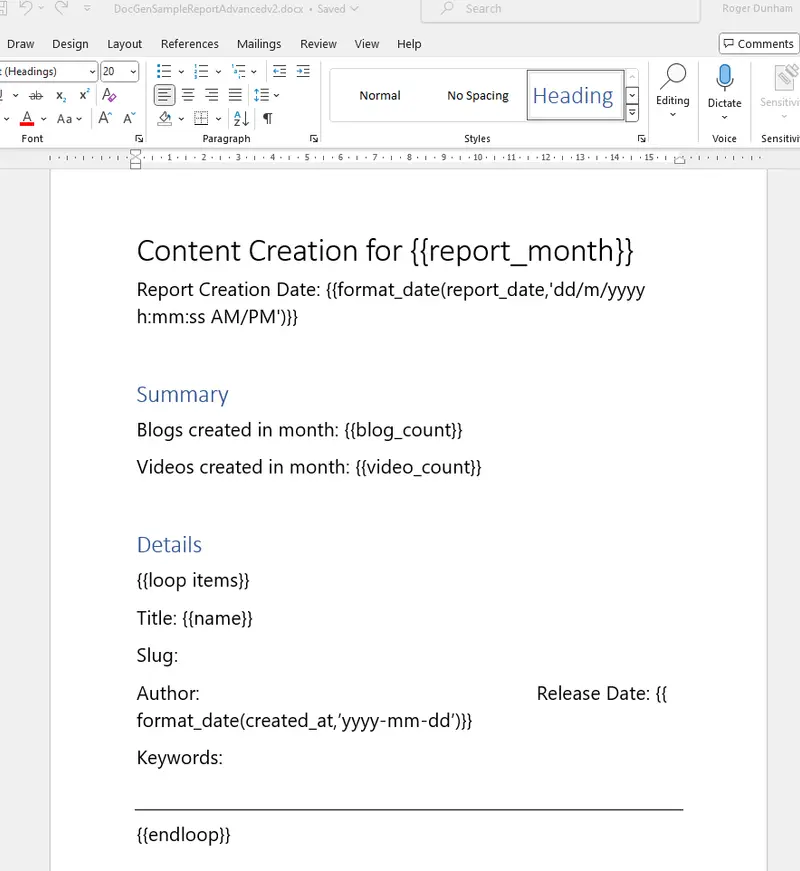
Figure 4 - The template with the date formatting specified.
We’ll see the result in a moment.
Using values from Sub-items
Our next problem is that we need to get the “author”, “slug” and “keywords” from the “custom_fields” object.
We can do that using a dotted syntax that will be familiar to programmers.
For example, we can use {{custom_fields.keywords}} to get the value for keywords from the custom_fields object.
As the next step, we will update the template to get the values for author and keywords.
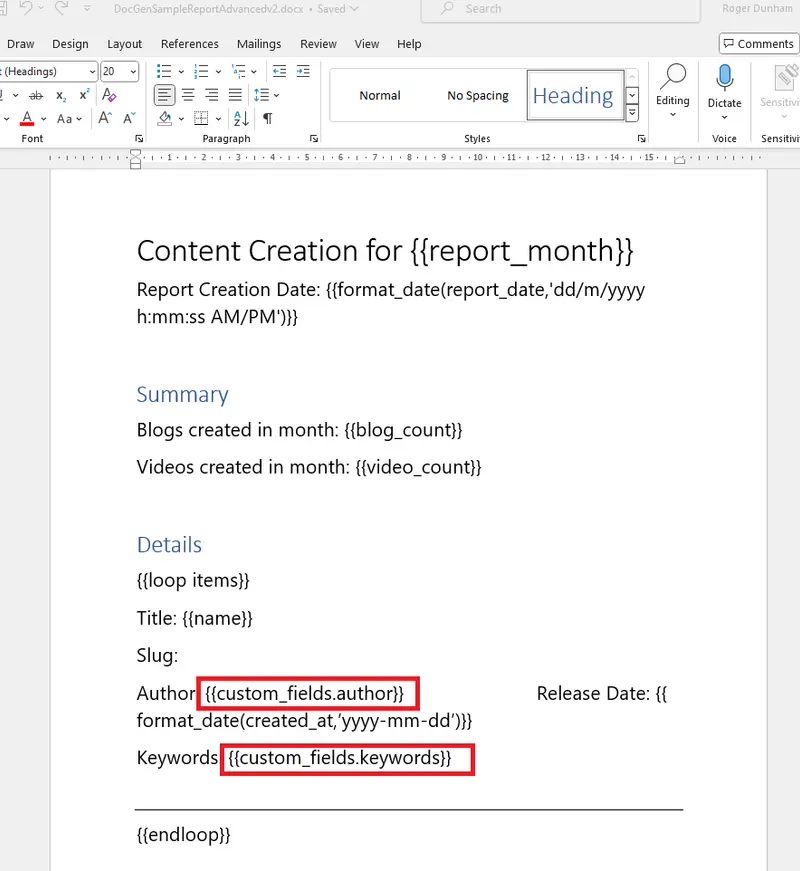
Figure 5 - The template with dotted notation to get values from a nested object.
If we re-generate the report, then we can see that we have the correct values for author and keywords.

Figure 6 - Author and keywords have been extracted from nested data.
Null values in WebViewer 10
That’s all looking great, so let’s try that with the “Slug” field.
Uh-oh! We get an error in the browser.

The message tells us that there is some kind of problem with a value for “Slug”. If we look at the JSON data file, then we can see the problem - one of the values is null.
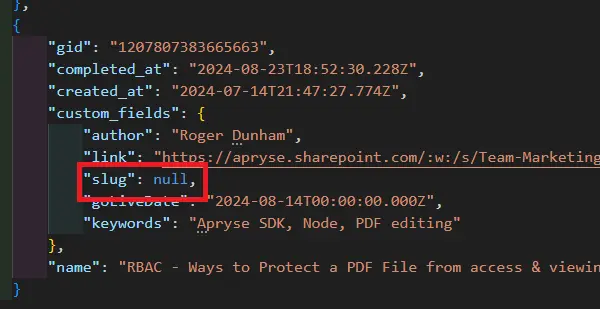
Figure 7 - null values cannot be used in document generation in WebViewer 10.
This is not an issue in WebViewer 11, where null values will be displayed as empty strings
Dealing with Null values
While null values do not cause an error in WebViewer 11, you may still wish to handle them in a particular way. This can be done by using conditionals. These typically take the form of
{{if cond}} ... {{endif}}:
The JSON value corresponding to the condition key (cond in this case) is converted to a Boolean. It is evaluated as false when either:
- The key is not present in the JSON
- The value is false, "", 0, or null
This means that we can modify our template to check if the value for “slug” is null (it would be good practice to also do that for any other fields that might be null, but we will skip it for now).
{{if custom_fields.slug}}{{custom_fields.slug}}{{endif}} That code block says: “if slug is not null (i.e. it has a value), then use it, otherwise do nothing”, but you could extend the method to inform the user that the value was missing.
Our template now looks something like this:
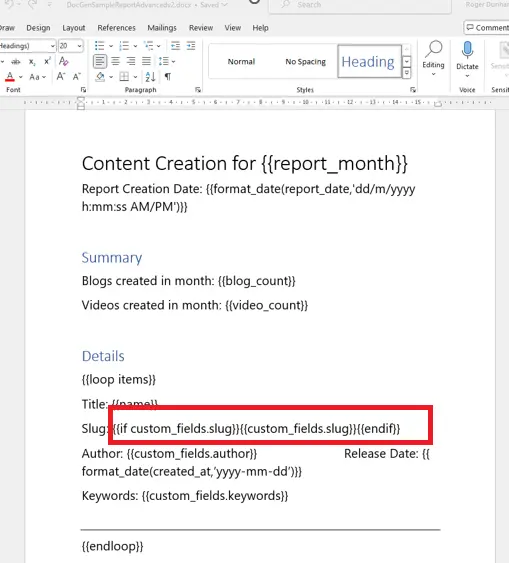
Figure 8 - The template with the null-check for “slug”.
When a report is generated from that template. we now get different results depending on whether or not “slug” is null, but, importantly, we don’t get an error in either case, even in WebViewer 10.
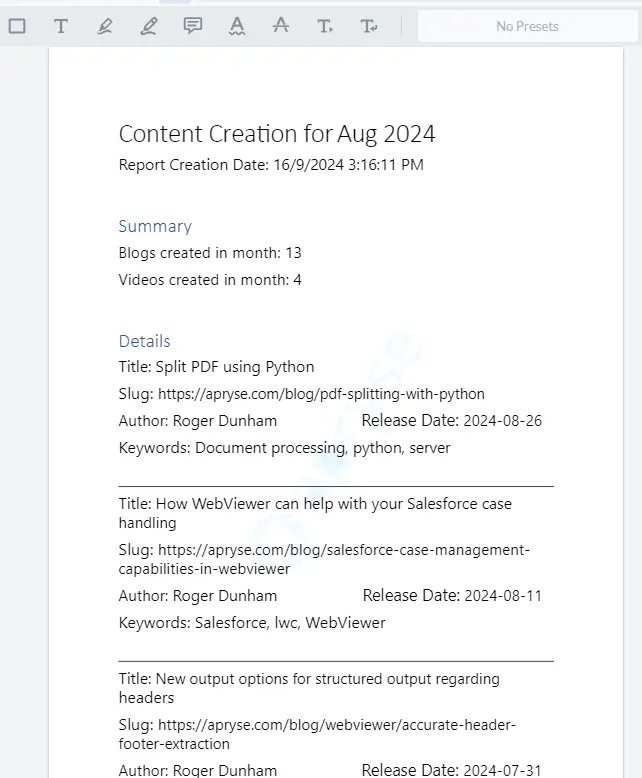
Figure 9 - The final, automatically generated, report.
If you are eagle-eyed, then you will have spotted a couple of differences from the report in Figure 1.
Firstly, the link to the draft document is missing, and secondly the time format for “Report Creation Date” now ends with “PM” but previously ended in lower case “pm”.
Currently it isn’t possible to specify a hyperlink in the template, or to use time formats that don’t fit the Excel specification (such as ending in “pm”). If either is important to you, then please send us a feature request. Alternatively, you could modify the JSON to match the required formatting (possibly using Structured Input), as was done in the previous article.
OK, so we have a report generated with the correct date format, handling nulls, and using subitems with simplified data structure, but what about the real JSON format?
Structure of the incoming JSON data
The actual data retrieved from the RESTful API has an array of custom fields where each element has values of “gid”, “name” and “display value”, rather than as key:value pairs.
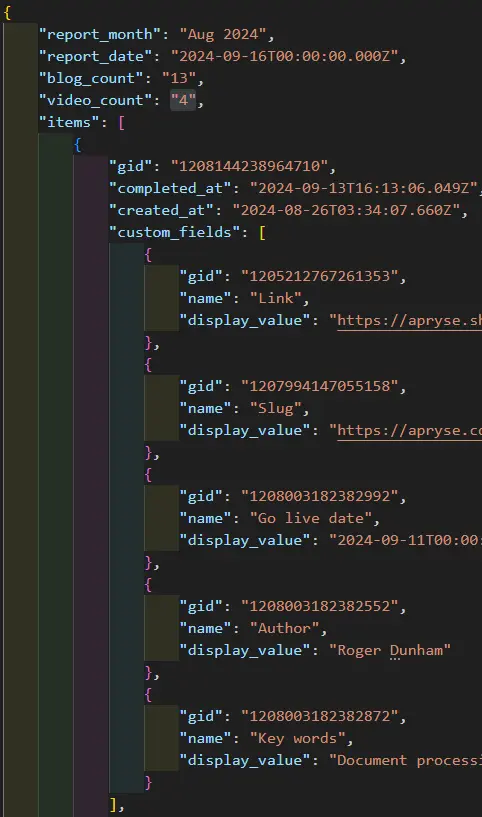
Figure 10 - An example of the actual structure of custom_fields.
Apryse Document Generation allows us to work with these by using a loop that will iterate over the array of custom_fields.
This means that we will now have two loops - one for each item, and an inner one for each custom_field.
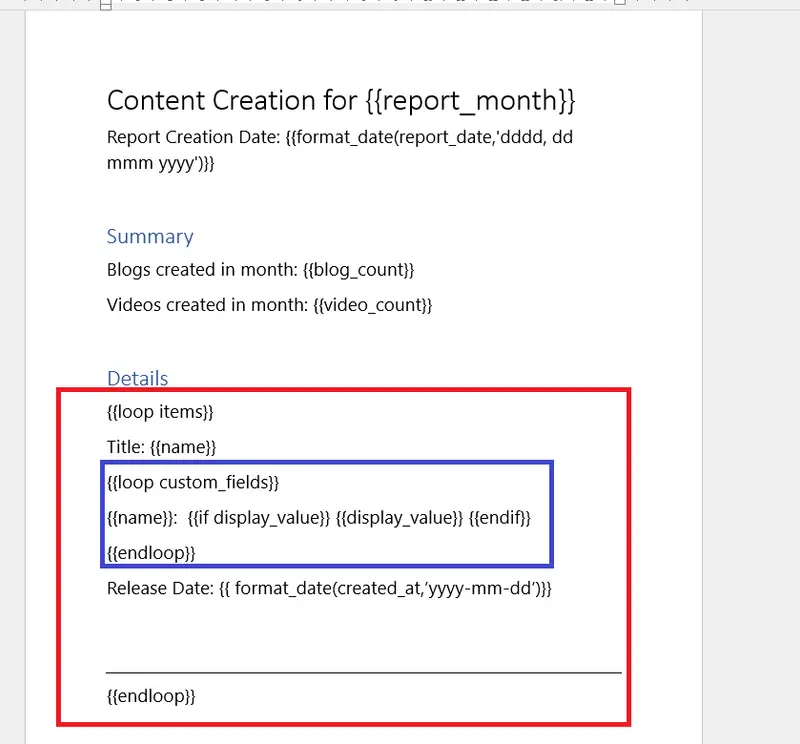
Figure 11 - A simple way to get all of the custom field data displayed. The inner (blue) loop will get data for each custom field, the red loop will get data for each item.
Note: I’ve moved “Release Date” outside of the loop, which will slightly alter the report. I could use a text box to keep it located where it was, but for now I’m happy for the changed layout.
If we use the updated template to create a document, we get to see all the custom fields for each blog article.
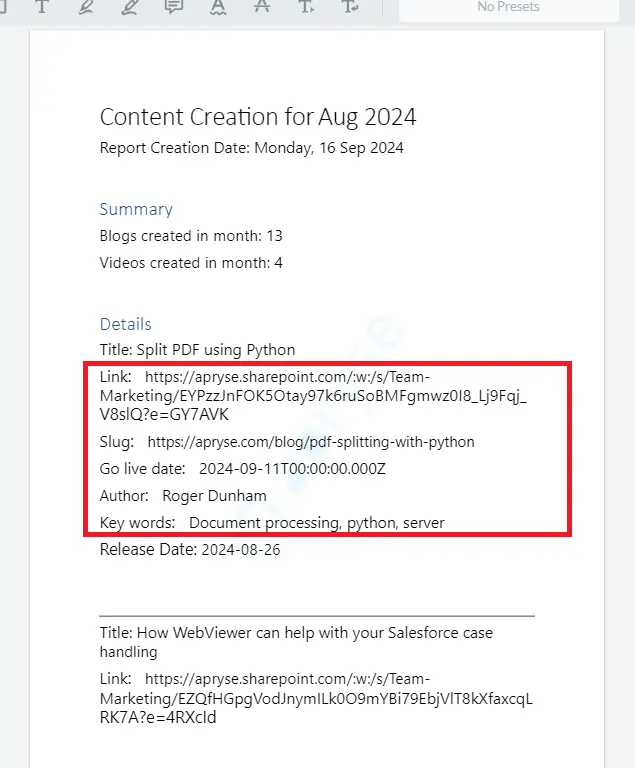
Figure 12 - The automatically generated document showing the names and values for each custom field.
That’s a good start, but not all of the custom fields are needed - for example, the fields “Link” and “Go live date” are not required in the report. We also need to change the name of the field “Key words” to be “Keywords”.
We can achieve this using the equal operator - and comparing the name of each custom field with the names of only those fields that we want in the report. We can even choose the order in which they will be displayed, and change the name that will be used for that field in the report.
It is also good practice to check that the display_value isn’t null (as we saw earlier) so I’ve included a test for that too.
{{loop custom_fields}}
{{if display_value}}
{{if equal(name, “Slug”)}}Slug: {{display_value}}{{endif}}
{{if equal(name, “Author”)}}Author: {{display_value}}{{endif}}
{{if equal(name, “Key words”)}}Keywords: {{display_value}}{{endif}}
{{endif}}
{{endloop}}
Now when we regenerate the document from the template, we get the result that we want - just the fields that we want, in the correct order, and with the correct names.

Figure 13 - The final report.
That’s great - we can now create an up to date report simply by querying the RESTful API, then using that JSON and our template to generate a document.
Wrapping up
Moving the formatting logic to the template rather than having it in the JSON file, means that minor changes can be made by anyone that understands the document generation data model. The level of skill needed to include date-formatting and null-checking is, however, greater than that needed if the JSON file is already correctly structured.
Both options have merits, and the one discussed in this article may be an ideal way to work around roadblocks if it is not possible to modify the incoming data.
Where next?
The Apryse SDK and WebViewer are both powerful tools for generating documents from Office-based templates and JSON data. The generated files can be PDFs, or DOCX, and you’ve seen how you can apply formatting to control the result.
So, get yourself a trial license for either WebViewer or the Apryse SDK and try things out - they do far more than just generate documents. If you run into any problems, then you can reach out to us on Discord and our Solution Engineers will be happy to help.


