Generating Documents and Reports from DOCX Templates and JSON using Apryse and React
By Apryse | 2023 Oct 28

10 min
Tags
docx
report
react
Summary
Discover the comprehensive solution for document generation with React, covering everything from creating document templates using DOCX and JSON, setting up multiple-row tables and generating the final document.
Introduction
Apryse has two distinct systems for generating documents and reports from templates. In both cases the templates are Office documents, but neither method needs Office to be installed to generate the final document from the template.
The first mechanism is Fluent, and there have been several recent articles on using this versatile and powerful system which can create not just PDFs, but also other document formats, for example DOCX or PPTX or HTML – all from the same document template. Furthermore, this sophisticated system can get data from a huge range of data sources, including JSON, XML, SQLServer, OData.
The other system – SDK DocGen – is based directly on the Apryse SDK, and can be used either entirely within the browser, running as a specific process on the server side or as an entirely standalone app running on a local machine.
This system is used to create PDFs directly and requires data in a JSON format in order to populate the template.
In this article, we will look at the Apryse Document generation system. We will
- See why it is better to use Office documents than PDFs as templates
- Download sample code and see an example in action
- Examine and edit a simple template
- Set up data that will used to populate the document
- See how easy it is to generate the report, entirely on the client side using React.
Why Text Substitution in a PDF Sometimes Gives Poor Results
A quick search of the internet reveals some document generation systems that are based on using a PDF as a template, then substituting content within the PDF. There is nothing wrong with generating documents in that way if it does everything that you need. However, when used with real data it is likely that you will soon find limitations.
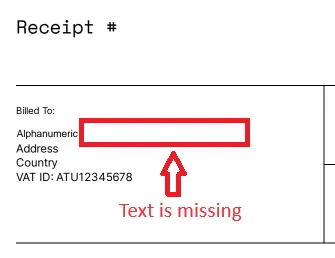
Figure 1 - A PDF created by substitution of text from a PDF template. There was not enough space, so some text is missing.
You can read more about why using PDFs as a template is problematic here.
Using DOCX files as a template solves this problem. The Apryse SDK is great at reflowing text in just the same way that Word does, making it an ideal tool for substituting text-markers in a template, and it also supports the text and paragraph formatting specified in the template. Even better, it does all of this without a dependency for Office or any other Word processing to be installed.
Seeing Document Generation in Action
Before we go any further, let’s look at a live example of document generation from a DOCX template. This can be found here. It is written in JavaScript, but the principles of document generation are language agnostic. You can choose any template, and the program will query it for the tags, and then use those to create a form that allows you to enter data, which is then used to populate the template.
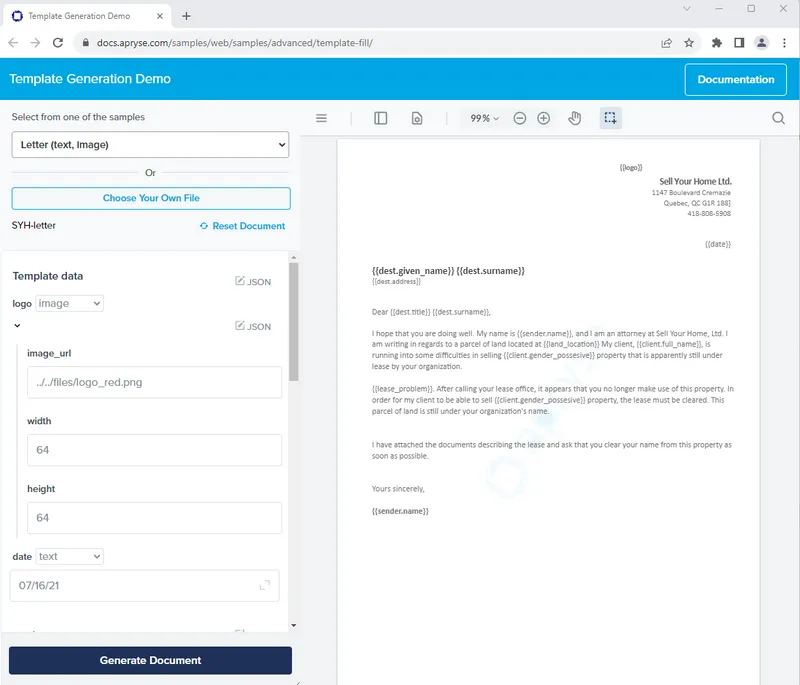
Figure 2 - The online sample showing a dynamically generated data entry area.
So let’s see how we would do this in practice.
Overview of the Document Generation Process – From DOCX to PDF
- Create a template in DOCX format. This can be done using markers (which Apryse refers to as ‘tags) to indicate where text should be located. In addition to single word replacement, tables with run-time row creation are supported as is some conditional logic. The method for creating templates is well documented, and can be performed by anyone that has an editor that understands the DOCX format.
- Gather the data that is to be used for the generated document. This does need to be in JSON format for the template filling to occur, but where you get that data from is limited only by your imagination – whether it is collected from a file, user input, a database or a RESTful API.
- Replace the tags with the real data using the Apryse WebViewer (or the Apryse SDK server side) to fill the template then display or save the resulting PDF.
In this article the code is based on the React sample. A few changes have been made can be found in the branch ‘template-fill-blog’ which you can get to here.
However, before we get to the code, we need to generate a template.
Want to learn more about report generation? See how Fluent can help.
Template Creation
The template used in this example is a Word DOCX file, although other Office formats are also supported – it can contain any formatting, and any amount of text that you want. Furthermore it can contain any number of tags that should be filled when the PDF is created. Although it is a DOCX file, it doesn’t need to be created in Word – any editor that supports that format can be used.
The easiest way to understand the template is to look at one that already exists. Let’s look at the file ‘Quote.docx” which is included in the sample data, and which we will use to create a PDF document.
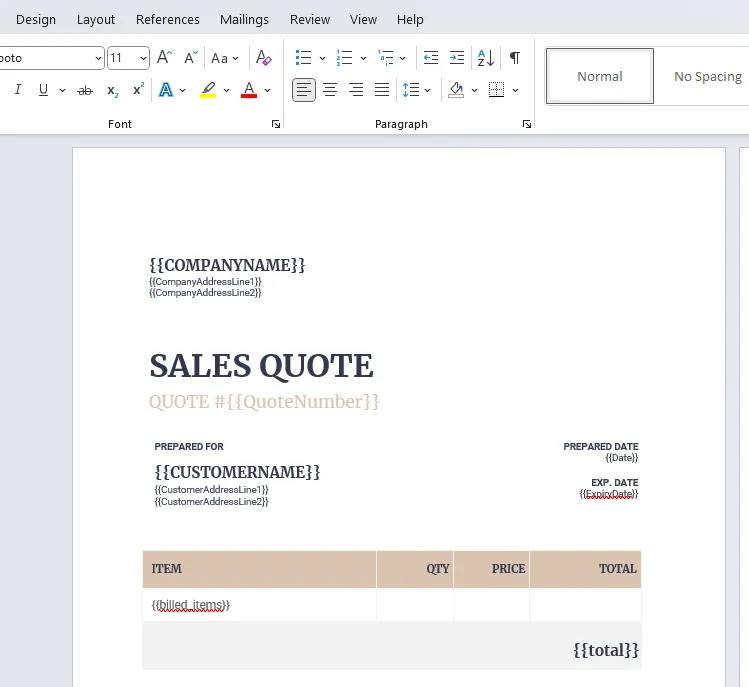
Figure 3 - Part of the report template DOCX file.
The tags typically start and end with two curly braces (sometimes known as “mustache” braces). If necessary, it is possible to use a different delimiter, (for example if pairs of braces means something else in your document). You can find out more by asking on Discord.
In the image above there are a number of tags marked, for example {{COMPANYNAME}}, {{CUSTOMERNAME}}, {{CustomerAddressLine1}} and {{CustomerAddressLine2}}.
When we run the template these will simply be substituted with values from the JSON data source that match these names.
Setting Up a Multi-row Table
While we could just use the template as it is, let's add a table to it, as that illustrates an important feature of SDK-DocGen – the ability to add multiple items to the document, when the number of items is not known when the template is created.
The initial location and format of the table is performed just as you would for any other table.
Specifying the data that should be shown in the rows of the table can be done in two ways – either within the template, or within the data.
Specifying tables within the template
This is the recommended method wherever possible, and is based in the Loops syntax.
In one of the rows add the following tags to the cells in that row:
- {{loop rows}}{{item}}
- {{item_qty}}
- {{item_price}}
- {{item_total}}{{endloop}},
and in the bottom right cell add the tag {{total}}
The {{loop}}…{{endloop}} syntax indicates that there may be multiple rows of data, the name ‘rows’ in this case is used to map where the data should come from in the JSON file, and the other tags indicate what should go into each cell within the row.
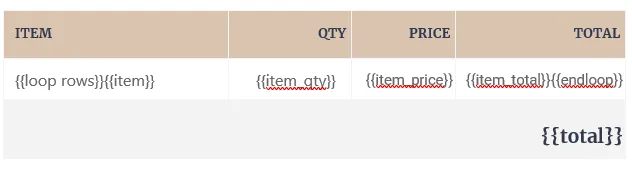
Figure 4 - A table specified with the loop syntax.
A benefit of this syntax is that the table can have cells that are not populated from the same JSON data item – perhaps from a different JSON object, or with static text. It is also easy to see in the template which tags are in which column, which is essential if you decide to change the layout of the table.
Specifying tables within the data
This method is not recommended, since it requires more complicated JSON data structure and increases the risk of generating a messed-up document. It should only be used if the template-based specification method won’t give you what you require. It is included in this article just to show the difference
In one of the rows add the tag {{billed_items}}, and in the bottom right cell add the tag {{total}}.
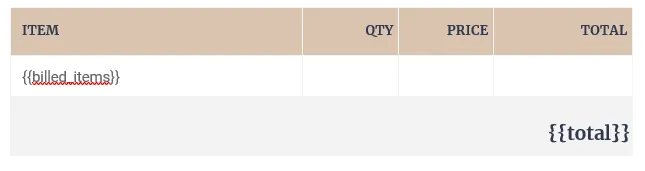
Figure 5 - An example table with tag values, where the table cells will be implied from the data.
The matching data structure would be something like
billed_items: {
      insert_rows: [
        ['Apples', '3', '$5.00', '$15.00'],
        ['Oranges', '2', '$5.00', '$10.00'],
      ],
    },
We will see in a minute how the tag replacement occurs, but in this case one row of data would be generated for each array in ‘insert_rows’ – with the data for each element placed into a separate cell. This is great when it works, but if the number of elements doesn’t match the number of columns, or the order of columns changes, or you want to have data in cells from another source then the results are likely to be confusing.
For both templates based, and data-based tables, only one row in the table needs to contain tags. We will see in a few minutes how multi-line data is stored within the JSON data object, and how that controls the generation of multiple data rows within the document generation mechanism.
Adding a New Item to the Template
Before we move on, let’s add an extra item, just to see how easy it is.
Beneath the table enter Current Bitcoin rate is {{UsdRate}} and format it in whatever way you wish.
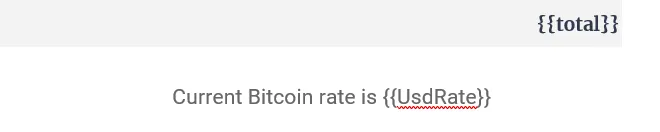
Figure 6 - Part of the template after adding a new tag.
When the document is generated, provided that data is available for this tag, then this new item will be populated. Nothing more is needed within the template.
Using Conditional Data
You can find information here about how to specify conditional tags. These allows some parts of the text to be deliberately hidden, or shown, depending on what is present in the data. Conditionals, in this case for the key cond,
- start with {{if cond}},
- end with {{endif}}
- and support {{else}}
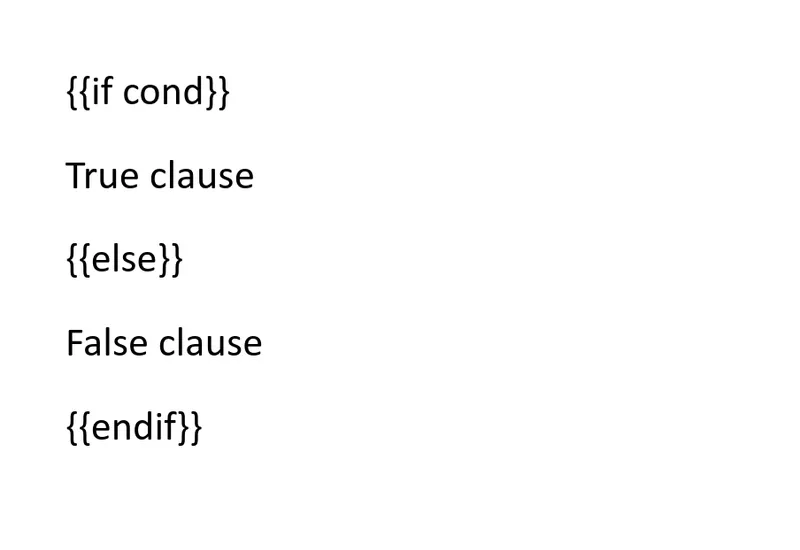
Figure 7 - A typical conditional. If cond is true the then True clause is shown, otherwise False clause is shown.
The JSON value corresponding to the condition key (cond in this example) is converted to a boolean. It is evaluated as false when either:
- The key is not present in the JSON
- The value is false, "", 0, or null
The conditional key also supports operators.
New in SDK Version 10.4 is the equal operator, which we will use in a few moments.. If you try to use equal with older versions of the SDK then you will get an error.
As a trivial example, let’s show some text if the total spent is exactly $25, and different text if it does not.
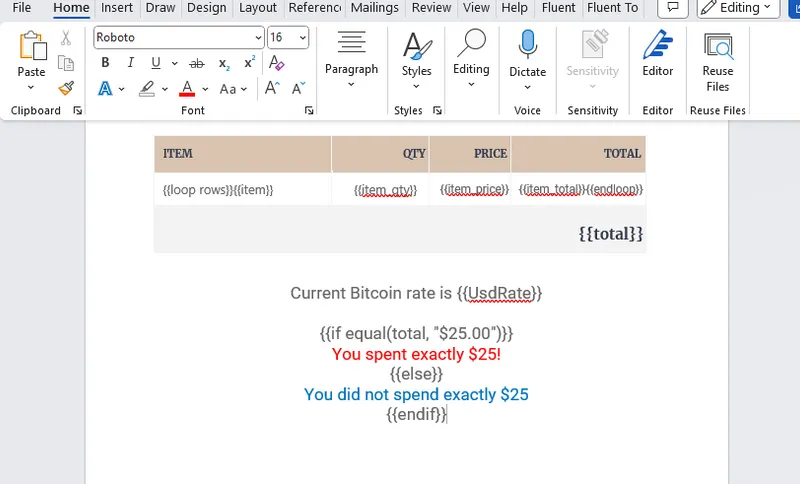
Figure 8 - The template showing the table and conditional data.
Currently the options for making comparisons is limited to just “equal’.
If you need more complex control, then this can be done by manipulating the JSON data source, for example adding a key for “More than 25” so that the message can be shown when the spend is more than a value rather than being an exact value.
OK, we will leave the template there, and next look at the data.
THE JSON data structure
The text substitution API should be supplied with a JSON dictionary, where each template tag within the template matches a key within the dictionary. The content of the JSON values can be text, images, structured input (html and markdown) or objects.
Please see here for a detailed description of the JSON file requirements.
While SDK DocGen requires that the data is in JSON format, how you generate that data is up to you. It could be hard-coded, acquired from user input, a local file, a database call or even from a web call.
For example, if we needed to show the latest BitCoin exchange rate, we could do that by adding an object to the JSON data.
let response = await fetch("https://api.coindesk.com/v1/bpi/currentprice.json")
let data = await response.json();
jsonData['UsdRate'] = data.bpi.USD.rate;
For our example though, the sample code can contain hard-coded data to populate the table and conditional text
For our simple template though, the sample code contains the following hard-coded data
const jsonData = {
COMPANYNAME: 'Apryse',
CUSTOMERNAME: 'Huw Dickens',
CompanyAddressLine1: '838 W Hastings St 5th floor',
CompanyAddressLine2: 'Vancouver, BC V6C 0A6',
CustomerAddressLine1: '123 Main Street',
CustomerAddressLine2: 'Vancouver, BC V6A 2S5',
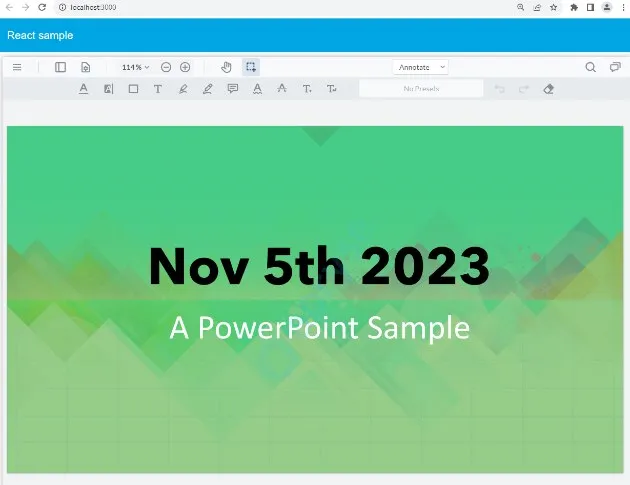
Date: {html:"<span style='color: red'><b>Nov 5th, 2023</b></span>"},
ExpiryDate: Nov 15th, 2023',
QuoteNumber: '134',
WEBSITE: 'www.apryse.com',
rows: [{'item':'Apples','item_qty':'3','item_price':'$5.00','item_total':'$15.00'},
{'item':'Oranges','item_qty':'2','item_price':'$5.00','item_total': '$10.00'}],
days: '30',
total: '$25.00',
}; Most of the layout is self-explanatory, but let’s look at two specific areas:
Handling Rows in the Document
The recommended method, of specifying cell tags in the template uses the data from rows. This is followed by an array that contains an object for the values that should be placed into a single row.
The alternative ‘insert_rows’ method, which is not used in this example, is described earlier in this article.
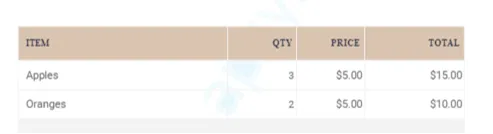
Figure 9 - Part of the final report - showing how the multi-line table was generated.
Controlling Style from the Data – Structured Input
While most of the data is just text, the date is specified as html.
Date: {html:"<span style='color: red'><b>Oct 5th, 2023</b></span>"}, This is an example of how the formatting of the document can be controlled from the data using html or markdown.
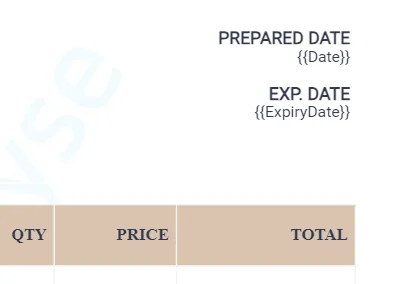
Figure 10 - Part of the template showing two tags - for Date and Expiry Date.
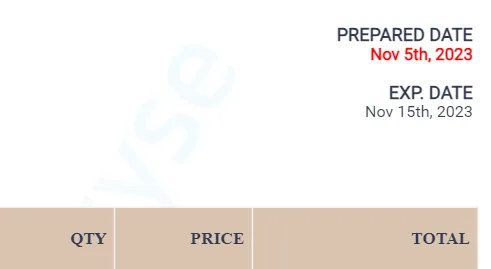
Figure 11 - the same part of the document after it has been populated with data. The Date is now in red as the JSON specified that it should be in red and bold. The Expiry Date is in black as the JSON just specified it as text, so the formatting was controlled by the template..
This mechanism is well suited to altering the look of the document via the data – with the ability to add paragraphs, headings, and styling.
Generating the Final Document
Everything that we have seen so far – template generation and JSON format - is platform-independent, and the results will be the same whether the actual conversion occurs within the browser or server side.
The actual process of document generation does have minor, platform specific, variations, however. With document generation supported on UWP, Android, Linux, macOS and Windows, as well as the Web, there are many opportunities for you to use this technology. Please check out the documentation for the specific language that SDK-DocGen supports.
This article is primarily about generating documents in the browser using JavaScript and React, and in this case the actual document generation requires nothing more than calling ‘applyTemplateValues’ and passing in the JSON data.
//populate the PDF by filling the template place holders with data
    doc.applyTemplateValues(jsonData);
The Apryse SDK-DocGen system then replaces each of the tags in the template with data from the JSON object wherever possible, including iterating through tables, and produces a PDF.
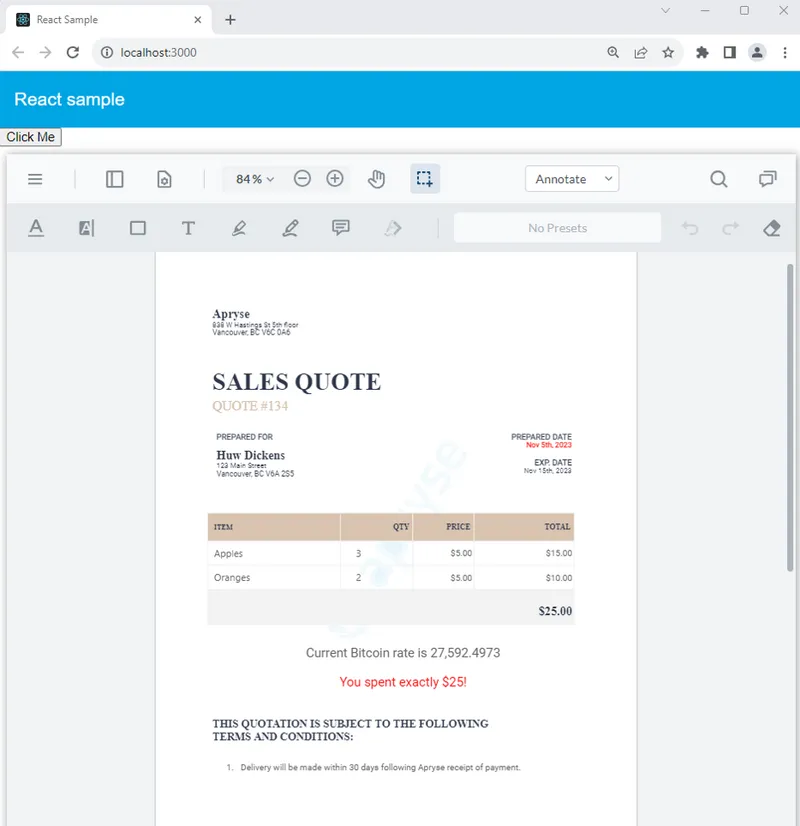
Figure 12 - The generated document.
It really is that simple. One line of code takes the template, merges it with the JSON data, and creates a document.
In the sample code, filling the template is done in the handler for a button click event. However, the ‘Click Me’ button that has been added solely so that you can see the document before and after the data is inserted. In practice you would likely apply the template values as part of the document opening process, rather than as an explicit step.
Beyond DOCX – Support other file type
The SDK DocGen mechanism always creates a PDF, and it is extremely good at doing that.
While the most commonly used template format is DOCX, the system also works with PowerPoint and Excel files, including the old style DOC, XLS and PPT file types.
In each case the tags that are to be substituted are marked in exactly the same way.
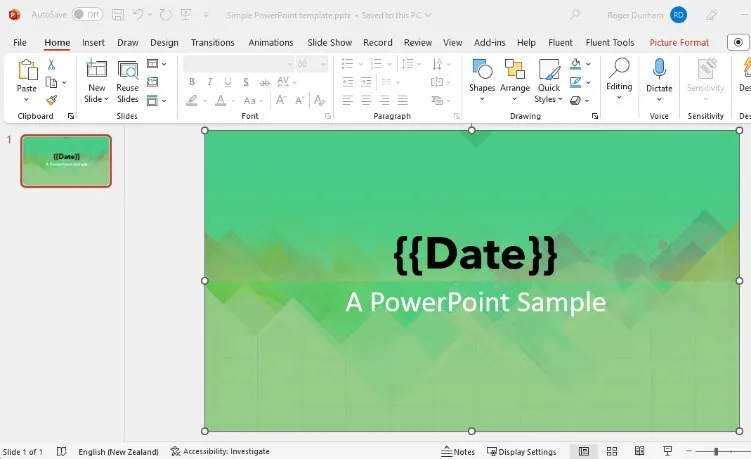
Figure 13 - A PowerPoint template, and the resulting PDF.

When Should Apryse SDK-DocGen be Used?
This system is great where the data source is JSON (or can easily be converted into JSON), the required document format is PDF, and its structure is relatively straightforward. This mechanism is also a great solution for use with Appian or Salesforce – with no external libraries being required.
One of the disadvantages of this system, however, is that a change in the data source will probably require help from a developer. For example the data source for a RESTful API might change, or the structure of data coming from a reporting system might need to be updated. In the case of Structured Input (formatting via html and markdown), if the formatting needs to be modified then that would likely also need developer help. As such, if your data source or complex formatting is likely to change then Apryse Fluent may be a better fit.
Similarly, in any situation where your use-case isn’t supported (such as requiring complex conditional formatting, charts then Apryse Fluent will be able to take you much further. Currently DocGen only supports generation of PDFs, but direct creation of Word (DOCX) documents will be available soon.
Conclusion
We have seen how we can create templates in a familiar environment that can support text of initially unknown length by behaving like Word documents – adjusting the layout of the document to work around the text. We have also seen how we can add logic to the template so that some parts of the document are only shown if some data condition is true.
And we have seen how this can all be done in the browser without the need for Office to be installed. Furthermore, if you want to extend the document generation in some way – perhaps developing a desktop app, or providing server-side processing, then the information that is included in this article is a great basis for taking those next steps.
When you are ready to get started, see the documentation for the SDK to help you to get up to speed quickly. Don’t forget, you can also reach out to us on Discord if you have any issues.
Tags
docx
report
react

Apryse
Share this post


