Roger Dunham
Published May 16, 2025
Updated May 18, 2026
6 min
How to Implement Translating a PDF into a Different Language
Roger Dunham
Summary: This guide explores different methods for translating PDF documents, from basic text extraction to full-document translation with layout preservation. It focuses on using the Apryse SDK with XLIFF files for high-fidelity multilingual document creation, ensuring that translated PDFs maintain the same visual structure as the original. A step-by-step implementation in C# is included, along with insights into integrating external translation services.
Introduction
PDFs are widely used for sharing information but translating them can seem tricky, especially if you want to retain the “look and feel” of the document.
In this article we will look at how you can translate the text content using online tools, and also see how you can get a much better result using XLIFF – a format supported by the Apryse SDK since v11.4.
Apryse doesn’t offer translation directly–instead that is done externally, either using an online computer-based service (CAT or Computer-assisted translation), or a human-based one (where skilled people manually translate the content), or a mixture of both.
What Apryse offers is the ability to map the translated text back into the PDF structure to give a document that looks like the original, only with different text. We’ll see an example of that in a moment.
Converting the content of a PDF
There are several ways that you can translate the content of the document. Let’s at those in turn.
Option 1 – Text only translation
The most basic way to convert the content of a PDF is to extract the text and drop it into Google Translate or another online translation service and then do something with the result.
Text extraction can be performed programmatically or (often) by dragging a mouse over the PDF and copying it to the clipboard and then pasting it into the translation service (or sending it to the Web API).
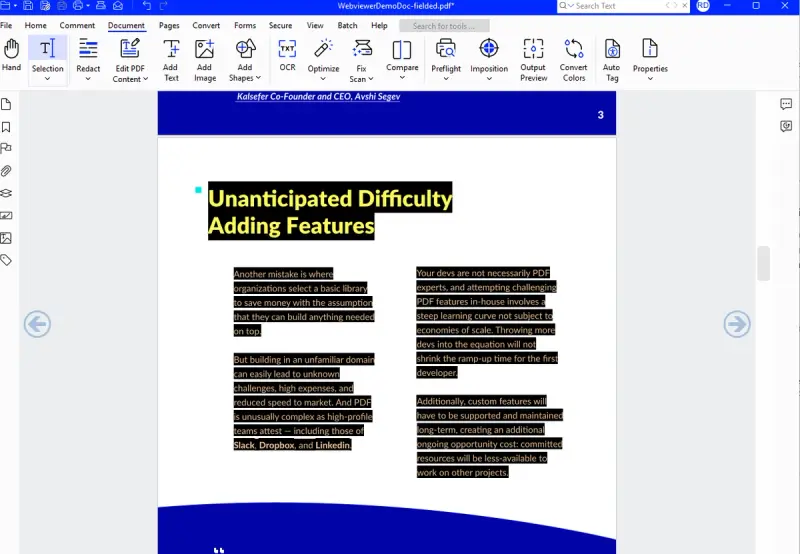
Figure 1 - You can manually select the text in a PDF and copy it to the clipboard.
The service will then perform the translation and return the translated text.
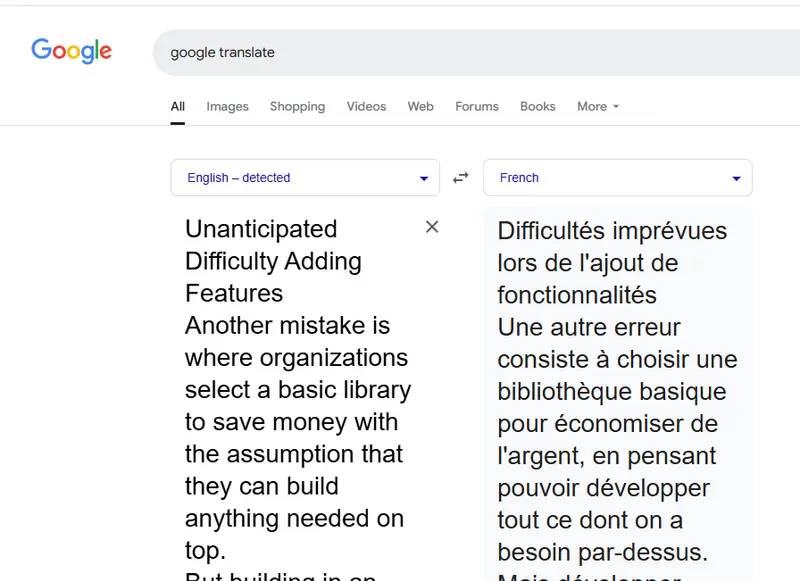
Figure 2 - The text pasted into Google Translate and the resulting translation.
What you do with the translated text is up to you. You could, for example, use it to create a new document.
While that will work, the layout of the document will be lost. The first sentence in the original text was a heading, but now it is just “text”. You could edit the new document to fix that but it would be tedious and error prone. There must be a better way.
Option 2 – Document translation with Google Translate
Google translate, offers more than just the ability to translate pasted text - you can upload an entire document.
As an example, let’s look at a PDF that you can find on the Apryse Showcase page.
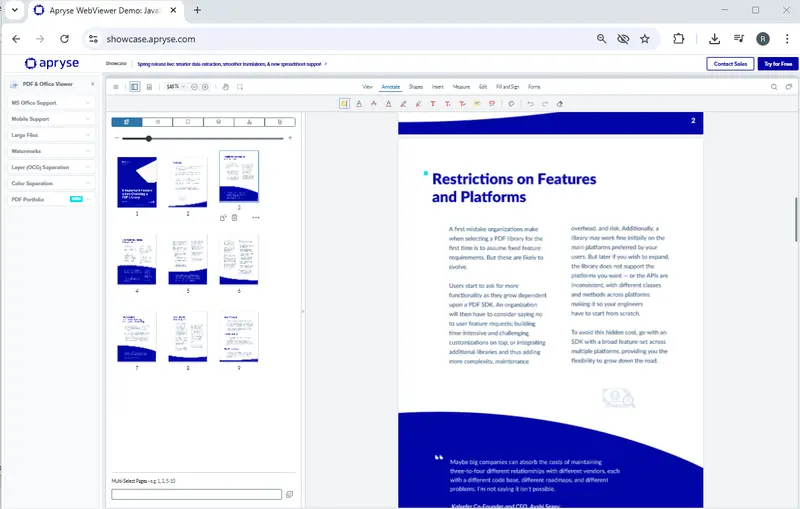
Figure 3 - The sample document, shown in WebViewer Showcase.
It’s a nine-page document and is exactly the type of document that might be designed to match a corporate brand.
It’s been carefully designed to be visually appealing with areas of white text on flowing blue backgrounds, various titles, columns and specific fonts.
If we upload the entire document to Google Translate, then after a few moments, a new PDF will be created that contains the translated text.
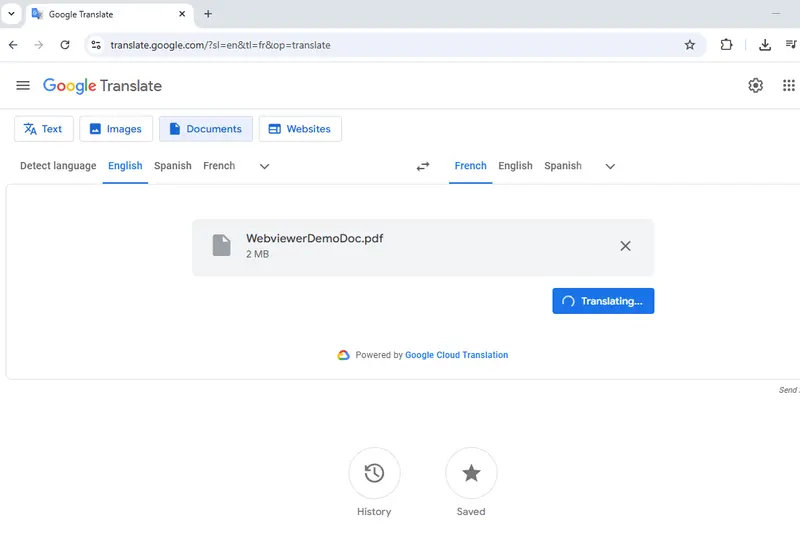
Figure 4- Translating the document using Google Translate.
At first sight, this may look like a great and simple result – the general layout has been retained.
However, if we look more carefully, then things are not the same as in the original – and details can be important.
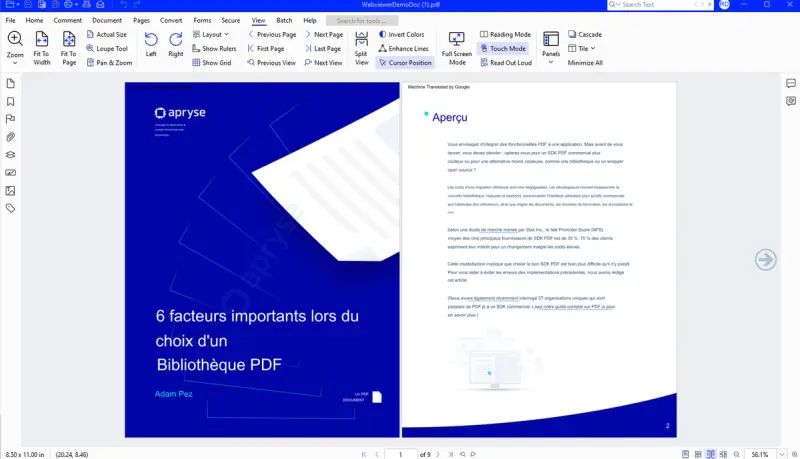
Figure 5 - The PDF after automated translation by Google Translate.
Let’s look at page 4 in the original document – there’s a heading that uses the font Lato-Black, with two lines of text of the same size. In addition, there are two columns of text that look visually different from the heading.
It’s also worth noting that the heading extends beyond the center of the page and about a third of the way over the second column.
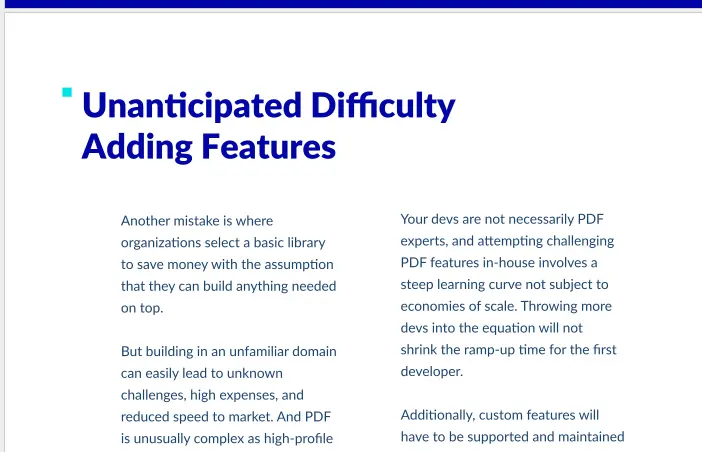
Figure 6 - A small part of the original file. Note that the title is Lato Bold and is laid out so that it extends over the second column of text.
However, in the PDF created by Google the title is an entirely different looking font (Arial MT). Worse still, each line is a different size.
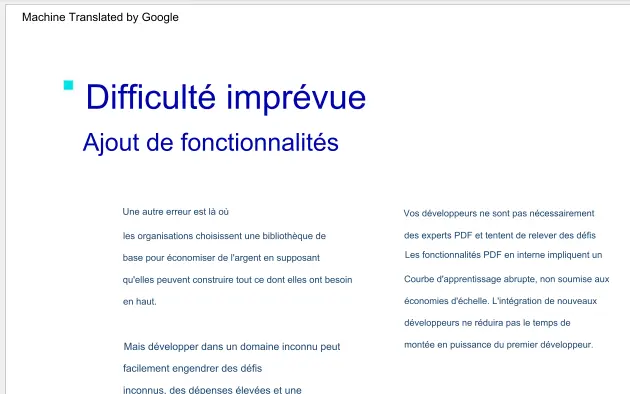
Figure 7 - The same part of the PDF in the document translated by Google.
Somehow the document no longer has the same “look”.
Maybe that matters, maybe it doesn’t.
Maybe “near enough is good enough”.
But what if you want better than “good enough”?
Let’s look at what Apryse can offer, because it does do “better”.
Option 3 – Translation using Apryse and XLIFF
In a moment we will see how to implement translation using XLIFF, but first let’s look at the result of doing so.
Note that the text translation is different from that provided by Google. That’s not unusual. There are many different translation services avaialble, and the accuracy and readability of the translated text differs from one to another.
What matters here, though, is the layout.

Figure 8 - The PDF after using XLIFF based conversion, with greater fidelity of appearance.
The resulting PDF has the same “look and feel” as the original PDF – the heading is bold and the same size and extends about one third of the way over the second column.
That’s awesome!
What is an XLIFF file?
Before we go further, we need to understand what an XLIFF file is, since that is the central part of the process.
The XLIFF format is a human-readable XML-based file. At the file's beginning is metadata including the source and target languages. That is followed by a number of “Trans-Unit” tags which hold the text to be translated.
These tags relate to sentences or paragraphs of text in both the source language and, after translation, also the target language.

Figure 9 - A small part of an XLIFF file, showing both the source and target text for, in this case, a heading.
The intention is that the file format is translation service agnostic.
While the actual translation may differ whether you use DeepL or Smartcat or any of the other available Computer Assisted Translation services (or even translate the text manually) – the structure of the file is the same.
What’s more, being text based, it is easy to edit – you could use one of the online XLIFF editors, or a dedicated desktop app, or even just a text editor. Manual editing isn’t unusual – you might want to change an automated translation to be an idiom, or simply to have a better cadence as you read it.
As an example, let’s change the title from Figure 8 to be the same as that created by Google.

Figure 10 - The XLIFF file after manual modification.
We can now save that file and if we run the TransPDF (which we will learn about in a moment) process again, then now we will see the new text in the resulting document.
While the text has changed, the look and feel of the document stays the same.
Figure 11 - The PDF after manually modifying the XLIFF file to use the heading that Google Translate used.
Once again, the look and feel has been retained – a much better result than the Google Translate version – but using the same text. Apryse is giving a better outcome.
Sometimes if the translated text has a different length from the original then the font size may be adjusted so that the text still fits in the same space. This is deliberate so that if, for example, you had a table, then longer text wouldn’t bleed from one cell into another.
If you want to edit the text size in the generated PDF, then that’s easy to do within Apryse WebViewer.
You can check this out using https://showcase.apryse.com/pdf-editing.
Implementing XLIFF translations
So far, we have seen the results of using XLIFF based translation. Let’s now look at how to implement this. I’m going to use C#, but the same functionality is available in many other languages and frameworks, including Java, C++, and NodeJS.
The code I’m using is based on the Document Translation Reflow sample, which is one of the many code samples to help you get started with the Apryse SDK. For this article, though, I have broken the code into separate steps.
I won’t go through how to download the SDK – you can find out how to do that if you don’t already know using the Apryse “Get Started” documentation.
Step 1 – Get a trial license key
You will need a license key in order to use the Apryse SDK. It’s free to get a trial license key.
Step 2 – Initialize the SDK
Before you can use the Apryse SDK, you need to initialize PDFNet, passing in your license key.
PDFNet.Initialize(“[Your license key]”);Step 3 – Extract the XLIFF file
Next open a PDFdoc object (which can be created from a path, a byte array, or a stream) and call TransPDF.ExtractXLIF.
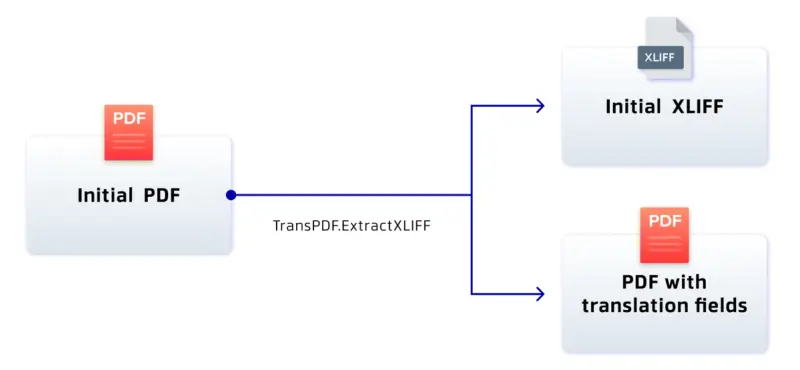
Figure 12 – The function translation.ExtractXLIFF has two outputs – an XLIFF file and a PDF that has translation fields.
This function does two things. It generates an XLIFF file from the content of the document, and it prepares the document for having translations applied by adding field markers that indicate where the text should go.
If you are not going to apply the translations immediately then you need to save this intermediate file.
Step 4 – Translate the content of the XLIFF file using an external service
Apryse doesn’t offer translation services itself, but you can now send the XLIFF file to an external service such as DeepL, Smartcat or Language I/O, or many others for machine or in-person translation.
As a proof of concept, you could do this by hand, but you could also automate this and programmatically send the generated XLIFF file to a translation service Web API.
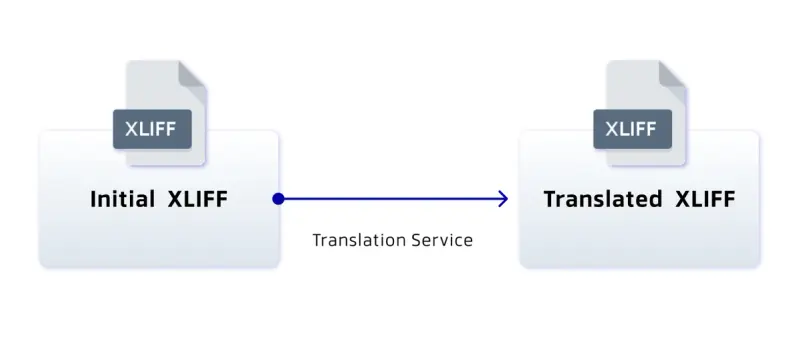
Figure 13 - The actual translation is performed by an external service.
Note that the Document Translation Reflow sample uses a prebuilt XLIFF file so that there is no need to send the XLIFF file to an external provider.
Once translation is complete, the XLIFF file will be returned with the ‘Target” fields populated as we saw earlier.
Step 5 – Apply the translated XLIFF file
The translated XLIFF file can then be applied to the intermediate PDFDoc using TransPDF.ApplyXLIFF(doc, xliff_file);
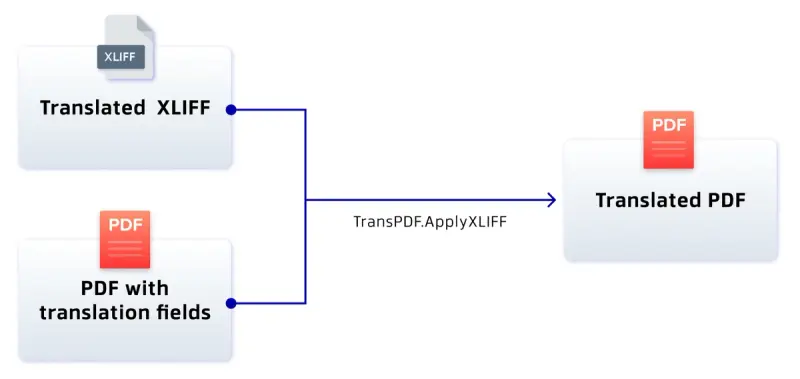
Figure 14 - Combing the XLIFF file with the prepared PDF to create the Translated PDF.
If the PDFDoc from step 3 is still in scope, then that can be used. If not, then a new PDFDoc can be created from the intermediate file that was saved in step 3.
Applying the XLIFF file is resource intensive and may take several seconds.
All that remains is to save the final file.
Step 6 – Tidy up resources
The final step is to terminate the SDK so that resources can be freed.
PDFNet.Terminate();What about options?
While you can run TransPDF without specifying options, it is also possible to pass in a TransPDFOptions object. This exposes three options:
- BatchSize (default of 20 pages). This affects how many pages will be handled at a time. As the number increases the amount of memory required will also increase.
- Pages (default is all). This is a string that specifies the pages that should be translated. For example, “1,3-5” would translate page 1, 3, 4, and 5 of the document.
- SourceLanguage (default is “en”). This specifies the language of the source document within the XLIFF file.
Where next?
Support for Computer Assisted Translation using XLIFF is the latest in a long line of functionality that Apryse offers. And just like many others, it is a breeze to implement–with almost no code needed to generate the new localized document.
In this article we performed only a single translation (from English to French). In practice you might want to convert the PDF into many different languages–and that is easy to do. You just need to use the source XLIFF file and create a new “translated” XLIFF file for each target language. Each one could then be applied to the intermediate document to create a complete set of documents, one for each required language, with all of them having the same look and feel as the original document.
The Apryse SDK offers much more than just translation though. It’s also easy to set up page manipulation, document generation, redaction, and conversion to and from Office file formats, to name just a fragment of what is available.
So why not check out the other tools that we have and see how a single vendor can help you in many different ways?
There’s a wealth of documentation for the SDK to get you started quickly, and if you have any questions then reach out to us on Discord.