Apryse
Published September 08, 2023
Updated July 08, 2025
6 min
Understanding the Options Available When Converting an Office Document to PDF.
Apryse

Introduction
In a previous blog, we have shown how easy it is to convert a Word (or other Office document) to a PDF using the Apryse SDK, even without the need for Office, or any other Word Processing Application to be installed.
Typically, this can be done with just two or three lines of code, and the result is great.
However, it is possible to tailor how the conversion occurs, and in this article, we will dive a little deeper into some of the options that are available.
Sample Project for Converting a Document to PDF
The team at Apryse have created some great samples for showing off the power of the SDK. This article is based, somewhat loosely, on the 64-bitC# OfficeToPDFsamples for.Net Core that can be downloaded here, however the options described here are also available for the other languages supported by the Apryse SDK.
The initial code for FlexibleConvert illustrates how you can specify the options using the OfficeToPDFOptions object.
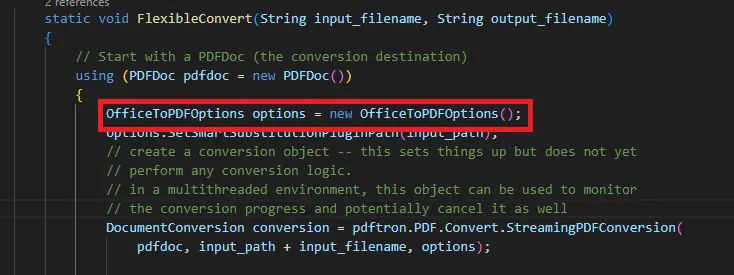
Figure 1 - A snippet of the FlexibleConvert method, indicating the OfficeToPDFOptions object.
The documentation for these options can be found HERE
Some of these options relate just to conversions from Excel whereas others apply to conversions from all Office document formats.
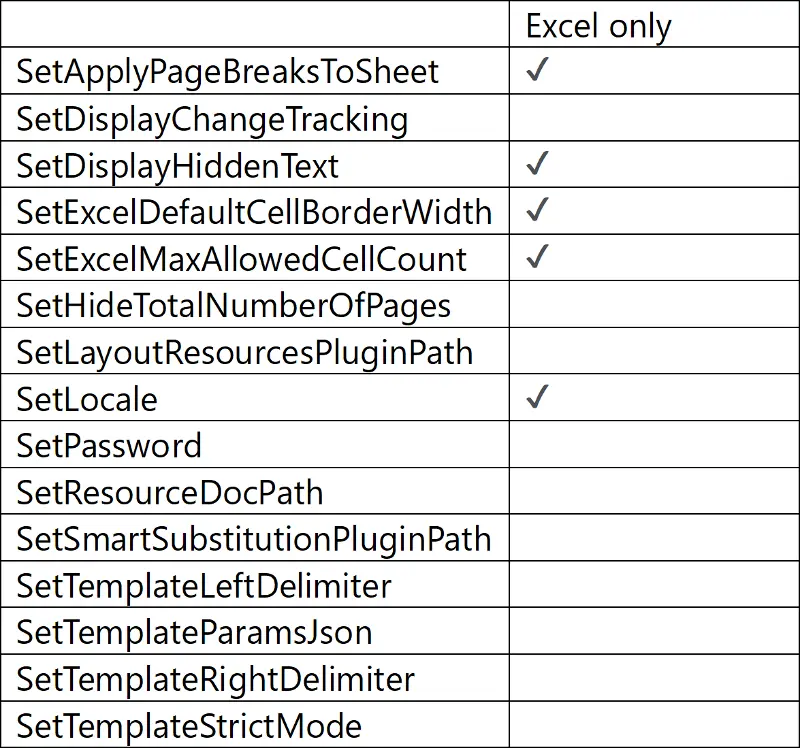
Table 1 - The various options that are available.
Excel Specific Options
SetApplyPageBreaksToSheet(bool)
This option controls the behavior of what to do if you have a large spreadsheet that contains so many columns that it will not fit on a single page.
The Excel worksheet is either split into separate pages so that the output resembles print output, or alternatively an attempt should be made to fit the entire sheet onto a single page – typically by making the page size larger and the font size smaller.
In some cases, though, the spreadsheet is so large that the page size would be greater than that allowed within a PDF, so some splitting will still occur, but this will be minimized.
In the following example we will use this spreadsheet that contains many columns and rows of data.
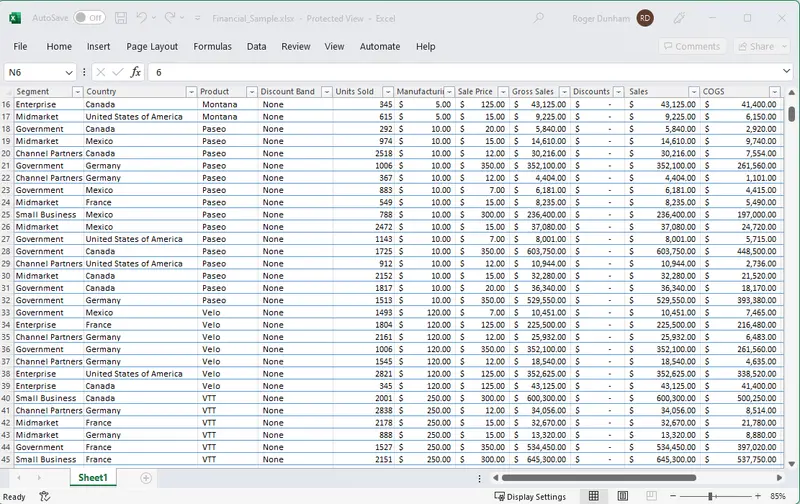
Figure 2 - The original spreadsheet which we want to convert to a PDF. You can see from the scrollbars that there is a lot of data.
The default option is to try to use a single sheet. In this case all the columns of data can be fitted onto the width of the page, but the rows need to be split over four pages to avoid a page being too long.
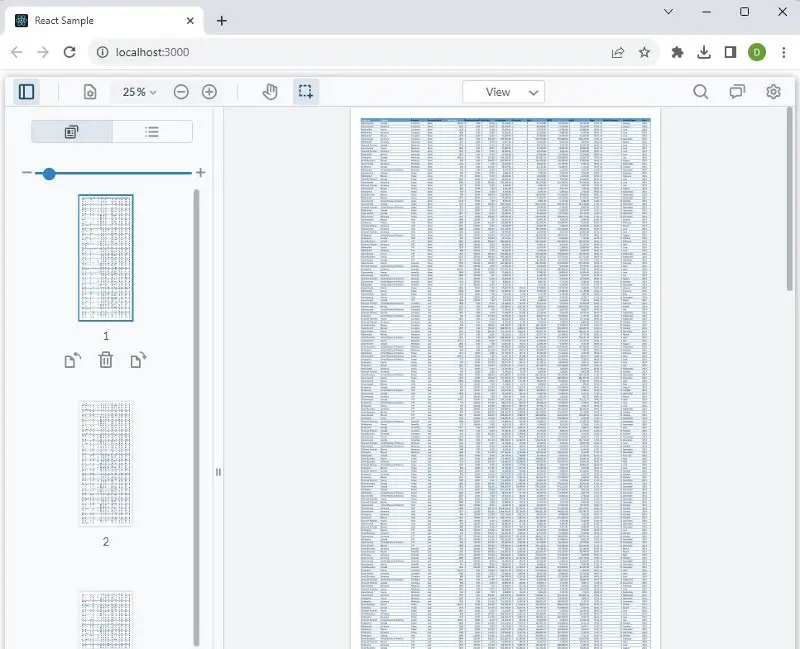
Figure 3 - Result of converting the file with ApplyPageBreaksToSheet set to false (the default). The page size of the PDF has been increased, and the font size reduced so that more data fits onto a page. However, as there is a limit to the length of a page, it then becomes necessary to create additional pages.
On the other hand, if we use ApplyPageBreaksToSheet=true for the conversion, then a 45-page PDF is created, with several separate sheets needed to contain all the columns.
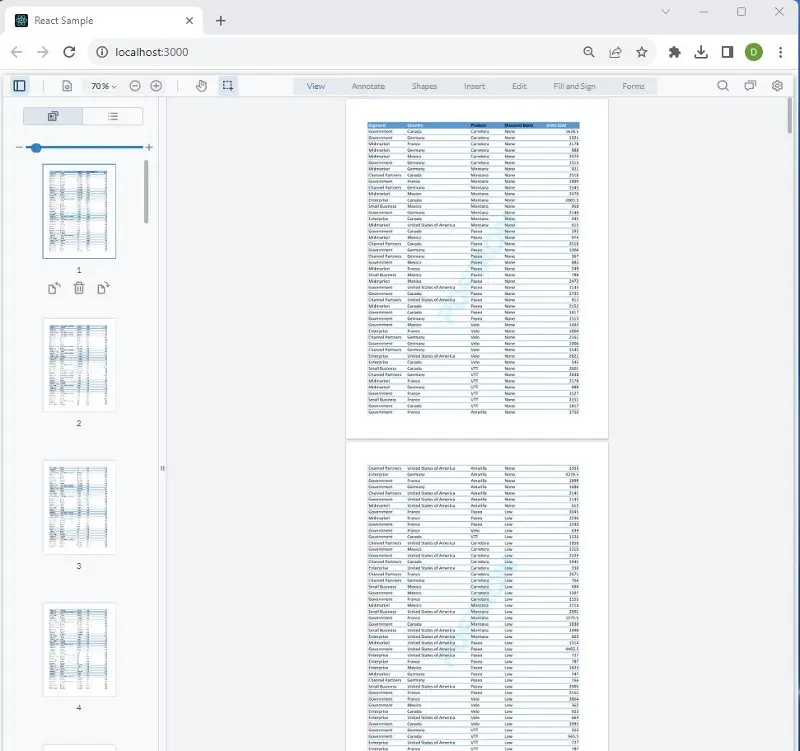
Figure 4 - Result of converting the file with ApplyPageBreaksToSheet set to true. This option gives the same result as if the document had been physically printed.
SetExcelDefaultCellBorderWidth
This option can be used to add a cell border around cells to make them look as if they are in a table. In Excel you would do that by showing the cell boundaries, but if that hasn’t been done, then the boundaries can be added at the conversion stage.

Figure 5 - The original spreadsheet.

Figure 6 - The default result when converting the spreadsheet to PDF. No cell borders are shown, which matches the source spreadsheet.
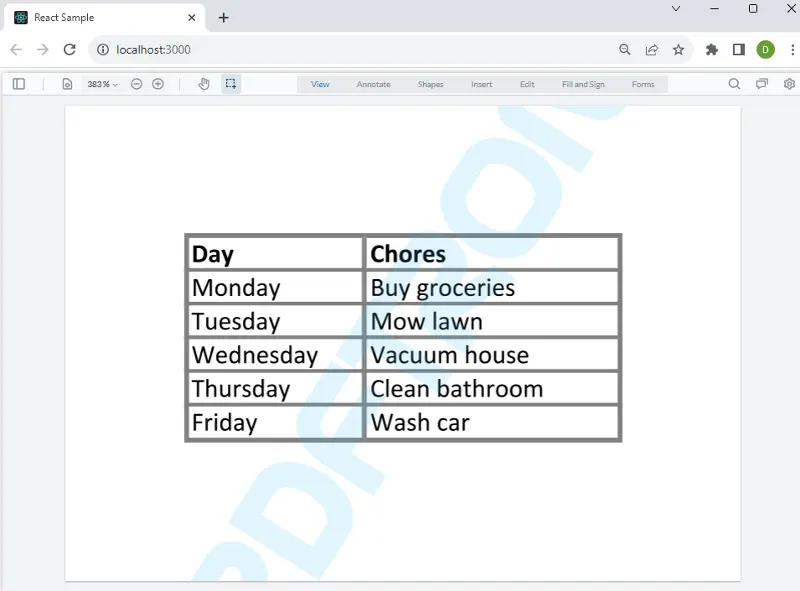
Figure 7–The result when converting the spreadsheet to PDF with ExcelDefaultCellBorderWidth set to 2 pixels. The data is now shown within a table.
SetLocale
This is a great option if you need to create PDFs for a locale that differs from the one where you are based.
The format of dates and numbers differs from country to country, and Excel will show those formats based on your regional settings. This means that the same spreadsheet will look different in different countries, which is generally exactly what people want.
PDFs on the other hand, do not do this. They appear the same to everyone, irrespective of the reader’s locale.
Setting the locale for a conversion will result in dates and numbers being displayed within the generated PDF in the way that is expected for the target locale.
That all sounds a bit complicated, so let’s look at an example.
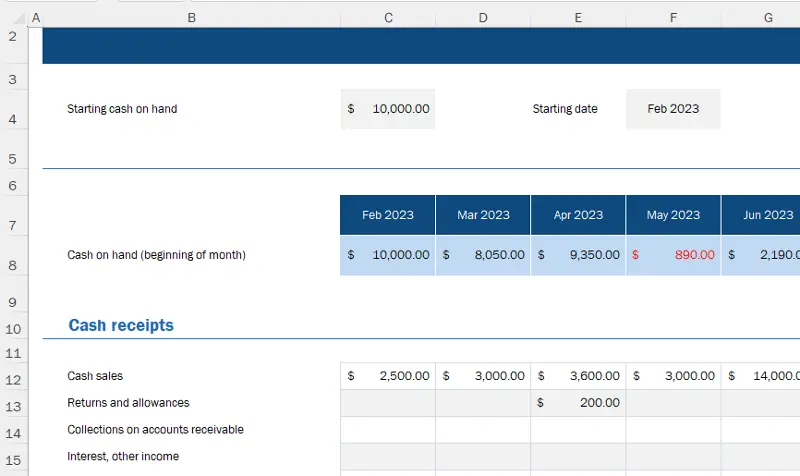
Figure 8 - The original Excel spreadsheet, shown with US date and number formats.
If we start with a spreadsheet in the US, then typically numbers will use a comma as a thousand separator, and a period as a decimal point. As such the value for exactly ten thousand is written as “10,000.00”.
And when we convert the spreadsheet without specifying the locale, the result will look the same.
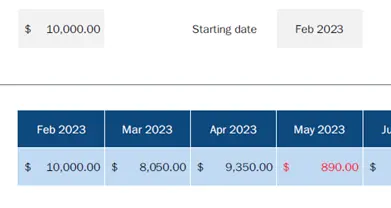
Figure 9 - Part of the PDF created from the spreadsheet, with locale unspecified. The numbers and dates are the same as in the spreadsheet.
So, if converted in the US, then the PDF will show the value as “10,000.00”.
However, in France, numbers are displayed in a different way. If we convert the same spreadsheet to a PDF specifying the locale as French, then the value for ten thousand is displayed as “10 000,00”. The format of dates will also be updated.
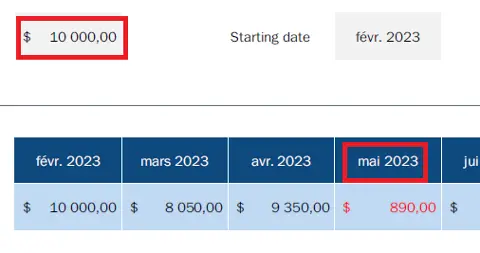
Figure 10 - The PDF when converted to a 'fr-FR' locale. Note how the thousand separator has become a space, the decimal point has become a comma, and the date format has also changed.
Similarly, if the file is converted to a PDF with a German local then the value is displayed differently again as “10.000,00”.
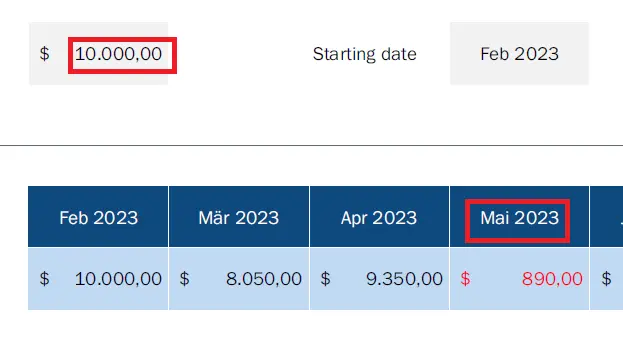
Figure 11 –The PDF when converted with a 'de-DE' locale. In this case the thousand separator has become a period, the decimal separator has become a comma, and again the date format has changed.
All the results are correct and would make sense to the reader based in the country for which the PDFs were created.
SetExcelMaxAllowedCellCount
The maximum size for an Excel spreadsheet is 1,048,576 rows by 16,384 columns, or about 17 billion cells. And there can be many sheets in a workbook.
As such, there is potential for a spreadsheet conversion to use very large amounts of memory or be very slow. If you are running a website where users upload spreadsheets to be converted, then this could be a significant issue and could potentially be used as a mechanism for a Denial-of-Service attack.
By setting a maximum allowable cell count, the conversion will fail quickly with an error.
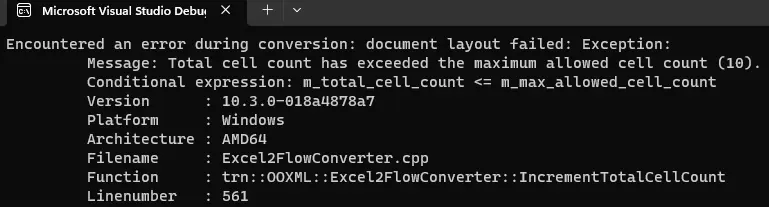
Figure 12 - Typical output if an attempt is made to convert a spreadsheet that contains more cells than has been specified as a limit.
Setting this value to 250000 will allow the vast majority of Excel documents to convert without issue, while keeping RAM usage to a reasonable level.
Options available for all Documents
SetDisplayHiddenText
In a Word document it is possible to hide text by using Ctrl Shift H.
For example, in the following document there is hidden text after the second paragraph.
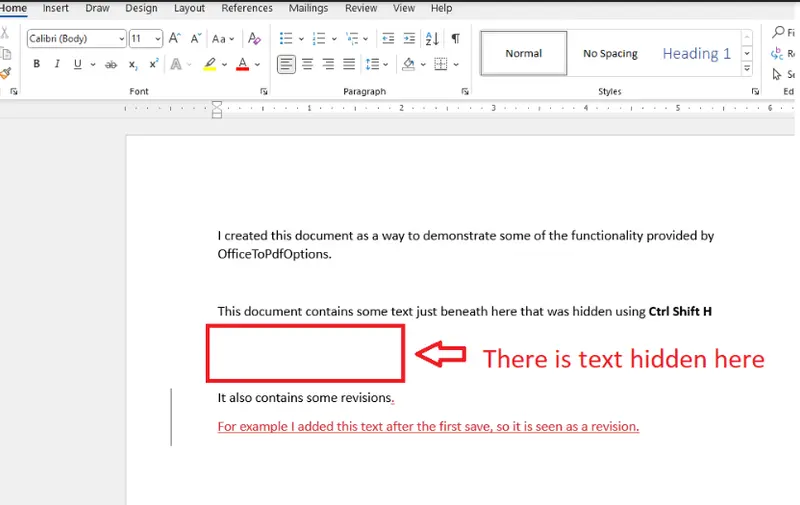
Figure 13- A Word document with text that has been hidden.
Very often, what you will want when converting a Word document to a PDF is for it to look like the Document, and therefore that is the default behavior – the hidden text is not shown.

Figure 14–The PDF after creation from the Word document. The hidden text is not shown (default value).
If you do want to see the hidden text, then one option is to make it visible using Word, but that requires Office to be installed. One of the great things about the ApryseOfficeToPDF technology is that there is no need for Office to be installed.
Fortunately, the hidden text can also be shown simply by converting with the optionSetDisplayHiddenText=true.
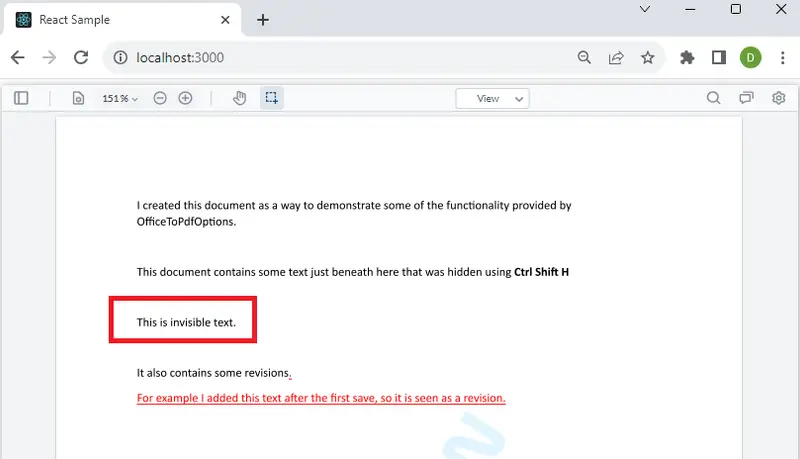
Figure 15–PDF with the hidden text now visible as a result ofSetDisplayHiddenText=true.
SetDisplayChangeTracking
Another great feature of Word is that it allows changes to be marked up, allowing reviewers to see what has been modified.

Figure 16 - A Word document that contains changes that are being tracked.
When this is converted to a PDF, the default behavior is, as with hidden text, for the output to look the same as the Word document.
Figure 17 - Revised text that was in the Word document is still shown as a revision when converting with the default option.
However, if SetDisplayChangeTracking is set to false then the revisions are brought into the document as if they have been accepted.
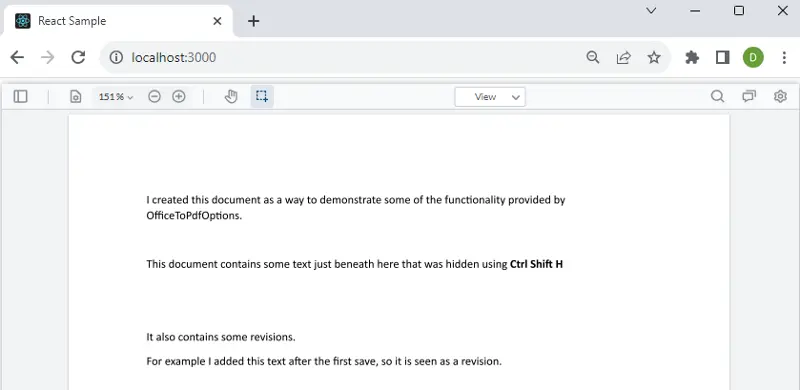
Figure 18 - The tracked changes are no longer obvious as a result of SetDisplayChangeTracking=true.
SetPassword
Office documents have supported encryption with a password for many years. If an attempt is made to convert an encrypted document, then an exception will occur.
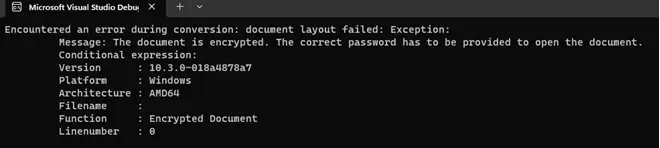
Figure 19 - Typical error output if an attempt is made to convert a password protected Office document.
The SetPassword option allows a password to be used during the conversion process to unencrypt the document and generate a PDF from it. This has the benefit that the document does not need to have the password removed before it can be converted to a PDF.
Note: the generated PDF will not be automatically password protected, and a few extra simple lines of code will be needed to implement a password on the PDF.
SetHideTotalNumberOfPages(bool)
If the document has an element that displays the total number of pages and the total number of pages is unknown beforehand, remove those elements from the document.
Templating Options
The Apryse SDK allows the generation of templates from Word documents that can then be used for automatic creation of multiple PDFs with data entered from, for example, a database.
The options:
- SetTemplateLeftDelimiter
- SetTemplateParamsJson
- SetTemplateRightDelimiter
- SetTemplateStrictMode
are used to control this process.
Template generation and use is beyond the scope of this article, but further information can be found HERE.
Other Options
The three remaining options:
- GetResourceDocPath
- GetSmartSubstitutionPluginPath
- SetLayoutResourcesPluginPath
are unlikely to need to be modified from the default values. They are mentioned here just for completeness. They relate to specifying the location of data for creating PDFs on machines that have a limited selection of fonts available.
Conclusion
The Apryse SDK allows easy creation of PDFs from Office documents, with the default values usually giving a great result. There may, however, be occasional use cases where more control is required, and this can be achieved using the OfficeToPDFOptions object.
In addition to converting Office documents to PDF, Apryse offers many tools for editing and handling both Office Documents and PDFs, including converting PDFs into Office documents.
When you are ready to get started, see the documentation for the SDK to get started quickly. Don’t forget, you can also reach out to us on Discord if you have any issues.


