Roger Dunham
Updated January 28, 2026
9 min
Deep Dive into Custom Digital Signatures – Part 1 – Digital Certificates
Roger Dunham

Summary: Learn how digital signatures and certification enhance document integrity and authenticity. Create secure PDF signing certificates using our comprehensive SDK.
Introduction
PDFs are everywhere, used for documentation, invoices, contracts and many, many other things. In this article we will look at how a PDF can be “signed”.
Historically contracts were signed with ink (a “wet signature”), and a similar appearance can still be added to a digital PDF – often done by using an image of a signature.
It is, however, very easy to add an image of someone else’s signature to a PDF – but that doesn’t mean that they signed (or even knew about) the document – so there is a clear risk of fraud if precautions are not taken.

Figure 1 - Just because the PDF contains the image of a signature doesn't mean that person signed it – in this case it was ChatGPT.
Furthermore, even if the PDF is signed by the correct person, there is the possibility that the content of the contract could be changed after it was signed.
So how can you prove that the signature was added by the correct person, and that the document was not changed after it was signed?
That is where Digital Signatures come in - providing a secure, verifiable, and tamper-proof way to ensure the authenticity and integrity of documents. Cryptographic technology is used to link the signer’s identity to the document using a digital certificate, and to confirm that the document has not been altered after signing.
This might all sound very complicated, and under the hood it is – but Apryse have done the hard work for you, meaning that you can implement digital signatures with just a few lines of code.
This is the first of a series of articles that will deep dive into working with Custom Digital Signatures. In this article we will see what a certificate is and how you can create one that can be used to sign a PDF.
In the next article we will look at how to implement a custom digital signature solution using that certificate.
In future articles we will see how to validate the digital signature and then go on to how to use a certificate held in an Azure key vault, or on a YubiKey, but for now everything can be done on a desktop computer.
A Quick Overview of Certificates and Keys
There are three parts to creating a digital signature.
- A private key – which should only be known to the person (or organization) that is signing the document.
- A public key – which needs to be shared with anyone reading the document.
- A certificate – that contains information about who the signer is.
Clever people worked out that with asymmetric encryption, you could encrypt data using the private key and only decrypt it with the public key (you can also encode it with the public key, in which case it can only be decrypted with the private key).
In practice the person signing the document uses the private key, and the certificate (which contains the public key) is embedded into the PDF as part of the process.
Once signed, the public key can be extracted from the PDF and used to decrypt the rest of the digital signature including the certificate.
It’s vitally important that the private key is kept private – if that “leaks” then anyone who has the key can use it to sign documents that will appear to have come from the rightful owner of the key.
Since Digital Certificates and Keys are used for a number of different purposes there are also a number of different file types that have different purposes and structures.
1. .cer (Certificate):
- Purpose: Contains the public key and certificate information but no private key.
- Format: Can be encoded in either DER (binary) or PEM (Base64-encoded with "BEGIN/END CERTIFICATE" headers).
- Usage: Used to distribute public certificates for verification.
2. .pem (Privacy-Enhanced Mail):
- Purpose: A widely used container format for certificates and keys.
- Format: Always Base64-encoded with headers like "BEGIN/END CERTIFICATE" or "BEGIN/END PRIVATE KEY".
- Usage: Can contain certificates, public keys, private keys, or entire certificate chains.
3. .key (Private Key):
- Purpose: Contains the private key, which must remain confidential.
- Format: Can be in PEM (Base64) or DER (binary) format.
- Usage: Used for SSL/TLS encryption or signing operations. It must be paired with a certificate (.crt or .pem).
4. .crt (Certificate):
- Purpose: Another file extension for certificates, like .cer.
- Format: Can be in either DER or PEM encoding. Often PEM-encoded with "BEGIN/END CERTIFICATE" headers.
- Usage: Contains the public key and certificate information but no private key. Commonly used in SSL/TLS setups.
5. .pfx (Personal Exchange Format):
- Purpose: A binary format that combines the certificate and private key into a single file.
- Format: PKCS#12 standard (binary encoding).
- Usage: Often used to transfer certificates with their private keys securely, such as in Windows environments or for SSL/TLS configurations.
Creating a new Certificate and Key
Let’s start by creating a self-signed digital certificate, since that is a great way to get started with the functionality. Once you have your code working though, you will probably want to buy a certificate from a Certificate Authority. While that is not free, it does mean that the certificate will automatically be seen as “Trusted”.
For now, though, we will create a self-signed certificate using OpenSSL.
Typically, a certificate contains information about the subject (the person or organization for which the certificate was created), so let’s create some dummy data for a fictional company called “MyCompany” based in San Francisco.
We will specify the following:
- Country: US
- State: California
- Location: San Francisco
- Organization: MyCompanyInc
- Organizational Unit: IT Department
- Common Name: mycompany.test
- Email Address: admin@mycompany.test
We can now use that information when creating a self-signed key using OpenSSL req;
openssl req -x509 -newkey rsa:2048 -keyout blogkey.pem -out blogcert.pem -sha256 -days 365 -subj "/C=US/ST=California/L=San Francisco/O=MyCompany Inc./OU=IT Department/CN=mycompany.test/emailAddress=admin@mycompany.test "What’s going on here?
- -x509: means that we want to create a new self-signed certificate.
- -newkey rsa:2048: generates a new RSA key with 2048 bits (other options exist).
- -keyout blogkey.pem: specifies the name of the file that will hold the private key.
- -out blogcert.pem: specifies the name of the file that will hold the self-signed certificate.
- -days 365: validity period for 1 year (but you could specify a longer term).
- -subj: inline subject definition using the X.509 DN format – based on the data that we specified above.
It’s possible to use the argument -nodes, in which case no passphrase is needed for the private key. However, since the private key is so important we will specify one – in this case “9876”. That way if the private key does get leaked it can’t be used directly (though if the passphrase is short then it could be found using brute force techniques quite quickly).
I created a new folder C:\demo\dig-signature in which to generate the certificate, but you can, of course, create it where you want.

Figure 2 - After a few seconds the two files will appear in the folder.
After a few seconds the two files will appear in the folder.
Changing the Certificate and Key format
In the next article in this series, we will use the certificate and private key within the DigitalSignatures sample code that ships with the Apryse SDK. That code requires that the certificate is in .cer format, and the key is in the .pfx file, but that is easy to solve since we can use OpenSSL to convert the files that we created into these formats.
First, we will create a .pfx file that includes both the certificate and the private key. Since we are working with the private key we will need to enter the passphrase.
openssl pkcs12 -export -out blogcert.pfx -inkey blogkey.pem -in blogcert.pemYou will also be asked to create a passphrase for the generated .pfx file since that also contains the key. You could use a different passphrase, but we will continue to use 9876.
Now we can export the certificate using:
openssl x509 -inform PEM -in blogcert.pem -outform DER -out blogcert.cerThe passphrase isn’t needed this time since the certificate is intended to be a public document.
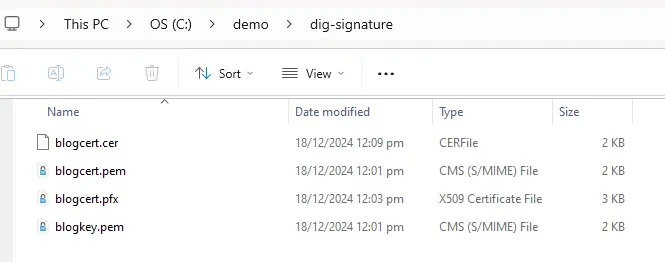
By now you should have a set of files that look like this.

Figure 3 - By now you should have the original files that you created, plus the two new ones in the alternative formats.
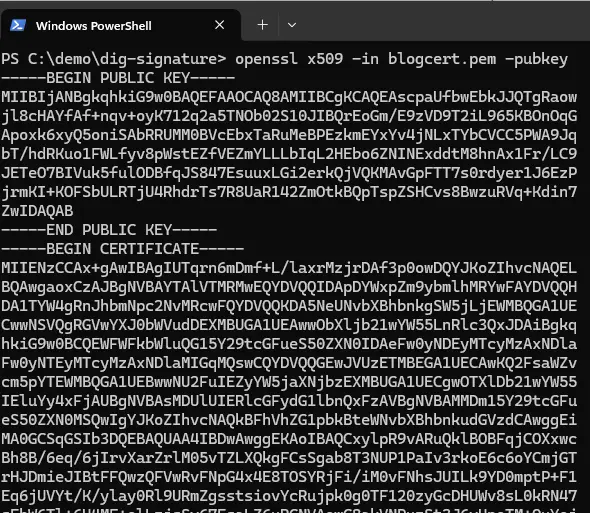
Before we go any further let’s look at one more thing – getting the public key from the digital certificate. We don’t need to do that, but it is interesting to see what is present.
openssl x509 -in blogcert.pem -pubkey
Figure 4 - The Public key that has been extracted from the certificate.
As such you can see, the certificate file that we generated already contains the public key. Therefore, if we have the certificate, we have everything that is needed to decrypt the digital signature – and know who signed the document. With just the public key you can decrypt the signature, but there would be no information as to who had signed it.
In practice, you never need to know the public key, provided that you have the certificate.
Wrapping up
In this article we have seen how to create a new self-signed certificate, though when you are ready to use your system in production you will likely purchase a certificate from a Certificate Authority. Having a self-signed certificate is great though when you are still in the Proof of Concept stage if creating a new program.
We have also seen how to convert the certificate from one format into another, and in the next article we will use the certificate and the Apryse SDK to custom sign a PDF.
The Apryse SDK does much more than just digitally sign documents though, including in-browser PDF and DOCX editing and much, much more.
So, grab yourself a free trial license, download the SDK in whatever programming language you prefer and give things a go. Digital Signatures are complex, so if you need support then please reach out to our team on our Discord channel.
If you decide that signing a PDF within code is not what you require but you still need to sign PDFs, then you may be interested in the Xodo Sign workflow.


