Roger Dunham
Published August 01, 2025
Updated May 18, 2026
7 min
How to Create a Browser-based Spreadsheet Editor Using TypeScript, React and Vite
Roger Dunham

Summary: Learn how to securely view and edit spreadsheets directly in the browser using the Apryse Web SDK. This guide covers integration with a React + Vite app, offering a lightweight, secure alternative to traditional spreadsheet tools—no Office license or external services needed.
Introduction
Spreadsheets are more than just a tool for accountants—they're a flexible, lightweight data platform used across virtually every industry. From financial modeling in banking to inventory tracking in retail, from experiment logging in scientific research to project planning in construction, spreadsheets remain a critical part of day-to-day operations.
In the past, if you needed to view or edit a spreadsheet, you would download it, edit it in a desktop or browser-based app then save it again. While that works, it risks copies of the spreadsheet getting left on the hard drive, with associated risks of confidential data being compromised in a ransomware attack or data breach. Working with spreadsheets in a general editor also risks copies being inadvertently shared with confidential data in hidden columns.
You could, of course, use the Google offering, but there are significant security risks with Google Sheets too.
So, what’s an alternative?
Enter Apryse
The Apryse Web SDK has been around for several years – first offering the ability to view and edit PDFs using WebViewer, then since 2024, the ability to edit DOCX files entirely within the browser (without needing an Office license), and now, supporting, viewing and editing Spreadsheets.
Better still, it’s easy to get started. If you are already an Apryse Web SDK user, you only need to change one line of code to get the benefit of this functionality.
In this article we will step through what is needed to view and edit Spreadsheets in a React based application that runs within your browser, and we’ll do that using Vite.
Learn how to integrate Apryse WebViewer in JavaScript, React, Vue, Angular, and more in this video.
A few words on configuration
I’m using Windows 11, but everything that you see should also work with macOS and Linux.
You will need npm and Node installed. I used Node v 22 for this article.
Step 1. Scaffold the app using create-vite
In a terminal window create a new app using:
npx create-vite@latestThis will take you through a series of steps where it will ask you to specify a project name (I called it “spreadsheet-editor”), a Framework (choose React) and a variant (choose TypeScript).
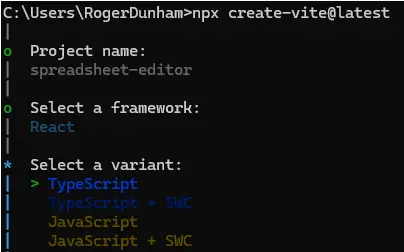
Figure 1 - Working through the steps of creating an app with create-vite.
After a moment or two the project will be scaffolded, and you will be advised how to get started.
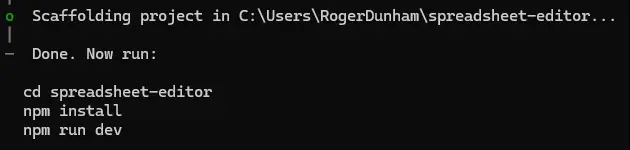
Figure 2 - The end result after successful project creation.
Navigate to the directory and install the dependencies using npm install.
If you want, then you can run the project at this point - it currently is just the default Vite+React app, but it’s useful to know that everything is working.

Figure 3 - The default app, running in a browser.
Step 2. Remove the default code
Vite scaffolds a fully working app, but much of what was created isn’t needed, so let’s delete that.
You could do this from the command line or another IDE, but I’ll open the project in VSCode.
First, remove everything from the App.css file. We will want to add things back in as we move from a prototype to production, but for now we can just delete all of the contents.
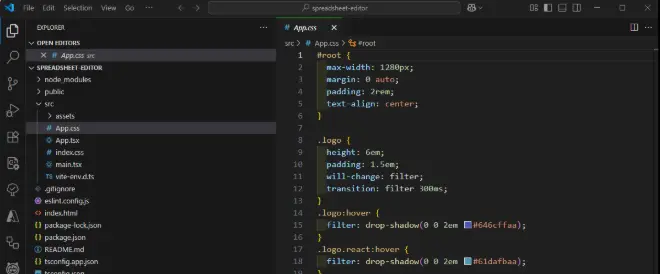
Figure 4 - The default App.css file contains lots of things that we don’t need at the moment. Delete all of the contents, so that we can concentrate on WebViewer.
We will also remove the contents of the index.css file at this point.
Next remove virtually everything from the App.tsx file.
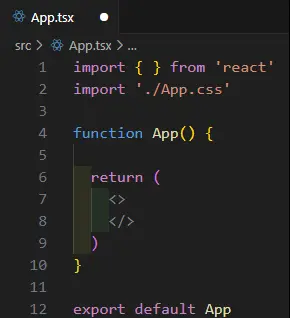
Figure 5 - In App.tsx, virtually everything can be deleted.
Step 3. Get ready to install WebViewer
Great, we have now got to the point where we can start rebuilding. We need to add Apryse WebViewer which we can do using npm install. Apryse was previously known as PDFTron and rebranded in 2023. As such, the WebViewer package still uses the name “pdftron” in its title.
WebViewer is written using JavaScript and is intended to be used within the browser. As such, we need to make sure that our code can access the files at runtime. For security reasons React can only access files in the project’s public folder, and not from the node_modules folder.
There are various ways that we can make those static files available at runtime – we can copy them manually, run a script, or use a plugin.
For this article we will install the plugin vite-plugin-static-copy.
npm i -D vite-plugin-static-copyIn addition to installing the plugin, you will also need to update the vite.config.ts file to specify where the files should be copied from and to.
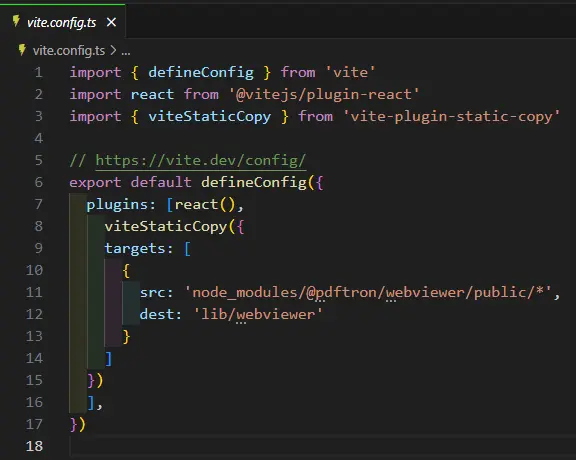
Figure 6 - The updated vite.config.ts file.
Now when we install Webviewer, the plugin will copy the files in 'node_modules/@pdftron/webviewer/public/’ into 'lib/webviewer'
You can specify an alternative destination if you wish – but if you do then you will need to modify the WebViewer initialization code – we will talk about that in a moment.
Step 4 - Install WebViewer
Next, we need to install WebViewer itself, which we can do using npm.
npm install @pdftron/webviewerThis will copy the package into node_modules and add it to the package.json file.
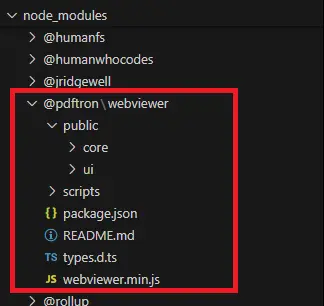
Figure 7 - Folder structure showing where to copy the files.
Note: If you have chosen not to use the plugin, then you will need to manually copy the files from the public folder into a location where they can be accessed by the client.
Step 5. Create an HTML element where WebViewer will be mounted
Now within the App.tsx file, add some html to create a div where WebViewer will be mounted. We will specify the element with a useRef and also include a className to allow us to style it with CSS.
Your entire App.tsx file should now look like:
Step 6. Instantiate WebViewer
WebViewer can be instantiated as a WebComponent (the default option), or as an Iframe. When working with the SpreadsheetEditor, WebViewer must be instantiated as an Iframe.
The WebViewer constructor allows us to specify various options and requires us to include the element where it should be mounted (in our case viewerDiv.current).
In this example we will specify three important options:
- path: which indicates the location where the plugin will be copying files to.
- licenseKey: which includes the trial or commercial license. If you haven’t got one, then it is free to get a trial license for WebViewer.
- initialMode: which specifies whether WebViewer should have the initial UI for working with PDFs, DOCX files or Spreadsheets. We will use WebViewer.Modes.SPREADSHEET_EDITOR.
There are many other options that you can use (check out the WebViewer documentation), but for now we will just use enableFilePicker, so that we can choose files from the UI, and initialDoc (in this case “invoice_template.xlsx“) to specify the file that should be loaded when WebViewer is created.
The WebViewer constructor is async and returns a promise. When the promise resolves, you can use the instance object to work with WebViewer. We won’t need that just now for our simple app, but we will create an empty code block so that it is available when you decide to further explore what WebViewer can do.
Our constructor should now look like:
As we are using React, we can put this code into a UseEffect hook with an empty dependency array so that it fires when the component mounts.
In recent versions of React the useEffect will fire a second time for Debug builds if strict mode is true.
There are several workarounds that I have used at different times. My preferred method at the moment is to create another useRef variable (“isInstantiated”) and only instantiate the WebViewer if that has not already occurred. This adds a little extra code that isn’t needed when you move to production but will be useful during development.
Your entire App.tsx file should now look like
At this point the code is effectively complete, so you can start the project using npm run dev.
You may find that the Spreadsheet editor appears to load but no grid is available.

Figure 8 - If no grid area is available, then it is likely a CSS issue.
If you look in the browser’s DevTools window, it shows messages to indicate that WebViewer has loaded, and we can even see the name of the file at the top of the browser too.
This isn’t a problem with WebViewer – it’s a CSS issue.
Step 7. Solving issues with CSS
When you have a real app, you will spend a lot of time carefully crafting the CSS for it, but straight out of the box this can be confusing. The fix is straightforward - add CSS to specify the height for the webviewer class (which we specified in the div where WebViewer is mounted).
.webviewer{
height: 100vh;
}
Now when you reload the page, you can see a fully functional WebViewer. Awesome work!
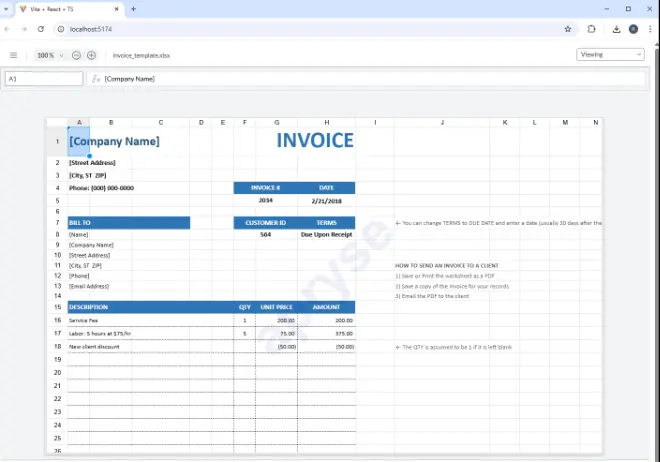
Figure 9 - WebViewer running within the browser, displaying a spreadsheet.
Where next?
With less than 40 lines of code, and as little as 10 minutes from creating the project, you now have a running project containing a Spreadsheet Editor within a web page.
Getting The Spreadsheet Editor running is just the beginning though. We’ll look at how we can work with the API in the next blog in this series, as a way to work programmatically with the contents of the Workbook.
The Web SDK offers more than just the ability to work with spreadsheets. With just a few changes to the code you can view and edit DOCX files, or PDFs. You can even set up a complete workflow for generating files from a template, converting them to a PDF, then digitally signing them.
One tool – a wealth of uses!
Don’t just take my word for it though – try it our for yourself. Get a trial license and see what you can do. If you have any questions, then reach out to us on our Discord channel and we will be happy to help.


