Garry Klooesterman
Senior Technical Content Creator
Published February 26, 2026
Updated May 18, 2026
5 min
How to Create Interactive PDF Forms Using WebViever and JavaScript
Garry Klooesterman
Senior Technical Content Creator

Summary: Building forms in the browser can be as simple as adding an <input> tag and some CSS. But PDF forms don’t play by the same rules. If you’ve ever tried to use document.getElementById on a PDF field, you know the pain. This blog discusses why PDF forms are unique and how to master them using JavaScript and Apryse WebViewer.
Introduction
If you’re coming from a web dev background, PDF forms may feel like a different dimension, as creating PDF forms in JavaScript works completely differently than building HTML forms. Here’s why:
PDFs have no DOM: Unlike an HTML page, a PDF is a group objects. There are no tags, no divs, and no inherited styles. Fields are stored as dictionaries in the file’s internal tree.
AcroForms vs. XFA: Apryse WebViewer supports AcroForms, the universal standard for interactive, fillable PDF forms. XFA (XML Forms Architecture) is an older, proprietary Adobe format that is difficult to render in modern browsers and was deprecated in the PDF 2.0 ISO standard.
The y-Axis Flip: In HTML, (0,0) is the top-left corner of the document, but in a PDF, the origin (0,0) is at the bottom-left.
Library Limits: Most JS libraries are headless (Node-only) or lack a visual UI. Designing a form blindly through coordinates can be difficult to ensure everything is in the right place.
Why WebViewer is the Best Way to Create Forms
Apryse WebViewer is a powerful and robust JavaScript Document SDK. It’s a fully client-side SDK with many features such as high-fidelity document viewing, annotation, conversion, and editing across 30+ formats.
Here’s why developers choose WebViewer for creating fillable PDF forms:
- Global Accessibility Standards: WebViewer’s WCAG 2.2 AA-compliant UI supports keyboard navigation, screen readers, ARIA attributes, helping teams meet accessibility requirements.
- Data Security: Data stays local to the user with processing happening entirely in the browser, eliminating server dependencies.
- Built-in WYSIWYG: You don't have to code every field. WebViewer comes with a Form Builder mode that lets users drag-and-drop fields.
- Client-Side Speed: All the rendering and form-logic happens in the user's browser.
Project Setup
Before we start coding, let's get the environment ready. You’ll need to make sure you’ve done these steps first, then we’ll get started.
- Install Node and npm to use as your run-time environment and package manager.
- Create a folder for your project.
- Open a text editor like Visual Studio Code.
- Get your Apryse trial key if you don’t already have one.
Install WebViewer
First, we need to install WebViewer into your project using the following command on the command line from your project directory:
npm i @pdftron/webviewerCreate public folder
- Create a folder in your project named public to store the code for your project.
- In the new public folder, create a file named index.html.
Copy static assets
- In the new public folder, create a subfolder called lib/webviewer.
- Now copy the specific static assets required for WebViewer. The static files to copy are in node_modules/@pdftron/webviewer/public in your project and are:
- core
- ui
- webviewer.min.js
Paste the files you copied to the new lib/webviewer public location.
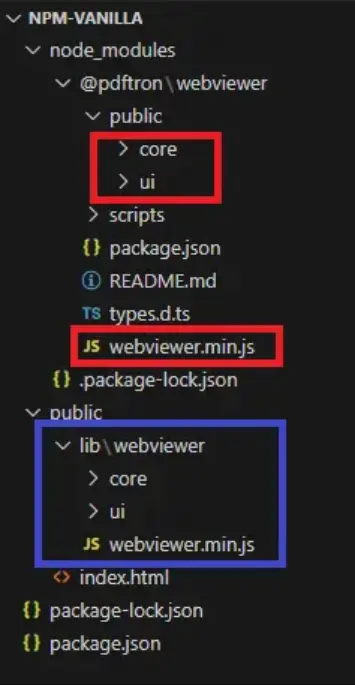
Figure 1: Folder structure for our project.
Add HTML code
Now let’s add some code to the index.html you created. Copy the following HTML code and paste it into the file.
Note:
- Make sure the script tag references the correct path for the JS file you copied into the public folder you created.
- The div element viewer id is where WebViewer will be mounted. In this example, it also contains styling elements for the viewer, but this can be done using CSS if you prefer.
Add JavaScript code
1. The next thing we need to add to the index.html file is the following JavaScript code.
Note: Place it after the div and before the close body tag.
2. Confirm that the paths to the static files for core, ui, and webviewer.min.js are correct.
3. Add your license key in place of 'YOUR_LICENSE_KEY'.
Note: If you've created your license key and you're logged in, your key is already in the code below.
4. Choose an initial document to open when WebViewer starts using the initialDoc parameter and replace 'YOUR_DOC_HERE' with the path and filename.
5. Specify the id of the element where you want WebViewer to be mounted. In this case, that's viewer.
View a PDF in WebViewer UI
1. Save all the files and you’re now ready to serve the webpage so you can see the WebViewer UI and the PDF you included to open in WebViewer.
2. Run the following command on the command line from your project directory to run http-server, which is a simple web server.
npx http-server -a localhost3. Click the localhost link created in your terminal to view the WebViewer UI and PDF file locally.
Ok great, so we’ve set up our project and WebViewer and we’ve opened a PDF. Let’s move on to the best part and make this a fillable PDF form.
How to Create PDF Form Fields in JavaScript
In this example, we’re going to programmatically create a text field. In a PDF, a form field consists of two parts: the Field (the data/logic) and the Widget (the visual part the user sees).
We’ll add a text field and text widget annotation using this code:
And there we have it. We’ve programmatically added a text field and text widget annotation to a PDF.
Here’s an example of what this would look like on a PDF.
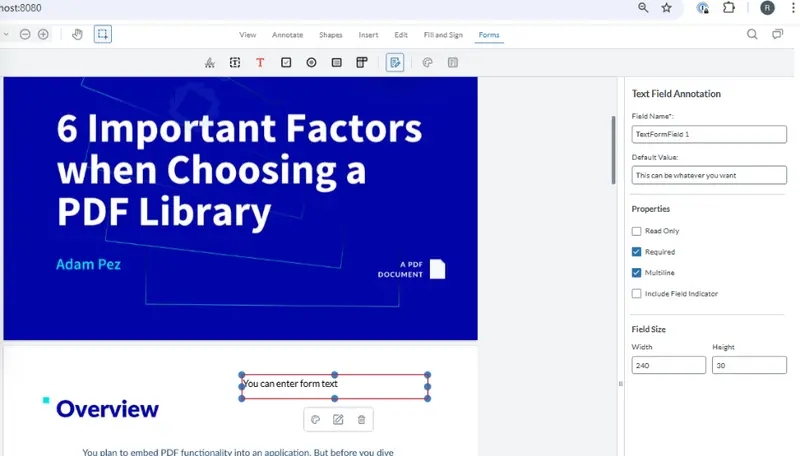
Figure 2: Our PDF with the new text field added.
There’s a lot happening in that code sample so let’s take a look at what’s going on:
- First, we use the DocumentViewer.documentLoaded event to make sure the document has loaded before we add fields and widget annotations.
- Next, we add a text field and text widget annotation.
- And last, we need to add the form field to the field manager and the widget annotation to the annotation manager.
The Apryse WebViewer SDK fully supports reading, writing, and editing PDF forms. So, after a form field is filled with data, the SDK can read and extract that data to JSON format to be used later.
If you’re looking for a way to set up fields with less coding, you can do it directly in the WebViewer UI. Check out the demo!
FAQ
What’s the difference between a Field and a Widget?
Doing a comparison, a Field is the variable name in your code (the data), and the Widget is the CSS/HTML input on the screen (the UI).
Can I make fields required?
Yes. You can use WidgetFlags when creating your field.
Does this support digital signatures?
Yes. You can add e-signatures and advanced digital signatures backed by certificate authorities.
Can I customize the look of the fields (colors, fonts)?
Yes. You can set various elements including the stroke color, fill color, and font size directly on the WidgetAnnotation.
Conclusion
Creating PDF forms in JavaScript can be easy if you’re using a robust SDK like Apryse WebViewer. You can treat PDF objects with the same ease as DOM elements while letting the engine handle the complexities of the PDF specification.
Want to try it out for yourself? Check out our demo or start a free trial.
You can also contact our sales team for any questions.
Suggested Reads
- Blog: How to Create a Fillable Form in WebViewer
- Blog: Popular Uses Cases for the WebViewer Form Builder
- Blog: All You Need to Know About WebViewer


