Roger Dunham
Updated February 10, 2026
5 min
What A Save! An introduction to PDF File Structure - Part 2
Roger Dunham

Summary: The “ideal” structure of a PDF depends on how it will be used, for example if the PDF is to be Digitally Signed by multiple people, then a different structure is required than if it is to be streamed over the internet. Whatever the scenario, Apryse has your back. The Apryse SDK allows you to specify the way in which a PDF should be structured. This advanced tutorial covers the options that are available.
Introduction
The PDF file format is certainly an exceptionally useful format with billions of PDFs being created annually. But have you ever wondered what is going on “under the hood”?
In the previous article in this series, we saw the multiple ways in which the internal workings of a PDF can be structured. In this article we will look at how you can use options within the Apryse SDK to specify the file structure that you want.
Controlling File Structure using the Apryse SDK
The Apryse SDK allows you to work with PDFs at both a high level (adding annotations, or converting an entire PDF into an Office file) as well as at a very low object level – working within individual COS objects.
Whether working at a high level or low level, at some point you will want to save the file. There are six Save Options available that allow you to specify how it should be saved.
- e_compatibility
- e_incremental
- e_remove_unused
- e_linearized
- e_hex_strings
- e_omit_xref
Read a great article about the different save options and when to use them.
Let’s look at how these can be used from a programmatic point of view. We’ll do this using code based on the Element Builder sample, which is one of the many sample projects that are available to demonstrate the functionality. I’ll be using C#, but the samples are also available in many other languages including Java, Python and Node.js.
The Element Builder sample adds a range of elements to the PDF, which is great for illustrating the flexibility of the SDK, but is a little complicated for what I want to show. As such I’ve simplified the code so that it just creates a single line of text, which says “Hello World!”
You’ll need to make a few changes to that code to make it work – including initializing PDFNet (which you will need a trial license for) and specifying which SaveOption you require.
Once you have done that, run the code and you a PDF will be created that looks something like this.
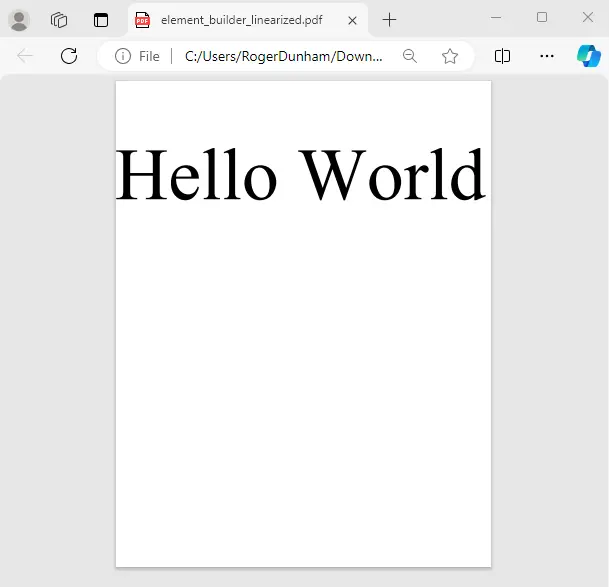
Figure 1 - A PDF created using the Apryse Element Builder functionality.
Save Option - Compatibility
This option creates a PDF 1.4 structure similar to the one that we first looked at. It’s not very efficient, and it may be larger than it needs to be, but if you need to provide support for very old PDF tools this is one way to do so.
If you are interested in seeing the actual content of the streams, such as we did when we created a PDF by hand in Part 1 of this series then you will need to disable stream compression. You can do that by specifying the option as false in the ElementWriter.Begin() method.
writer.Begin(page, ElementWriter.WriteMode.e_overlay, true, false); The code will now create a file in which you can see the actual text that should be written within the PDF file structure.
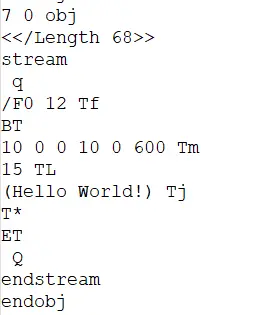
Figure 2 - A snippet of the PDF file created with the Compatibility SaveOption with content stream compression disabled.
That’s interesting, but probably not very useful other than for learning about how PDFs work.
Save Option - Incremental
We saw in Part 1 how incremental save adds just the changes that have been made to a PDF. That can be efficient, but generally, it is not recommended, and we will see why shortly.
One situation where Incremental Saving is useful is when multiple people need to digitally sign the same PDF. As each person adds their signature, a hash is added to the file that records the state of the file at that time. When the next person adds their signature, it’s important to keep the original file intact, otherwise the changes will invalidate the earlier signature. “Incremental save” allows this to be done.
Let’s have a look at how you would implement this programmatically. While we could use the Element Builder code to create a PDF using the incremental save option, it wouldn’t be very exciting – that sample doesn’t make any changes to the file so there would be no “increment”!
Therefore, to demonstrate this, we will use code taken from a different sample PDFPackage.
That sample demonstrates how a file can be attached to a PDF or placed into a PDF Portfolio, both of which have important use-cases.
For now, though we will modify the code and create three PDFs at different parts of the process – when the PDF is first created, after a simple text file has been attached, and after the attachment has been “removed”.
The important parts are that we:
- create a file (in a very similar way to the Element Builder sample),
- attach a text file by generating a NameTree called Embedded Files then adding a FileSpec object that contains the actual data for the embedded file, then finally
- remove the FileSpec object again (resulting in the attached text file becoming unattached again)
When we run that code, we get three files created. Let’s look at each one in turn.
The initial one contains no attachment (it’s not exciting to look at, so I haven’t created a screenshot of it). If you open the PDF in a text editor, you can see that there are 10 objects present.
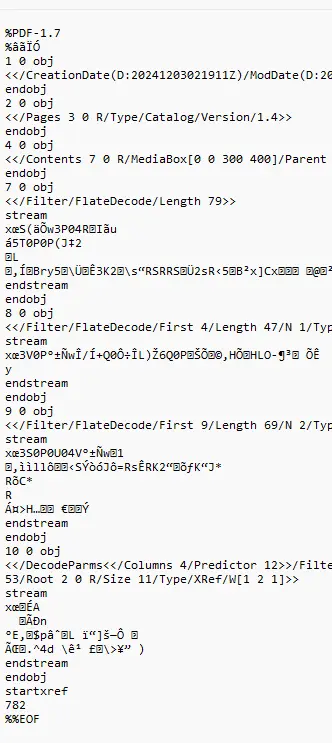
Figure 3 - The underlying file content of the Initial document. There are 10 objects and no attached file.
The second PDF contains the attached text file. If you open the PDF in a suitable viewer such as Xodo PDF Studio you can see the attached file – and even open it from the viewer.
If you look at the file structure you will see that the original structure is still present, but now added to the end are new objects (giving a new total of 15 objects. Furthermore object 2 has been modified and contains a “Names” value (the details of which are in object 12 with the actual file encoded into object 14.).
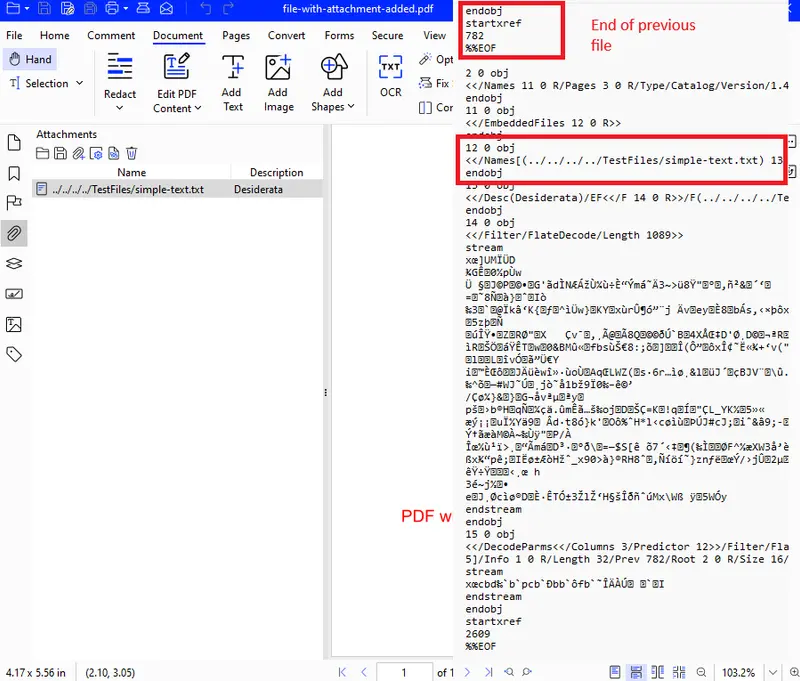
Figure 4 - The PDF containing the attachment - and a screenshot of part of the PDF file structure - showing how the new content has been appended to the original file after the first %%EOF.
The third file, created after the attachment was removed, is particularly interesting.
If you open the PDF in a viewer then the attachment is no longer shown, which is exactly what is expected. However, if you open the PDF in a text editor, then you can see that the Names dictionary in object 12 is now empty (and there are no other new objects).
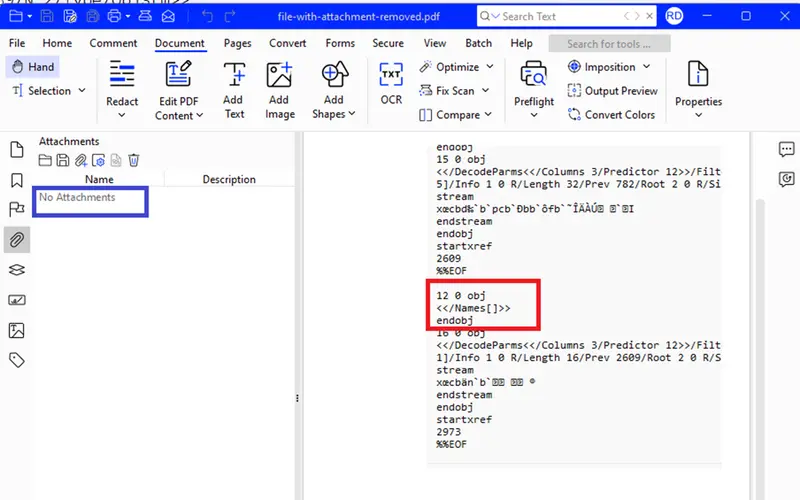
Figure 5 – After the attachment is removed it is no longer accessible from the Attachments pane in Xodo PDF Studio, and the Names dictionary is now empty.
But because incremental save can only add to the existing content, the embedded text file is still in the PDF structure.
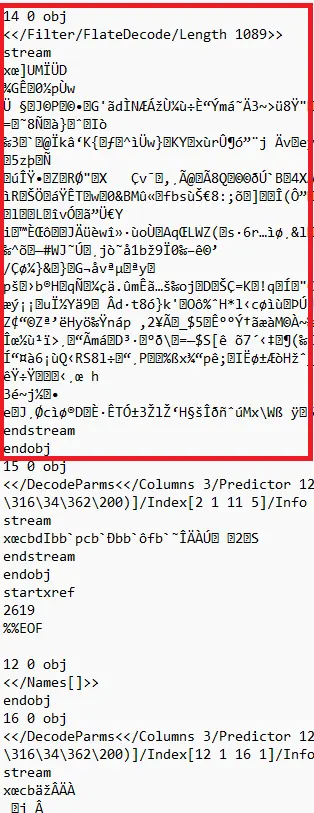
Figure 6 - Part of the same PDF created after the attachment was removed. The Names object is empty - but object 14 which contains the encoded file is still present.
You can get a hint of what is happening by looking at the file size – with each successive save the file is getting larger – even when something was intended to be removed.

Figure 7 - Each time that the file was saved incrementally, it became larger, even when the attachment was apparently removed.
Incremental save as a security risk
Having a file that keeps getting larger is one problem, a much more serious one is that the embedded file which is no longer shown in the PDF Viewer can still be accessed. Doing so is surprisingly easy using tools that can be found on the internet.
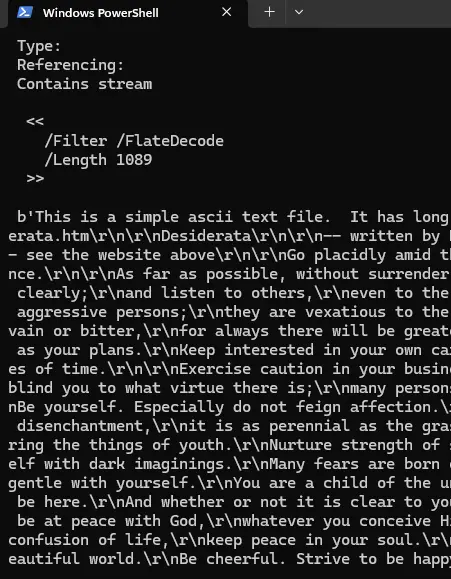
Figure 8 - Using some freely available tools it is possible to extract objects from a PDF that are no longer being used. That is a potential security risk.
In this case the embedded file was the Desiderata, so there was no real harm done. However if that file had held PII, medical information, or confidential business data – that could have been a disaster.
This risk is similar to, but different from, incorrectly performed redaction, where you think that something has been removed but hasn’t.
Apryse offers world class redaction, not only removing content effectively but also deleting unused embedded files.
Read more about how Apryse can help you to safely redact documents.
Save Option - Remove unused
While redaction is one way to remove unused objects, another is using the Remove_Unused SaveOption.
doc.Save(output_path + "file-with-attachment-remove-unused.pdf", SDFDoc.SaveOptions.e_remove_unused); If we run that code on the incremental file that contained the deleted text file, then we get a PDF that looks identical, is much smaller, and no longer contains the embedded file.
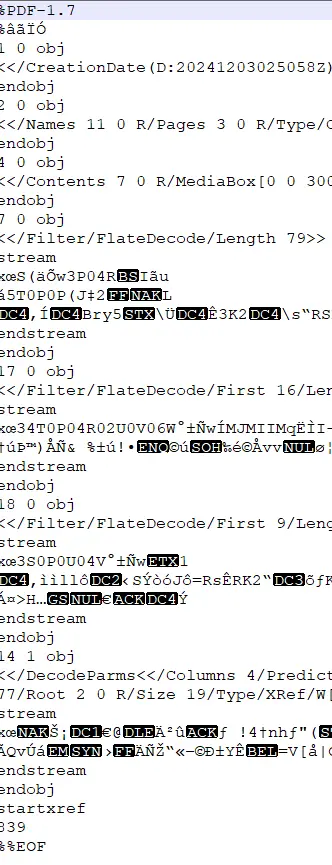
Figure 9 - Part of a PDF which was previously saved incrementally, but which has now had unused objects removed. The embedded text file has been completely removed, and the file is much shorter – you can see all of its lines in this screenshot.
Save Option - Linearized
The primary objective of linearization is to allow the PDF to be opened faster when downloaded over the internet (it’s also called “Fast Web View” for that reason). That is done by restructuring the file as we saw in Part 1 of this series. A secondary benefit, though, is that any unused objects are discarded in the process – giving all of the benefits of SaveOptions.e_remove_unused.
Creating a linearized file is easy.
doc.Save(output_path + "file-linearized.pdf", SDFDoc.SaveOptions.e_linearized); Visually, the PDF looks the same as when created using the other options. Internally, the file now has a marker that indicates it is linearized, and all unused objects are gone.
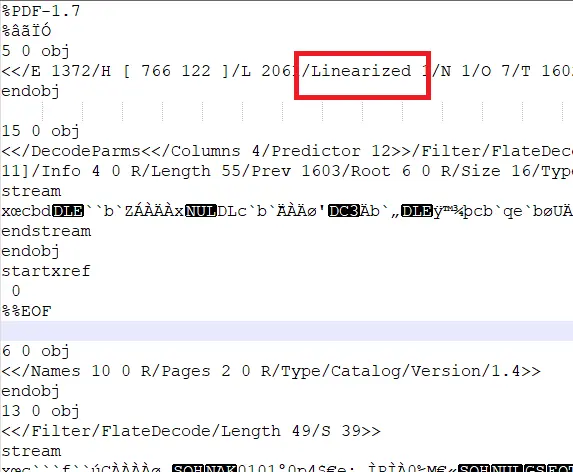
Figure 10 - Part of a linearized PDF.
The rest of the PDF structure is rather complex, and outside the scope of this article.
What about the other two SaveOptions?
There are two more SaveOptions – e_hex_strings and e_omit_xref.
You are unlikely ever to need these. If you think that you do, then please reach out to us on Discord.
Optimizing the PDF for WebViewer
So far, we have looked at options for saving a PDF when we don’t know which of the many viewers will be used to read it.
If, however, you know that the PDFs will be opened using Apryse WebViewer, then there is an option to save the PDFs in a way that is optimized for that tool using SaveViewerOptimized.
//Code from ElmentBuilder sample
doc.SaveViewerOptimized("wvOptimized.pdf", new ViewerOptimizedOptions());
This both linearizes the file and generates optimized thumbnails for each page. While the files can still be opened on other PDF Viewers this gives a faster, better experience when opened in WebViewer.
Finishing Up
In this series, we’ve seen how the underlying structure of a PDF may be different yet still create the same visual result, and how using the various SaveOptions choices results in PDFs with different structures.
Which one you use depends on how you intend to use the resulting PDF but, in most cases, linearized is recommended. Exceptions are if you need to have a PDF digitally signed by multiple people in which case the file must be saved incrementally, or if you know that the PDF will be opened using WebViewer in which case PDFDoc.SaveViewerOptimized is recommended.
But don’t take my word for it – get yourself a trial license and see for yourself.
Apryse offers much more than the ability to create PDFs. It also has great tools for working with PDFs and other document types, and there’s a huge range of functionality available, including annotation, page manipulation and redaction. Try things out, see how much time it can save you, and if you have any questions then please feel free to contact us using our Discord channel.


