Roger Dunham
Published March 21, 2024
Updated May 18, 2026
6 min
Working with PDF Layers: Creating a New PDF from Each Layer
Roger Dunham

Summary: This article explores using the Apryse SDK to split a PDF into multiple documents, each with a single layer. PDF layers, or optional content groups (OCGs), enable users to organize content effectively. However, not all PDF viewers support layers, and nested layers can be complex to handle.
Introduction
PDF layers (also known as optional content groups or OCGs) allow documents to have content placed either above or below other content within the PDF. Individual layers within a PDF can be displayed or hidden by the user if needed.
Layers offer real value in allowing complex data to be broken up and viewed in understandable amounts, rather than overwhelming the viewer with a flood of complexity. Unfortunately not all PDF viewers support layers, and the handling of nested layers is even worse.
Apryse WebViewer, however, makes working with layers great and intuitive. This makes it ideal for working with complex data such as CAD drawings used in architecture, engineering, and construction (AEC).
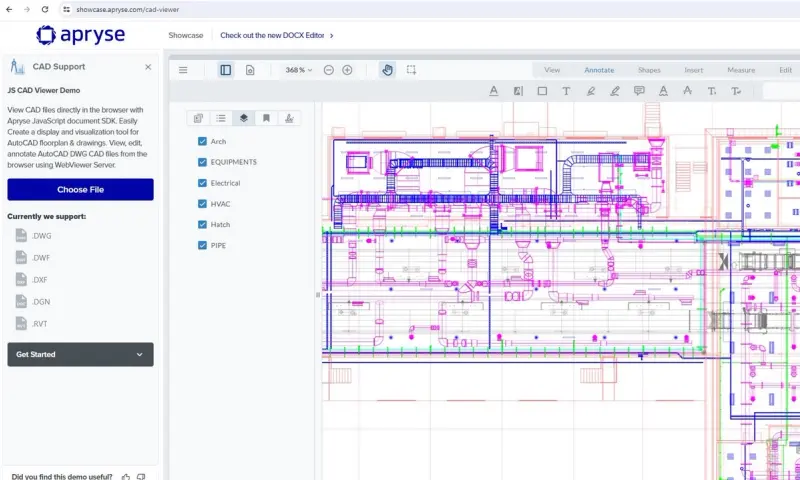
Figure 1 – The sample file illustrating the complexity of the individual layers
Don’t take my word for it, try it yourself using the Apryse Showcase. There, you can explore a CAD drawing and see six layers, one for Architecture, one for Electrical, and so on. Better still, with all the data in the same file, you know it’s being kept together and available at any time.
For some users, that is exactly what is required – the ability to explore all layers and their interactions whenever they want. However, for other users this amount of information can be overwhelming – the users aren’t interested in many of the layers, and so they just become a distraction. Six layers might be understandable, but six hundred could be mind-boggling.
In this article, we will look at one method for using the Apryse SDK to split a single PDF into multiple documents, each containing just one separate layer, so that your mind remains unboggled.
Streamline your PDF management with the Apryse Python SDK! Easily split pdf, extract pages, and boost productivity.
The Sample Document
If you want to follow along, you can download the sample document. It is about 1,300 KB in size. Note the file has a name that contains spaces, and while the code can handle that, it might be confusing. So we’ll rename it to “construction-drawings-color.pdf”.
The sample document has six layers. What we want is that, at the end of this process, we should have six new documents, each of which shows just a single layer.
Sample Code
The code used in this article is loosely based on the PDFLayersTest sample written in C#.
If C# isn’t your preferred language, check out the other languages that the same sample is available in:
- C++
- Go
- Java
- Java (Android)
- JavaScript
- JS (Node.js)
- Kotlin
- Obj-C
- PHP
- Python
- Ruby
- Swift
- VB
Although I said that the code in this article is based on that code sample, you should replace the entire contents of the code file PDFLayersTest.cs with the following:
We will run the code in a moment, but first let’s look at how it works.
How the Code Works
The code uses a hard coded file name and path – which is great for sample code. But in practice, you would of course want to make those configurable.
It then gets the array of OCGs (the layers), and if there are layers, it then iterates through the array, once for each layer.
On each iteration, it iterates over the layer list again, and sets the visibility of the layer that is of interest (the first one the first time through, the second one the second time through, and so on) to true, and all of the other layers to false.
This is done using the following line of code:
ocg.SetInitialState(init_cfg, [visibility]); As a result, only the one layer that we want will be visible.
For the sake of this example, I deliberately locked the layer visibility.
ocg.SetLocked(init_cfg, true);As a result, the user cannot change the visibility. However, if that was a requirement, it would be easy to achieve by simply setting the logged attribute to false.
ocg.SetLocked(init_cfg, false);The new file is then saved with the name of the specific layer included in its filename. Note that the PDF is also saved as linearized since that can reduce the time taken to open the file, but that is not actually required to control layer visibility.
Run the code and look at the newly created files.
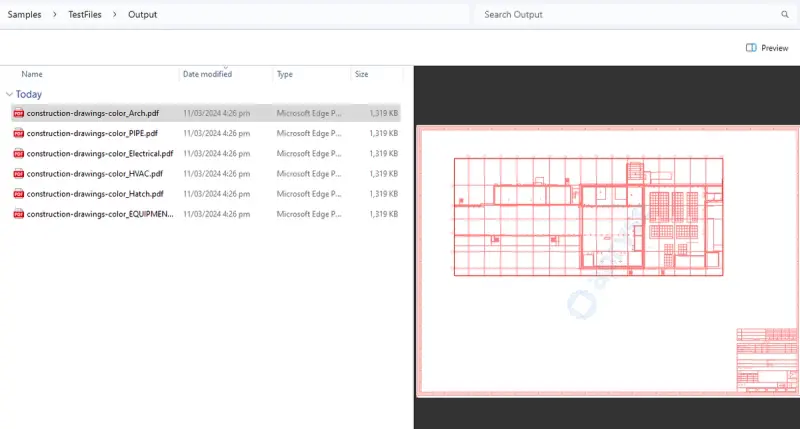
Figure 2 – The output from running the sample code. Each file contains just a single visible layer.
That’s it. Simple hey? Six files – each with one visible layer – exactly what we set out to do.
What’s Next?
There are lots of other things that you could do with this sample. It could be extended so that multiple specific layers are shown, for example, just the Architecture and Electrical layers, but none of the others. In reality the choice is up to you, as it should be.
This is one of the great strengths of the Apryse SDK – by giving you access to low-level functionality, you have control over exactly what you want within the PDFs.
Alternative Solutions
While the mechanism used in this article is simple and pragmatic, it is not the only way to create a separate PDF for each layer.
One issue with the current approach is that the layers are hidden, but not actually removed. This means that they are still shown in the layers panel.
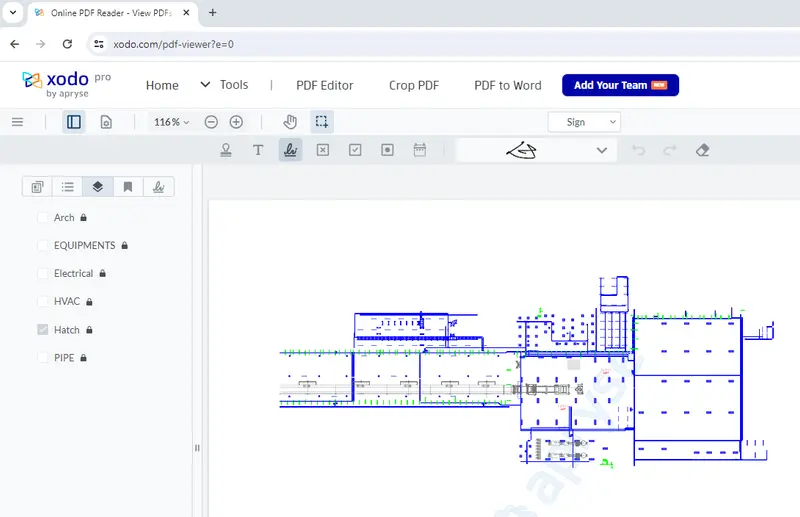
Figure 3 – The hidden layers are still present in the panel.
Furthermore, the data that the hidden layers contain is still included in the PDF, resulting in larger files than are necessary. In fact, if you look at Figure 2 you can see that all the files are the same size.
An alternative mechanism would be to iterate through the document using an ElementReader then copying all the content, except for the OCG layers that are not required, using an ElementWriter. There isn’t a specific tutorial available about how to do that, but there is sample code that will help to get you started at ElementEditTest. You could even extend the mechanism to rename the layers should you wish to.
Conclusion
PDF layers are undoubtedly powerful, but they can also overload the user with information, leading to confusion.
This problem is easily resolved by removing unnecessary layers with the Apryse SDK. Using the information in this article and the other code samples, you are well on your way to being able to perform that, and many other document processing operations.
While this article used C#, the same functionality is available in many other languages.
When you are ready to get started, see the documentation for the SDK. We want you to succeed, so if you run into any problems please reach out to us on Discord.


