Logan Bittner
Published December 09, 2023
Updated May 18, 2026
How Apryse Boosted Website Performance by Over 100%
Logan Bittner

Summary
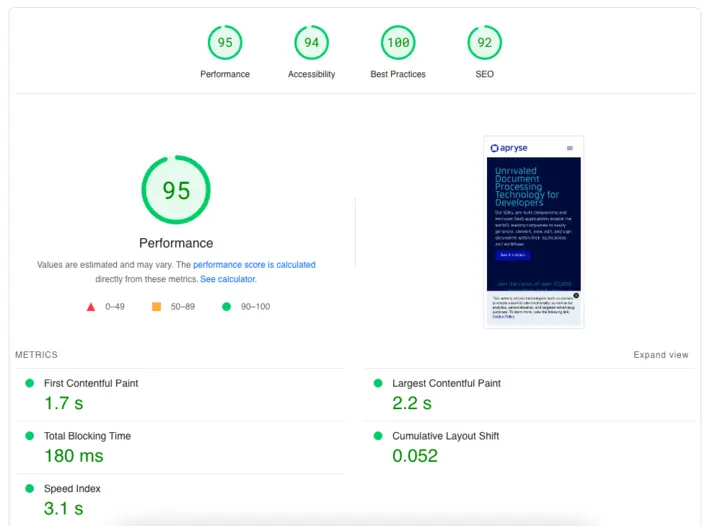
In August 2023, Apryse tackled low PageSpeed Insights scores affecting SEO. Using Next.js and Sanity CMS, they optimized large images, switched to WebP format, and addressed third-party script issues through code splitting. Delaying script loading until user interaction significantly improved the total blocking time. Further refinements and an upgrade to Next.js 14 boosted their performance score from 49 to 95. Keep reading for the lessons we learned in image optimization, script loading, and code splitting.
Introduction
Back in August 2023, it was brought to the team’s attention that our website performance was ranking fairly low on PageSpeed Insights - the tool that Google uses to determine your website’s performance. Having a low score on this tool can have a significant negative impact on your website's SEO (Search Engine Optimization). SEO is a very important part of our business here at Apryse, so we immediately set out to diagnose and fix this issue.
This blog goes into depth about the techniques we used to improve our performance score from a 49 to a 95 on PageSpeed Insights (please note that scores on PageSpeed insights can vary drastically between runs).
An Introduction Into Our Tech Stack
Before we dig in, it’s important to know the technology that Apryse.com is built on.
Our core framework is Next.js, which we use in every web project at Apryse. We love Next.js due to the flexibility and the built-in optimizations that come with it. We were using version 12 and rely heavily on ISR (Incremental Static Regeneration).
Our CMS of choice is Sanity. Sanity is an extremely powerful and flexible CMS with a hackable content editor. The developer experience is best in class and the flexibility of the platform makes it the standout choice in our opinion.
Both of these technologies are extremely powerful – but with great power comes great responsibility.
Image Resizing
One issue that PageSpeed Insights flagged was the fact that the images on our site were overly large. We were loading images that had much higher resolution and quality than needed, which caused slow loading times, particularly for mobile users (PageSpeed Insights measures performance on a typical consumer cell phone, making this even more of an issue).
Our infrastructure allows our internal teams to upload images to Sanity – any image. As such, large images were uploaded to Sanity and eventually made their way onto our website.
Putting annoying guardrails in place inside our CMS was not an option - having a smooth, hassle-free editing experience is a core goal for our website and we did not want to put the responsibility of image optimization on our content and marketing teams.
Luckily, Next.js ships with a great Image component that helped us resolve this issue without the need for manual image optimization.
Next.js’ Image component ships with built in “srcset“ support. Source sets let you determine which image to load based on the size of the user's screen. This feature (with the help Sanity’s content CDN) allowed us to resize images on the fly and make sure we are requesting only as many pixels as we need for each image.
Our image loading code after combining these two tools looks something like this:
The above code does a few things:
- The component accepts a ‘width’ prop. This prop determines the maximum width that the image will appear on the website
- We determine the aspect ratio of the source image coming from Sanity. We’re able to do this because the URLs that Sanity gives us includes the image dimensions
- We determine the height we should render the image at by using the ‘width’ prop combined with the aspect ratio
- We pass a “loader” prop to next/image - this function allows us to append “?w={width}” to the image’s URL. This parameter tells the Sanity Content CDN which size of image we need. Sanity will then resize the image on the fly before it’s sent back to the browser!
Although the image changes we made were a great optimization for our site, they only increased our performance score by about 5 points – this was a lot less than we were expecting. What gives?
Image formats
While we were researching and debugging the image sizing issue, we also realized that we were not loading our images in the most efficient format. Most of our images were either PNGs or JPEGs, which are ok, but not the best.
WebP images are 26% smaller than PNGs, making them the best choice for images on the web. WebP is also supported on all the browsers that we target for Apryse.com, which made it an easy decision to switch to the format.
However, as mentioned earlier, we did not want to put the responsibility of image optimization on our marketing and content teams, so we needed an in-code solution. After a bit of research, we discovered that Sanity’s Content CDN allows us to also convert images to WebP on the fly.
With just a small change to our code, we were able to make this optimization
We were now loading properly sized WebP images on our website, but our score still had only improved by around 10 points total. We still had some work to do.
Code Splitting Third Party Libraries
The next issue we set out to tackle is the dreaded “Reduce unused JavaScript” recommendation from PageSpeed Insights which is an indicator that we were loading too much unnecessary code in our main JS bundle. This is typically caused by importing libraries and components that are not used for the initial render of your site.
Using next-bundle-analyzer, we were able to identify several large libraries that snuck their way into our main JS bundle, with the biggest culprit being Sanity Client (Sanity Client is the SDK used to fetch data from Sanity’s CDN).
There are a few scenarios where we need to fetch data from our CDN from the browser (pagination on our blog home page for example). As such, we needed to import Sanity Client into our JS bundle. Unfortunately, we did not do this in the most optimal way.
We knew we could fix this problem with code splitting. Code splitting is the practice of separating your code into different JS files, and only loading them when it’s needed. Next.js supports this out of the box, so fixing this issue was quite easy.
Our solution for this problem was to change our code from this:
To this
The above code is a fairly small refactor that makes sure we only import Sanity Client when we really need it. Since the fetching code is already asynchronous, this was an easy change.
We ended up applying a similar pattern to other libraries that we didn’t need to initially render the page such as carousel libraries and rich text editing libraries.
These changes got rid of the “Reduce unused JavaScript” warnings and improved our score by another 5 points.
Script Optimization
At this point we’ve tackled the low hanging fruit which did have some impact, but our performance score was still not where we wanted it to be.
The next issue we decided to tackle was the decreasing the “Total blocking time” number reported by PageSpeed Insights. The report told us that this issue was mainly due to third party scripts blocking the main thread.
We load several third-party scripts on Apryse.com - things like GTAG, Google Analytics, Qualified, Hotjar, and other marketing scripts. All these scripts were blocking the main thread for some amount of time during the initial render phase.
We were loading these scripts with the suggested `async` tag, but this just loads the scripts in parallel, it does not prevent the execution of them from blocking the main thread. Due to the single threaded nature of JavaScript, there weren't a ton of options to work around this. It was a requirement from internal teams to load these scripts, so we could not just simply remove them.
After some brainstorming, we came up with an idea – similar to code splitting, what if we didn’t load the scripts until necessary? We could render the page as fast as possible and then load the scripts later.
Our final solution was to only load the scripts once the user interacted with the page (move their mouse, click, scroll, etc.). PageSpeed Insights does not interact with your page, and therefore would not load the scripts at all, resulting in a higher performance score. The tradeoff of this approach is that we may lose a bit of data for users who land on the page but do not interact, however, we determined that this trade off was worth it.
We ended up building a React component that looks like this
This code adds event listeners to a few “interaction” events and runs a function when that interaction happens.
We now can load third party scripts like so:
After loading all our third-party scripts like this, our score improved to an average of 85 – we finally made some significant progress!
Further Optimizations
Our performance score was now sitting around 85, but we were not totally satisfied yet - we wanted to get our score above 90. At this point, PageSpeed Insights was not giving us any useful recommendations, so we decided to get our hands dirty.
After some performance profiling, we concluded that upgrading to Next.js 14 would be the best way to get a score of 90+.
Our journey of upgrading to Next.js 14 App directory will be documented in a separate blog, but in short, the upgrade helped us squeeze out another 10 points in PageSpeed Insights, bringing our score to an average of 95!
Conclusion
Improving the performance of our website was an eye-opening experience for the team. We learned many things such as
- How to properly use the Next.js Image component
- How to leverage Sanity’s CDN to request the proper image sizes and formats
- How to optimize the loading of third-party scripts
We also got a good reminder about how important code splitting dependencies is.
In hindsight, we should have realized that the blocking third-party scripts was the biggest issue we had, and we should have tackled that first. All the other changes we made did have a positive impact, but the changes we made to loading third-party scripts by far had the biggest impact.
There will be a follow up post talking about how we leveraged Next.js 14’s server components to squeeze out another 10 points on our performance score!
As always, if you have any questions, please reach out.