Roger Dunham
Published June 20, 2025
Updated June 20, 2025
5 min
Using Bun and Apryse WebViewer to Display Excel Files in the Browser
Roger Dunham
Summary: This guide shows how to use the Apryse WebViewer with Bun to build a fast, modern web app that allows users to view Excel (.xlsx) and DOCX files directly in the browser. It covers setting up Bun as both a package manager and server runtime, and includes code examples for loading documents with minimal configuration.
Viewing XLSX and DOCX files directly in the browser has become an increasingly valuable feature for modern web apps, whether for dashboards, collaboration tools, or document portals. With the Apryse WebViewer, developers can embed rich document viewing capabilities, including support for Excel files (.XLSX) with just a few lines of code.
With the rise of modern JavaScript runtimes such as Bun, creating performant, minimal server-side apps has never been easier.
Bun does more than just server-side though, it can also be used as an alternative to npm.
In this article, we’ll walk through how to use Bun to serve a simple web app that loads the Apryse WebViewer and allows users to view Excel documents directly in the browser. (Spoiler alert: We’re actually going to do even more than just work with spreadsheets.)
We will be using Linux (Ubuntu 24.02), but the process is essentially the same on other platforms.
Why Bun + Apryse?
Bun is a fast all-in-one JavaScript runtime like Node.js, but with built-in TypeScript support, a package manager, and native web server APIs. It’s ideal for lightweight apps and developer-friendly projects.
Apryse WebViewer is a powerful JavaScript-based viewer that renders PDFs, Office documents (including Excel), and many other formats directly in the browser, with no server round-tripping or plugins.
Together, they make a great combination for building a modern web-based document viewer.
A note on versions
This blog was written using Ubuntu 24.02. You should get similar results on other platforms.
Step 1- Install Bun
Bun is available for Windows, Linux and macOS and there are slight variations in how to install Bun between the platforms.
However, as this article is primarily about Linux, we can install Bun using:
curl -fsSL https://bun.sh/install | bash 
Figure 1 - Successful installation of Bun on Ubuntu. Note that it informs you how to initialize Bun.
Step 2- Create a new project
Bun offers support for any different front-end frameworks and build tools. For this example, we will use Vite.
So, let’s scaffold a new project:
bun create vite We’ll be asked several questions: about the project name, framework and so on.

Figure 2 - Scaffolding a project with Bun and Vite.
When the scaffolding is complete, we will need to install dependencies using:
bun install 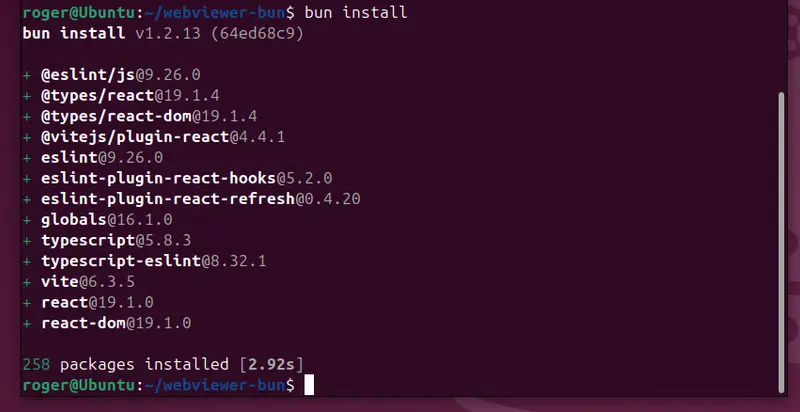
Figure 3 - Installing dependencies with Bun
This works in the same way as npm install.
Once it is complete we can edit the default source code. I will be using VSCode, but you can use whichever code editor you prefer.
Step 3 - Create method to copy static assets
We will be using the Apryse WebViewer. We need access to some of the library files on the server, and also on the client at runtime, so we need to make some of the static assets available.
Read more about copying Static Assets for WebViewer.
We will need to use static assets. We could copy those manually or use a script, but since we have Vite we can use the plugin vite-plugin-static-copy which we can install using Bun.
bun install -D vite-plugin-static-copy We will also need to update the vite.config.ts file, so that the plugin knows which files to copy and where to copy them to.
You can specify a different “dest” if you wish, but we need to make the code know the location that you have specified as we will see shortly.
Step 4 -Install WebViewer
Next, install WebViewer, which will copy the files into node_modules. Note that it still uses @pdftron, which was the former name of Apryse.
bun i @pdftron/webviewer 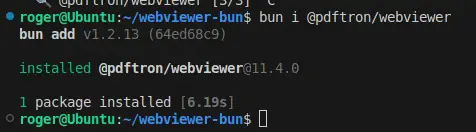
Figure 4 - Successful installation of the Apryse WebViewer.
Step 5- Update the default scaffolded code
Vite scaffolded a fully working project, but it contains a lot of things that we don’t need.
Let’s simplify what is there. For now, I won’t delete files, I will just update their contents, so that we can get a working Proof of Concept in a few minutes.
Styling matters a great deal, but for now remove the contents of the scaffolded CSS files (App.css and index.css)
Next, replace the contents of the App.tsx file with the following code:
Save the file.
The important parts are that we need to define a DIV element where WebViewer will be mounted. We then need to instantiate it. Because of recent changes in React (which cause “useEffects” to fire twice even with an empty dependency array), we are also using a useRef variable to make sure that we only call the constructor once.
The WebViewer constructor needs to know where the WebViewer library files can be found– in this example we have used “/lib/webviewer”. It’s important that this matches the value specified in the vite.config.ts file that we set up in Step 3.
Step 6 – Run the project
Great, we are now ready to use WebViewer so start the project using:
bun run dev As part of the process the vite-static-plugin-copy will fire, copying the WebViewer assets to the location that we specified.

Figure 5- bun run dev will start the development server.
We can now navigate to the location that the server is using (in this case http://localhost:5173), and we can see WebViewer running.
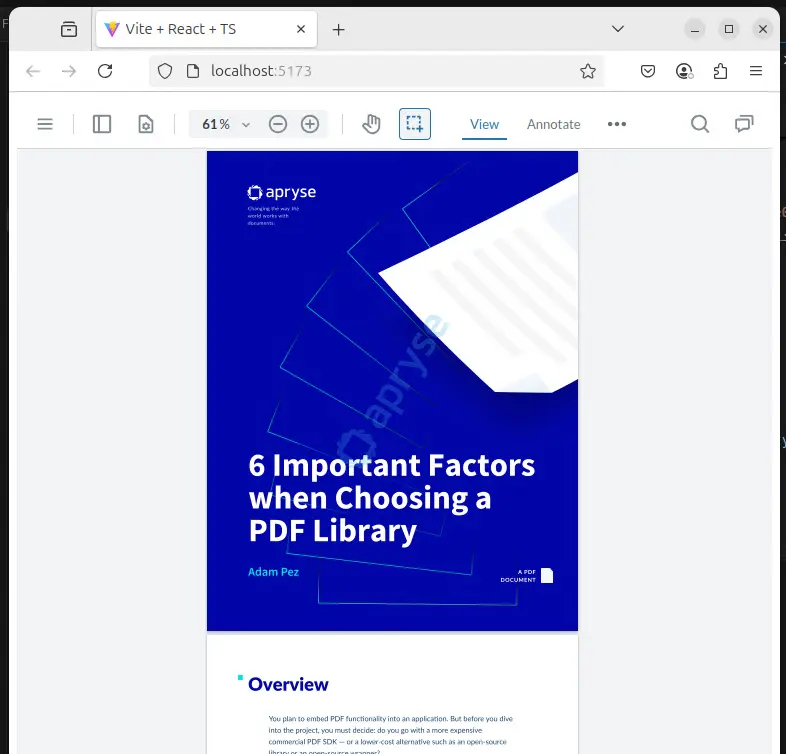
Figure 6 - WebViewer running in the browser.
So far, so good, but that’s not an Excel Document – which is what this article is supposed to be about!
You’re right, so let’s tweak out code slightly.
Step 7 - Opening other file types
Within App.tsx, change the code for the WebViewer constructor to be:
There are two important things here:
- We are using the Iframe version of WebViewer.
- We have set initialMode to be ‘spreadsheetEditor’ (though we could have used ‘Mode. SPREADSHEET_EDITOR’)
Now when we reload the page, we have access to the Apryse Spreadsheet Editor, and we can choose an XLSX file, and see the cell contents, and calculations that are being used.
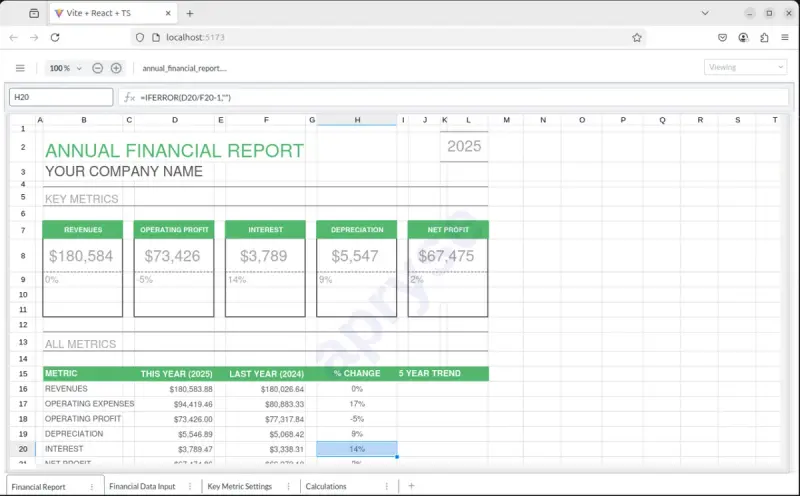
Figure 7 - The Apryse Spreadsheet Editor, shown on a machine using Ubuntu 24.02
That’s right – just a few changed lines of code, and suddenly you have a whole new UI and set of functionality available.
Now, let’s change the code again, this time adding “enableOfficeEditing:true”
If we save the code and reload the browser, then now we can open and edit DOCX files, even on a machine with neither Office nor LibreOffice installed! Simple, with no need to download files in order to edit them, and no need for an Office license.
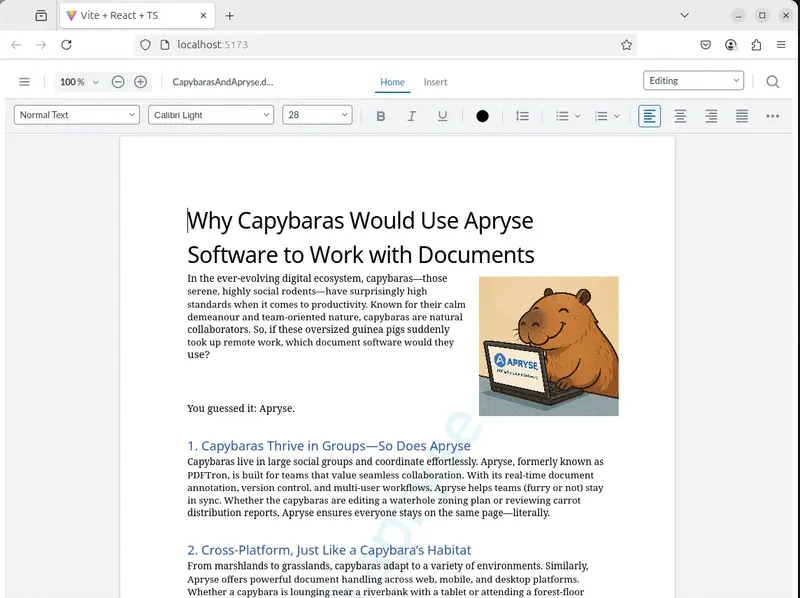
Figure 8 - A DOCX file shown running within the Apryse Web SDK.
That’s awesome – tiny changes in our code allow us to open up whole new areas of functionality.
That means that you can concentrate on the business specific things that you need, and Apryse has your back – making complex things, simple.
Where Next?
We have seen that while Bun is primarily a Node replacement, providing improved server-side performance, it can also be used as an npm replacement allowing client side code to be installed and served. It’s easy to get started, and when coupled with Apryse WebViewer you can quickly have a solution for working with PDFs, DOCX and XLSX files.
When you are ready to get started, see the documentation for the SDK, get yourself a trial license key and check out the samples and tutorials.
If you have any questions, then you can also reach out to us on the Apryse Discord channel.


