Roger Dunham
Published February 21, 2025
Updated May 18, 2026
6 min
Custom Digital Signatures using Azure – Client-Side Code
Roger Dunham
PDFs are everywhere, used for documentation, invoices, contracts and many, many other things. Digital Signatures can be used to provide a secure, verifiable, and tamper-proof way to ensure the authenticity and integrity of documents. Combining the two together allows you to use PDF based contracts, and other documents, with confidence.
In this article we will see how we can use the Apryse SDK to add a Digital Signature to a PDF using a certificate that is based on Azure. In a recent article we have seen how to Digitally Sign a PDF using the private key, but in this example the private key is stored on Azure and cannot be downloaded. As a result, the actual encryption that is part of the process of creating the signature is performed in the Cloud on the Azure server.
While there can be legitimate concerns about uploading files from your local machine onto a remote server, this is not an issue here. Using the process described in this article only a “Digest” (a few tens of bytes of data that are calculated from your PDF) is sent over the internet to Azure. That can’t be used to recreate your PDF, so the important, and possibly confidential, data in your PDF never leaves the security of your machine.
This article will use C#, but the same process can also be performed using one of the many other languages that the Apryse SDK supports, including Node.js, Java, C++, Ruby and Python.
There is a GitHub repo where you can get the source code for this article.
Creating a Custom Digital Signature using Apryse
Just as with the previous articles in this series we will be signing a PDF that ships with the Apryse SDK as part of the DigitalSignatureTest samples.
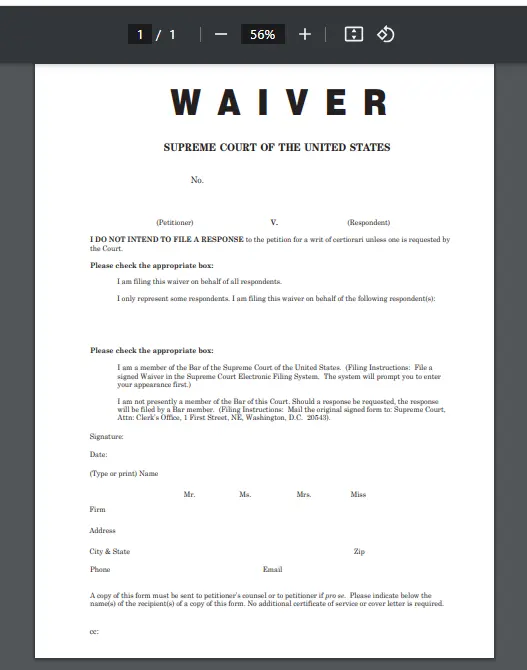
Figure 2 - The unsigned PDF
In the second article in this series, we saw the general way that custom signing of PDFs works. As a quick reminder the general process is shown in the diagram below.
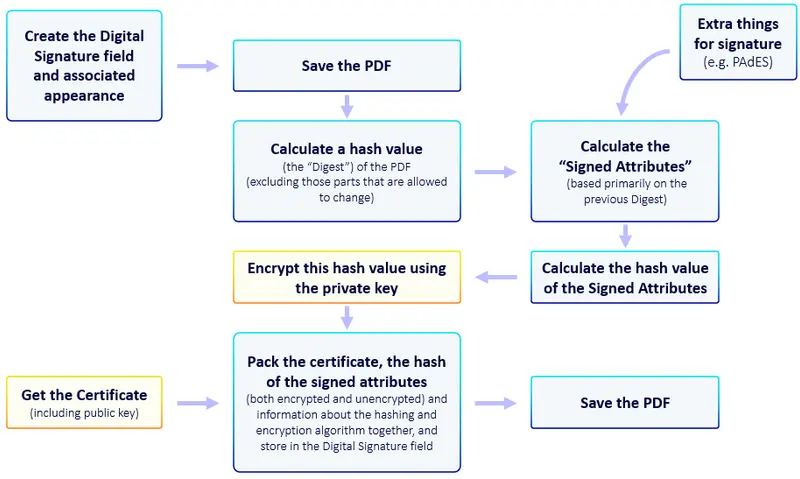
Figure 3 - The process for custom signing a PDF. The yellow boxes are the parts that differ when using Azure.
In the previous article the public and private keys and the digital certificate were all available on the machine where the code was hosted.
However, for this article the certificate (and the public key that it contains), is hosted on Azure, and the private key cannot be downloaded. As a result, the encryption of the hash value (the “digest” of the PDF) has to be performed within Azure itself.
While that sounds complicated, of the nine steps covered in the diagram, only two are different from what we have seen before.
- Getting the Certificate
- Signing the Digest
That sounds like a much more tractable issue – it’s just a minor extension of what we have already achieved!
Prerequisites
The code in the GitHub repo is intended to be a drop-in replacement for the code used in the standard Digital Signatures sample. It assumes that you already have a demo license available, and that you have downloaded the Apryse SDK.
It is strongly recommended that you get that sample working before you use the code in this article.
Within Azure you need to have created a Cryptography Client application on Azure and provided it with access to a valid Digital Certificate. The way to do this is described in the previous article.
You will also need the following information from Azure, so that the code knows exactly which certificate and which application to use, and to restrict access to only those people that should be able to sign documents. Those values should be put into an App.config file so that they are accessible from the rest of the code.
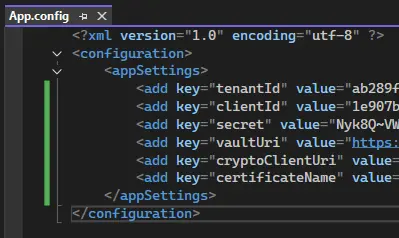
Figure 1 - The information that you will need to custom sign the PDF
Finally, you will also need to install some libraries in order to work with Azure. Within Visual Studio you can use NuGet to install.
- Azure.Identity
- Azure.Security.KeyVault.Certificates
- Azure.Security.KeyVault.Keys
Getting the Certificate
Azure allows us to access the certificate within an Azure key vault using a “Certificate Client”. However, since the Azure API is exposed to the entire internet, we need to control who can access our certificate. We can do that using a “Token credential” object.
The Credential object is based on the Tenant ID, the Client ID and the secret values that we saw when we set up the Azure Portal for this project – these should now be included in the App.config file.
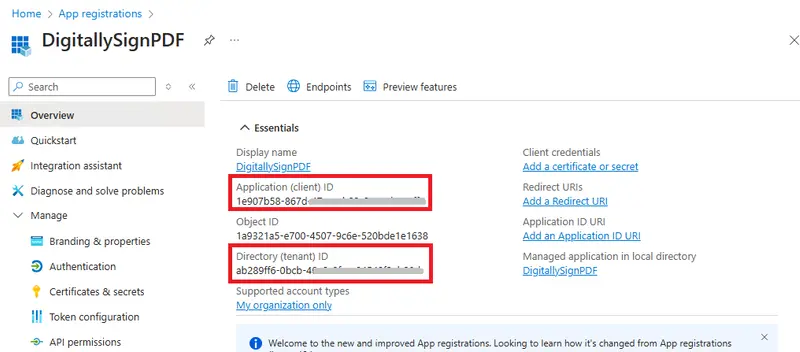
Figure 4 - Finding the Tenant and Client ID in Azure.
If you didn’t record those values, then jump back onto Azure and get them now. The previous article shows you how to do this.
The code in the sample is a little complex, since the Apryse SDK uses its own types for Cryptography, so it is necessary to marshal the .NET types into these.
In production code I would move this functionality into a helper class to avoid that detail - passing in the credentials (which are also used later in the code), and the certificateName (which we called “BlogCert" in the previous article) and the vaultUri (both of which should be included in the App.config file).
For the sake of walking through the code, in this article, I’m keeping everything together in a single function.
At the end of this code block we have the digital certificate that will be used for verifying the signed PDF and extracted from that the certificate chain that establishes the Certificate Authority.
If you have created a self-signed certificate, then the certificate chain will (almost certainly) only contain your own certificate – ultimately that will cause the issues with trust that we saw and resolved in the third part of this series, when we added the certificate to the list of trusted certificates within Xodo PDF Studio.
Encrypting the Signature
When we create a digital signature locally, we calculated a “digest” for the PDF (in fact we calculate two, the first of which is used as one of the inputs to the second “signed_attributes” one).
Those digests are typically just 32 bytes long (though that depends on which algorithm is used to calculate it). If anything in the PDF changes after the PDF is signed then recalculating the digest would give an entirely different value – this is what is used to verify that no changes have occurred.
Whether or not we are using a local or Azure based certificate the mechanism for calculating the digest is the same. The difference comes when encrypting the digest using the “Private Key”.
With an Azure based certificate the Private Key may not be available. That’s not a problem - we just need to pass the digest to the CryptographyClient app that we created in Azure specifying the key of the certificate that we want to use.
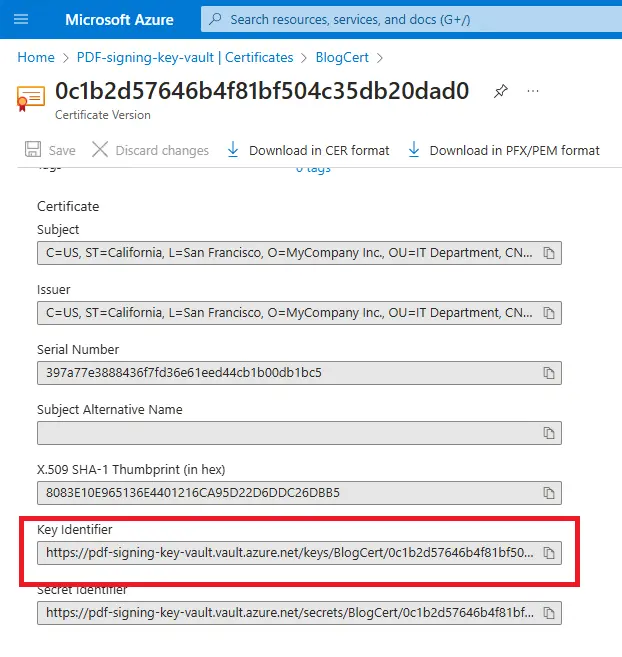
Figure 5- You will need to pass the Key Identifier to the code. I've stored this in the Environment variable " cryptoClientUri"
Once again, if I was creating production code then I would extract functionality to a separate class.
Just as before there is a need to marshal from .NET to Apryse specific types (in this case the value of the Algorithm enum). The “real” work is done in the function call client.Sign(algorithm, signedAttrs_digest); which returns an object that contains the “Signature” (the encrypted value).
Combine various pieces of data into the CMS signature.
Almost there! The CMS (Cryptographic Message Syntax) Signature is based on:
- the certificate – which we got using certificateClient.GetCertificate(certificateName);
- the certificate chain – which we calculated from the certificate
- the algorithm that was used to create the hashes
- the algorithm used to calculate the signature
- the signature - which we got using client.Sign(algorithm, signedAttrs_digest);
- the Signed Attributes – which the Apryse SDK calculated for you
The code used to combine these and save them into the PDF document is identical to what we have seen before.
That’s it – you are ready to use the code!
Seeing the Results
If you run the code in Visual Studio, you will see a couple of times when the code takes a little time to contact the Azure server and get a response. After a few seconds though the signed PDF will be created, and you can see the results in Xodo PDF Studio.
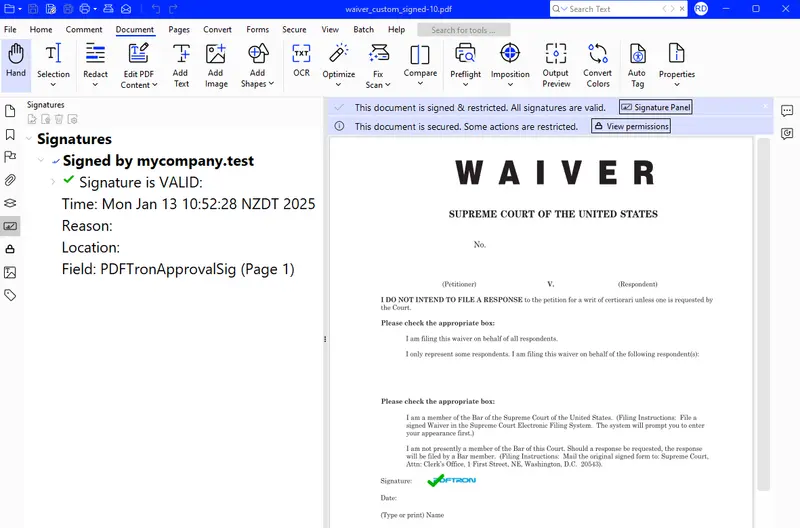
Figure 6 - The signed PDF in Xodo PDF Studio
Even though the certificate was based in the cloud we have a valid signature.
In this case the certificate was the self-signed one that we created in the first part of this series and added it to the list of certificates that Xodo PDF Studio trusts that in part 3. As a result, that certificate is still Trusted, even though the signing is now performed remotely.
If you generated a new self-signed certificate in Azure rather than importing the one that was previously created, then you would get issues with Signature validation. Check out the section on trusting a self-signed certificate in Xodo PDF Studio.
That’s a great result - we have leveraged what we had previously learned, combined that with the power of Apryse and ended up with a solution for digitally Signing PDFs using a certificate on Azure.
Where Next?
In this article we deep-dived into creating a custom digital signature using an Azure based certificate which is a niche (but not unusual) use-case.
Creating digital signatures can be much simpler than this if the certificate and private key are available locally – check out the DigitalSign sample, where the entire process can be done in one line in the “SignPDF” method.
If, however, you decide that signing a PDF within code is not what you require but you still need to sign PDFs, then Xodo PDF Studio offers two other options:
- signing documents directly with a digital ID from within its UI
- using the Xodo Sign workflow
The Apryse SDK can do much more than sign documents though – you can create PDFs from scratch or by converting HTML to PDF, or Office to PDF, you can also edit PDFs either via the SDK or directly within the browser, and a host of other functionality.
So, grab yourself a free trial license, download the SDK in whatever programming language you prefer and give things a go. There’s a wealth of documentation available as well as blogs to help you get started.
Digital Signatures are complex though, so if you need support then please reach out to our team on our Discord channel.