Roger Dunham
Published January 31, 2025
Updated May 18, 2026
7 min
Custom Digital Signatures - Part 2
Roger Dunham
Summary: This article explains how to create custom digital signatures for PDFs using the Apryse SDK. It highlights the importance of digital signatures for ensuring the authenticity and integrity of documents, particularly in contracts. While adding a basic digital signature is straightforward, more complex scenarios such as using cloud-based or hardware-stored keys and adding extra information for compliance (e.g., PAdES), require custom digital signatures.
Introduction
PDFs are everywhere, used for documentation, invoices, contracts and many, many other things. When working with contracts though, how can you tell whether a “signed” document was actually signed by the correct person, and that no changes have been made to the file since?
That is where Digital Signatures come in, providing a secure, verifiable, and tamper-proof way to ensure the authenticity and integrity of documents.
This is the second article in a series about using Digital Signatures with the Apryse SDK. In the previous article we saw what Digital Certificates are and how to work with them. In this article we will look at how to create a custom digital signature.
Adding a digital signature to a PDF can be as simple as finding the correct place to add the signature, then calling SignOnNextSave passing in the path to the .pfx file and its passphrase and then saving the PDF.
But that won't work easily if you need to have a cloud-based key or one that is stored on hardware. You might also want to add extra information to the signature, perhaps for PAdES compliance.
That is where the Custom Digital Signatures are needed.
Creating a Custom Digital Signature Using Apryse
To demonstrate adding a custom digital signature, we will use the sample code that you can download from Apryse.
For this article, I am using C#, but the samples are also available in many other languages including Java, Node.js, C++, Ruby, and Python.
There’s a whole sample file for digital signatures (and by all means check it out), but for now we are just interested in the CustomSigningAPI method. The process is complex, but we will walk through it in this article.
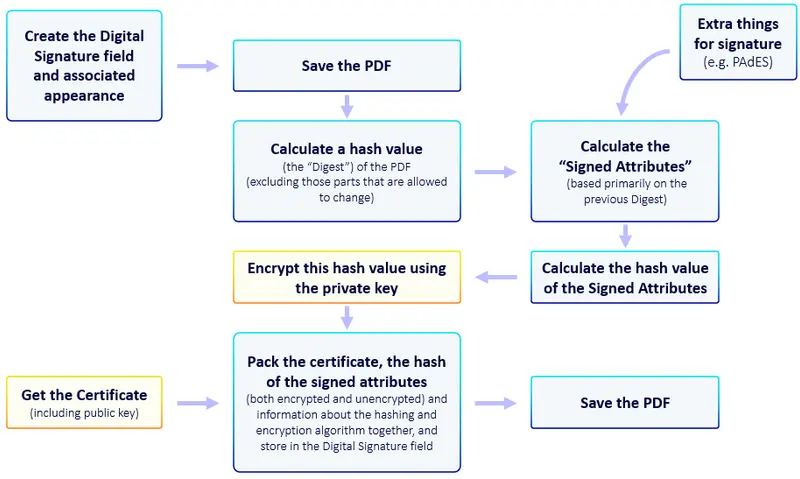
Figure 1 - The process of custom signing a PDF. The blocks in blue are the main parts that can be customized.
In a future article in this series, we will use a digital certificate that is based on Azure, but for now, and as a way of learning how things work, we will still use a local certificate and key.
This function takes a PDF (the example is a Waiver document) and will add a Digital Signature to it.
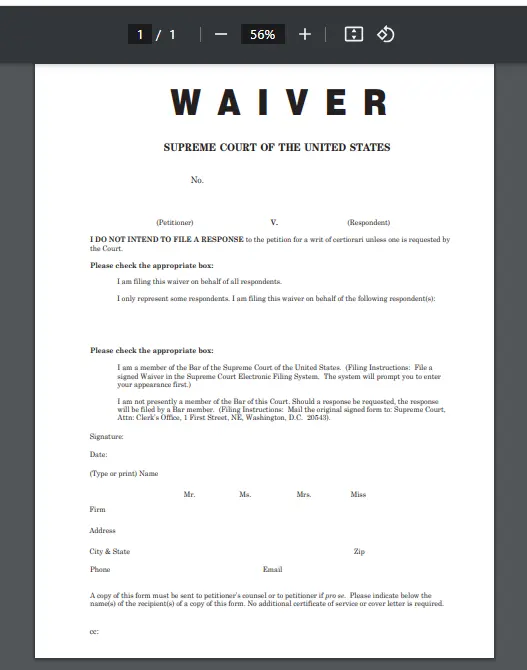
Figure 2 - The unsigned PDF.
The code sample supports functionality including PAdES support which makes it powerful but complex. However, it contains lots of comments making it easy to follow, so I won’t repeat it all here, but the main steps are:
Step 1 – Add a place to store the signature in the PDF to contain the signature
In order to add a digital signature, there needs to be a place within the PDF where it can be stored. The sample PDF doesn’t contain one, so it is programmatically added along with an associated Signature Widget.
While it is optional, the sample code also adds an image to the widget (in this case it’s the Apryse logo, but it could be a scan of a “wet” signature) to make it clear that it has been signed.
Step 2 – Save the file
There are lots of ways that the Apryse SDK allows you to save files, and linearized is often recommended. However, when working with Digital Signatures, if two or more people will need to sign the same PDF (which is common with contracts) then it is important to save incrementally. If that isn’t done, then when the second signature is added it will invalidate the first one.
doc.Save(output_path, SDFDoc.SaveOptions.e_incremental); Step 3 – Calculate the Hash for the PDF contents
Next a “digest” is created for the PDF file. This is the “Hash” that you will often see mentioned in articles about how Digital Signatures work.
The idea of the digest is that it is a set of bytes that is calculated from the file contents, excluding the parts that will be changed when we add the signature.
If any parts of the file change, even the time stamp for the PDF, then calculating the digest would give an entirely different result. Therefore, if the same hash is generated at different points in time, there is evidence that the file has not been changed.
byte[] pdf_digest = digsig_field.CalculateDigest(digest_algorithm_type); There are different algorithms that can be used to create this hash, but typically it will be the SHA256 algorithm. The size of the resulting hash depends on the algorithm used, but for the SHA256 algorithm the digest will be 32 bytes in length.
Step 4 – Create a set of Signed Attributes and create another hash
At this stage there may be multiple, additional, attributes that you want to add to the signature. In the example, a PAdES ESS attribute is added.
Having done that, a set of “Signed Attributes” (attributes that not yet signed but will be in the next step) are created that include the first hash that was created in step 3.
This set of Signed Attributes is then, itself, hashed.
Step 5 – Encrypt the hashed signed attributes using the certificate, private key and passphrase.
The resulting signedAttrs_digest is then signed.
byte[] signature_value = DigestAlgorithm.SignDigest(
  signedAttrs_digest,
  digest_algorithm_type,
  private_key_file_path,
  keyfile_password);
Step 6 – Build up a certificate chain
If you purchased the Digital Certificate from a Certificate Authority, then it would have a trust chain. That also needs to be built up for inclusion in the final signature. In our example, we created a self-signed certificate, so there is no need to do so.
// Then, load all your chain certificates into a container of X509Certificate.
X509Certificate[] chain_certs = {};
Step 7 – Combine all of the various parts into the CMS signature
Almost there! The CMS (Cryptographic Message Syntax) Signature is based on the certificate, the certificate chain, the algorithm that was used to create the hashes, the algorithm used to calculate the signature, the signature value (which includes the hashed Signed Attributes created in Step 5), and the Signed Attributes themselves.
Step 8 – Save the file with the CMS signature and Digital Signature field
Finally, we just need to save the file.
// Write the signature to the document.
doc.SaveCustomSignature(cms_signature, digsig_field, output_path);
Seeing the results
You can run the sample code exactly as shipped – there is a certificate and private key included in the test files. Alternatively, you can use the certificate files that we created in the previous article in this series.
In either case, after a few second, a new file will appear in the output folder.
If we open that in Chrome, it is – to be honest – rather underwhelming.
All that code, and the only obvious difference is that there is an image in the Signature field.
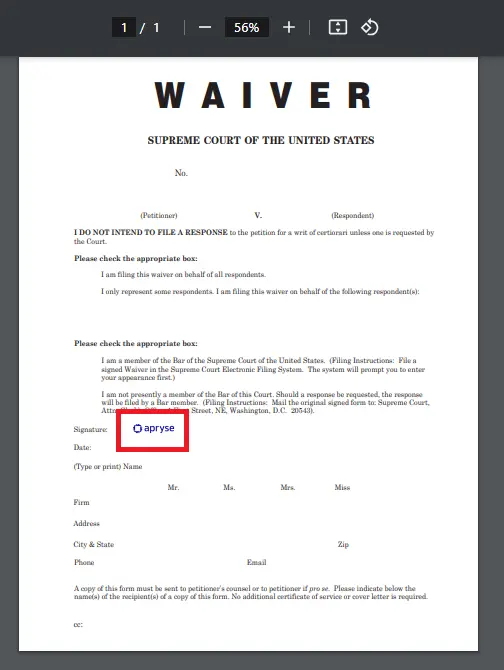
Figure 3 - The signed PDF. If you open it in Chrome, then the only apparent difference is that there is now an image next to the Signature label.
If you decide that signing a PDF within code is not what you require but you still need to sign PDFs, then Xodo PDF Studio offers two other options – you can sign documents directly with a Digital ID from within its UI, or use the UI to start the Xodo Sign workflow.
Validating the Digital Signature in Xodo PDF Studio
Not all PDF tools are the same, though. If you open the same file in Xodo PDF Studio – a desktop tool from Apryse that works on Windows, macOS and Linux, you can see that there is extra information presented.
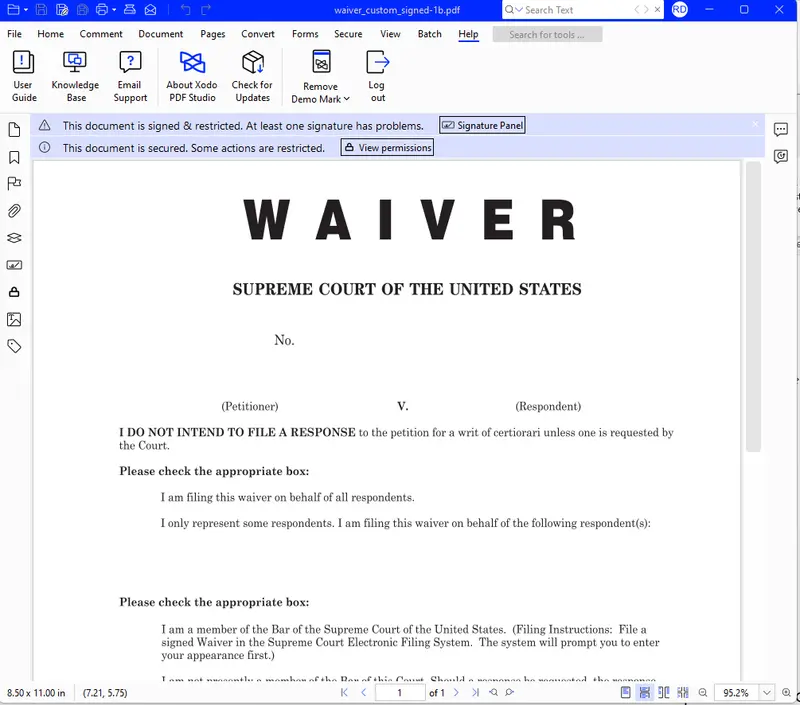
Figure 4 - The same file in Xodo PDF Studio – there is more information at the top of the PDF.
In the next part of this series, we will look at what that information means, see how we can validate that the Digital Signature is correct, add the certificate to the list of Trusted Certificates, and see what happens if someone tampers with the file.
Awesome!
Wrapping up
In this article, we have seen how to add a Digital Signature to a PDF using a custom signing method and the Apryse SDK.
That’s a lot of functionality within the Apryse family – and of course there is much more, including in-browser PDF and DOCX editing and much, much more.
So, grab yourself a free trial license, download the SDK in whatever programming language you prefer and give things a go. Digital Signatures are complex, so if you need support then please reach out to our team on our Discord channel.