Roger Dunham
Updated September 26, 2024
4 min
PDF Document Generation Using JSON and JavaScript
Roger Dunham

Summary: Learn how Apryse WebViewer can automate document generation, saving time and ensuring data consistency while reducing errors and confusion. This guide offers valuable insights if you need to convert JSON data into reports.
Introduction
I create a lot of blogs and videos, which is a remarkably complex business with input needed from graphic designers, proofreaders, and so on. To manage the process, we use a project management tool called Asana which allows team members to collaborate as blogs move from vague ideas to the final polished article with graphics and links.
As with every business, there’s a need to let managers know what is going on – and while Asana has tools for doing this, it also has an API that can be queried and creates output as JSON.
In this article, we will see how Apryse WebViewer can take that data and use it to automatically generate a report – in this case – the list of articles and videos that have been created in the month. Automatic report generation from this data not only saves time in itself, but by having a “single source of the truth” rather than multiple, potentially conflicting, versions of information in spreadsheets, Word documents, and elsewhere, it can avoid confusion and missed deadlines.
There is nothing special about the data that I’m using, so if you have a similar problem – data in JSON format that you need to convert into an up-to-date report - then read on!
Step 1: Get the raw data
The Asana API generates JSON data, including the range of fields that I want. Other tools have similar data access APIs, providing a way to query them and return data in a human-readable format.
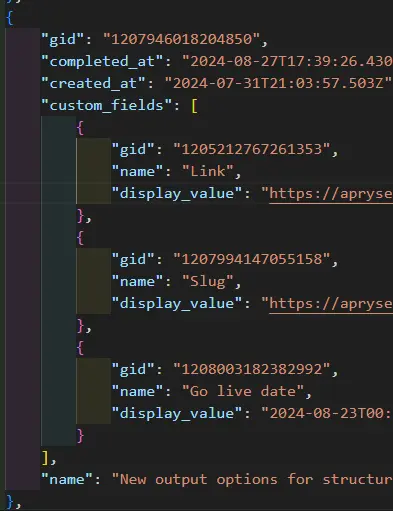
Figure 1 - Example JSON output from querying a RESTful API.
Step 2: Transform the data
The JSON from the API is a great start, but a little additional processing is needed to transform it into the data structure that Apryse Document Generation needs.
The Apryse Document Generation API involves string substitution and accepts only strings.
While it is possible to specify date formatting in the template for now, we will just create the strings in the JSON file in exactly the way that we want them to be in the final document.
Fluent is an alternative document generation mechanism and can use the data as it is.
As an example, the incoming JSON has dates that include the time (e.g. 2024-09-06T00:00:00.000Z), but in the final report, we just want the date (e.g. 2024-09-06).
The incoming JSON also contains custom fields with sub-items – these are in a form that can’t be handled directly in Document Generation – so they need to be modified to create top-level elements that take the name and display-value for each custom field.
In this example, there are no numeric values, but if there were then they would also need to be converted to strings.
As part of the data transformation process, I took the opportunity to add a few lines to the transformed JSON file that indicates when the data was generated, the month that it relates to, and an aggregated total for the number of blogs and videos (calculated from values in the data).
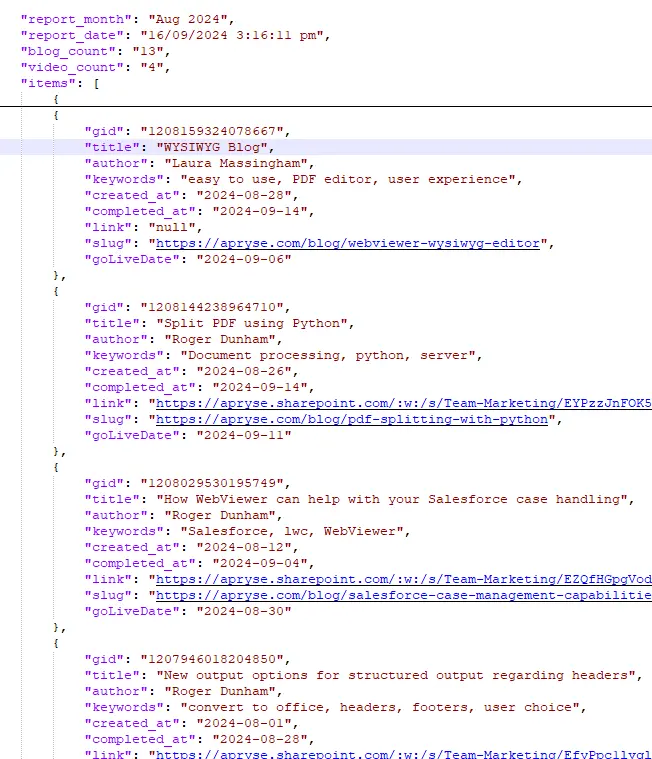
Figure 2 - The transformed JSON, with formatted dates, and explicitly key-value pairs for custom fields.
I used C# to transform the data, but it could be done in python, Node.js or a host of languages.
Step 3: Create a Template in Office
The Apryse SDK Document Generation system uses JSON data to replace values marked with delimiters in an Office Document. No special software is needed to create the template file, anything that understands the DOCX (or XLSX and PPTX) format will do – including GoogleDocs, OpenOffice and LibreOffice.
There are a few rules that you need to follow when creating the template, but they give a lot of flexibility – such as having loops and conditionals.
Anyone with moderate knowledge of Word will be able to create and edit templates – they just need to add the tags with the formatting that should be used for the substituted text when generating the final document.
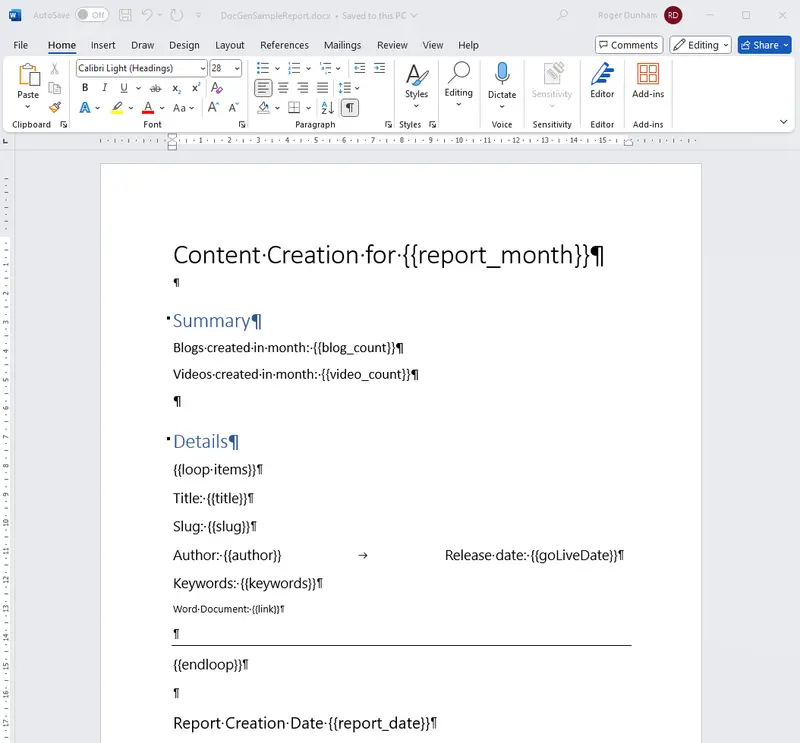
Figure 3 - Example of a DOCX template for use with Apryse Document Generation.
Step 4: Get a Trial License for WebViewer
Apryse Document Generation can be performed on the server with the Apryse SDK, or within the browser if you are using WebViewer – a JavaScript Document SDK with an opensource UI. For this article we will just look at WebViewer, though the principles are essentially the same for server-side document generation.
It’s easy to use WebViewer, but you will need to get a free trial license for WebViewer.
Step 5: Add some code to WebViewer
There’s lots of samples that show how to get started with WebViewer. These cover a range of frameworks, for example React, and there are also ready-to-go WebViewer samples on GitHub.
Watch a video on getting started with WebViewer with React and Vite.
If you haven’t used WebViewer before then I recommend getting one of the samples working before you proceed further.
Once you have a working environment, you can drop the following code into it:
Essentially the code initializes an instance of WebViewer, and when that is available loads the file DocGenTemplate.DOCX as a template.
There is a gotcha – the path used for loadDocument is relative to the WebViewer UI location, not directly within the public folder.
This causes the documentLoaded event to fire, with applyTemplateValues being used to fill the template with data from jsondata. The various placeholders in the template will be replaced with content from the JSON, and the {{loop}} syntax will result in a section being created for each of the blogs that was described in the JSON data.
Finally, and with no extra effort from you, the generated PDF report is displayed in the viewer.
Step 6: Be impressed with the automatically generated document
Wow! With no extra effort you have a great document populated with the latest data which was extracted from the Asana API.
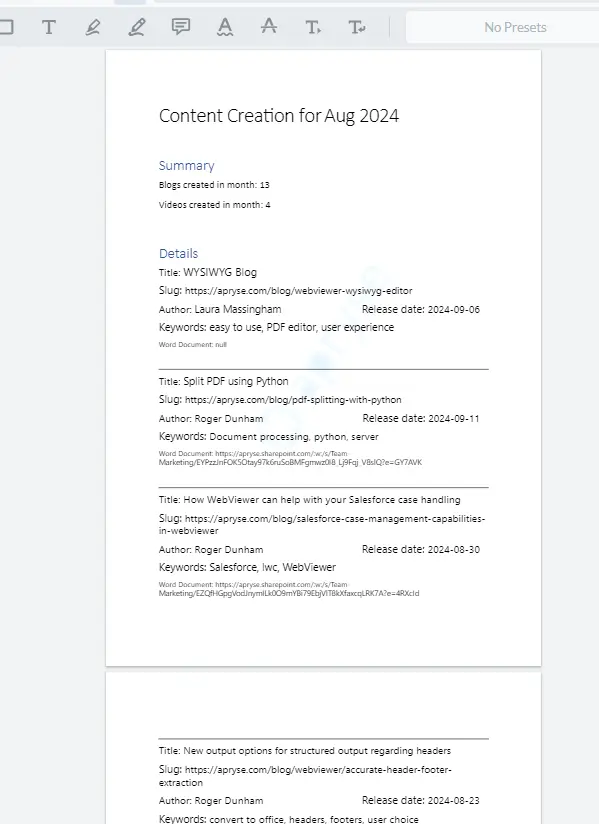
Figure 4 The finished document - generated from JSON
You can of course reuse the template, so the next time that you get data you can quickly re-run the process and get an updated document.
Step 7: Update the template (optional)
If there is ever a need to modify the template, then that is easy to do. Let’s look at an example which will also illustrate the use of Structured Input.
One problem with the existing document is that the path to the draft Word document is long and not meaningful.
WebViewer is smart enough to work out that it is a hyperlink, allowing you to click it and be taken will take you to the document, but it’s still unnecessarily long.
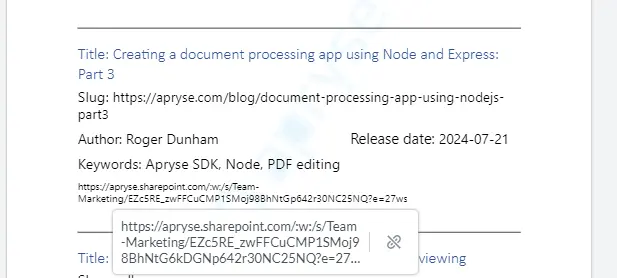
Figure 5- WebViewer identifies that the text is a URL and creates a hyperlink to it. That's great but not ideal in a report.
Let’s swap that for an explicit hyperlink.
We can do this by changing the way that we transform the JSON, to create a block of HTML.

Figure 6 - An example of using structured input to create a block of HTML
Now when the document is generated the tag {{link}} will be replaced with the HTML and a hyperlink is added that says ‘Draft document’.
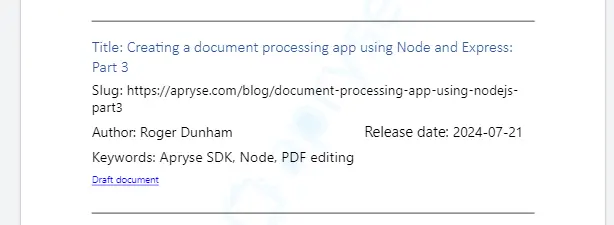
Figure 7 - By using Structured Input, the URL to the draft document is still available, but is now aesthetically more pleasing.
Conclusion
We’ve only scratched the surface of what can be done with automated document generation in WebViewer. We created a simple report generated as a PDF, but it is also possible to create a Word document. The document can also include images and tables, to name just a few of mechanism’s abilities. Why not check out the documentation for Document Generation?
Dive in, get that trial license and see how Apryse can save you time by producing high quality, timely reports and documents. If you run into any problems, then feel free to reach out to us on Discord.


