Apryse
Updated May 02, 2024
8 min
Safeguarding Sensitive Information: PDF Data Redaction Guide with Angular in WebViewer
Apryse
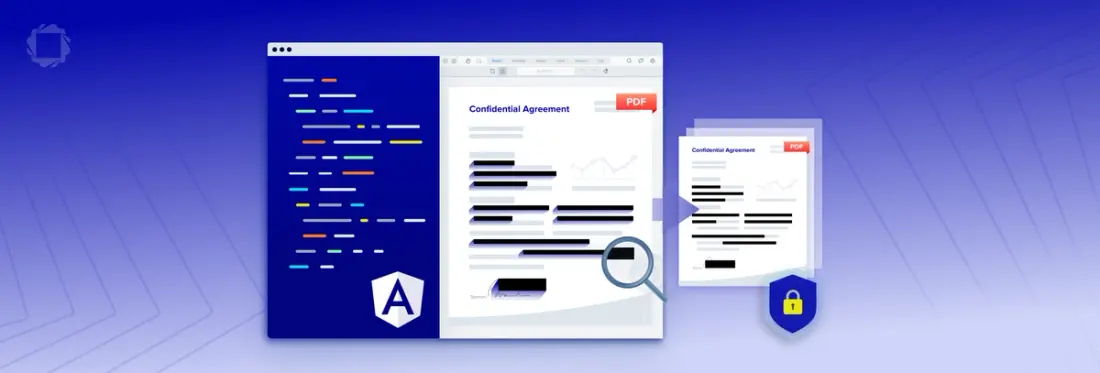
Explore this blog to discover how to apply redactions to sensitive information in PDFs using the Apryse WebViewer integrated into an Angular web application. Gain insights into manual redaction, text-based redaction, leveraging Ready-to-Use Search Patterns, employing regex-based searching, and redacting office documents.
Introduction
In an increasingly digital world, where information is shared at the click of a button, ensuring the security and privacy of sensitive data has become a paramount concern. Whether you're dealing with financial records, legal documents, or personal information, redacting data in PDFs is a critical practice to prevent unauthorized access. In this blog post, we'll delve into why redaction is important, how to redact data effectively, real-world consequences of inadequate redaction, and using WebViewer to streamline the process.
Understanding Redaction: Why It Matters
Redaction involves the careful removal or masking of sensitive information from a document, ensuring that the content is no longer visible or accessible. This process is vital for various reasons:
Protecting Privacy: Redaction safeguards personal and confidential data, preventing it from falling into the wrong hands. This is especially relevant in fields like healthcare, legal, and finance.
Compliance: Many industries are subject to regulations that require the protection of sensitive information. Failure to comply can lead to legal and financial consequences.
Data Breach Prevention: Even a single instance of exposed sensitive information can lead to a data breach. Redaction minimizes the risk of such breaches by erasing the information completely.
Maintaining Transparency: Redaction allows organizations to share documents while keeping certain information hidden. This is crucial when disclosing information publicly without revealing proprietary data.
The Consequences of Inadequate Redaction: A Real Example
The dangers of inadequate redaction were starkly illustrated in a widely publicized incident involving a legal case in 2019. A major news outlet obtained court documents that were meant to be redacted, revealing sensitive details about a high-profile case involving a prominent business figure.
The documents, initially thought to be properly redacted, contained blacked-out sections that were easily reversible. A simple copy-and-paste operation allowed the news outlet to uncover names, addresses, financial details, and other confidential information that should have remained hidden. The reputational and legal consequences were severe.
Methods for Redacting Data:
Manual Redaction: The traditional method involves printing out the PDF, physically redacting the information using black markers, and then scanning the document back into digital format. While this method is labor-intensive and prone to errors, the print and rescan mechanism guarantees that any hidden metadata in the original document cannot exist in the final redacted version.
Digital Redaction Tools: A number of websites and software tools offer the modern equivalent of allowing a user to select text or images and obscure them. Some of these software tools just hide the information. The data might look redacted, but it is possible for it to be extracted using copy and paste as described above.
Apryse, on the other hand, both blacks out the data and removes the underlying content.
In addition, to manual selection of areas to redact, text-based redaction is also possible, whereby the PDF is searched for text that matches a particular word or pattern (e.g. a Regex), and marks that content for redaction. This method can also be used for finding text that is obscured or non-visible, perhaps because the text is the same color as the background.
Apryse offers region based, text based and pattern-based redaction. To see this in action head over to the sample https://showcase.apryse.com/redaction.
Getting Started with Redaction with Angular and the Apryse WebViewer
The example in this article uses Angular for web development, but examples also exist for many other frameworks including React, Vue and Blazor.
Starting from https://docs.apryse.com/try-now/ select Web App, then Angular, then press Get Started.
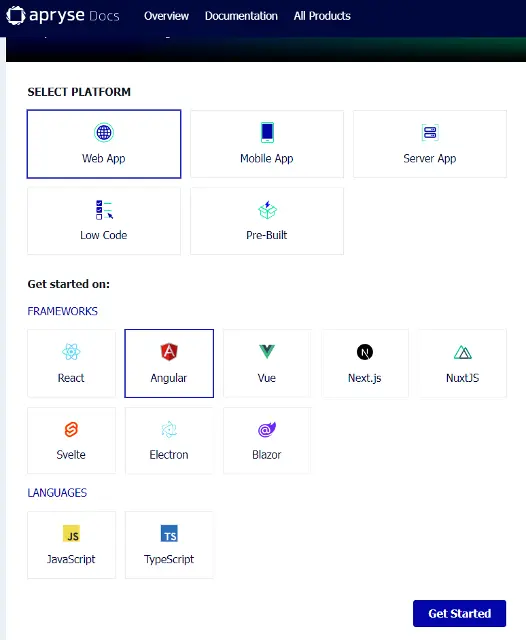
Figure 1 - How to get started with an Angular project.
There is a great guide that will help you to get started with Angular, but in this example let’s use the ready-to-go sample on GitHub.
Within a VSCode terminal, navigate to the folder where you want the project and enter
Git clone https://github.com/PDFTron/webviewer-angular-sample.git
Git will do its magic and after a few seconds the repository will be available.
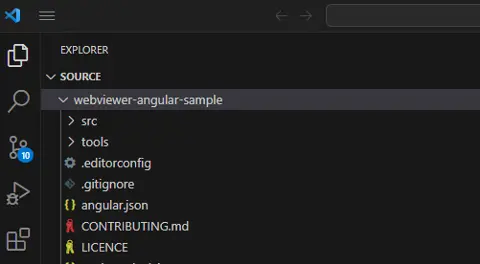
Figure 2- the Angular sample folder after cloning from GitHub.
Having downloaded the file, run npm install to install the dependencies.
Getting the License and Updating the Code
Now enter the value for a Trial license key. This is available from the Get Started page if you have already requested one. If not, then it will lead you through the steps to do so.
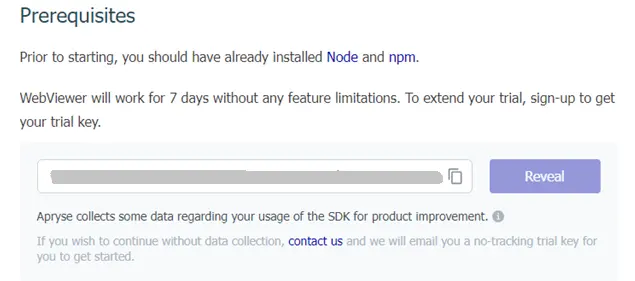
Figure 3 - The getting started page that indicates where you will find the Trial key.
Reveal the key if necessary and paste it into the file app.components.ts
You are now ready to run the basic Angular Sample, so enter npm start.
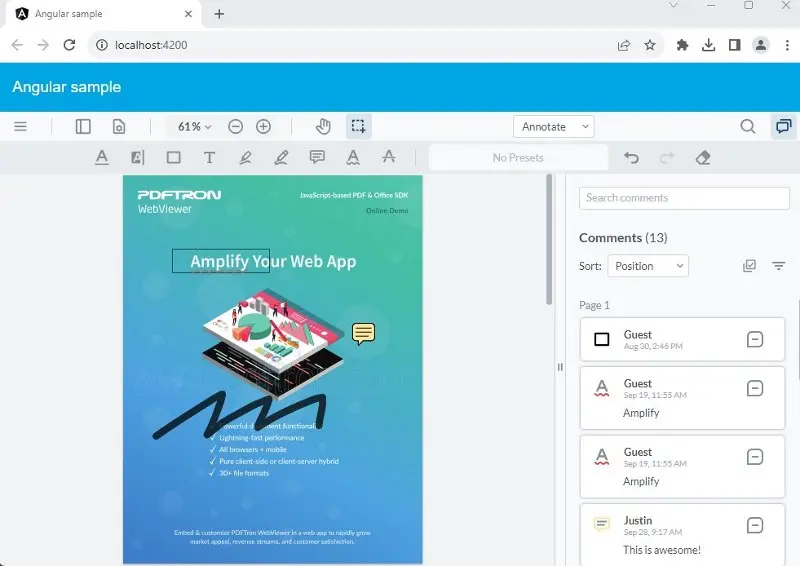
Figure 4 - A view of the basic Angular sample.
That’s great! You’ve got a PDF viewer and editor working. If you haven’t seen this before, then it is worth spending some time trying it out.
Adding Redaction Functionality
By changing just a few lines of code, we can modify this example and make it much more powerful, allowing us to open a PDF, redact and save it.
What we have done is remove the initial document that will be loaded, removed the menu items that aren’t needed, then added redaction, and a file picker to allow us to choose any document that we like.
The most important change is fullAPI: true
By default, the WebViewer loads just a subset of its potential functionality in order to minimize memory usage and data transfer requirements. Redaction is a more complex scenario, so additional functionality, which is only available from the full API, is required.
Having made these changes, restart the App, and you will be able to see that the UI has been updated.
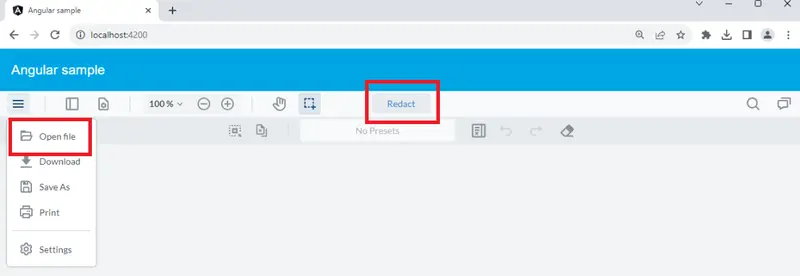
Figure 5 - The Angular sample after the UI changes have been made.

Figure 6 - The button to enable redaction marking to begin.
There are two ways of redacting:
- Manually
- Text searching (possibly with patterns)
We will cover each in turn.
Manual Redaction
Manual redaction involves just clicking on the redact selection button and dragging over the area to be redacted.
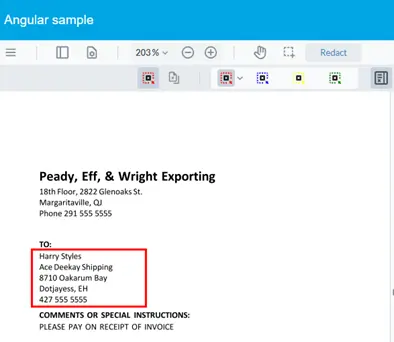
Figure 7 - The first part of manual redaction - selecting the area to redact.
There are different color options available for marking areas to be redacted. These can be used, for example, to indicate items that some of text might need to be reviewed by a co-worker to confirm that redaction is required, whereas there is no doubt for other text.
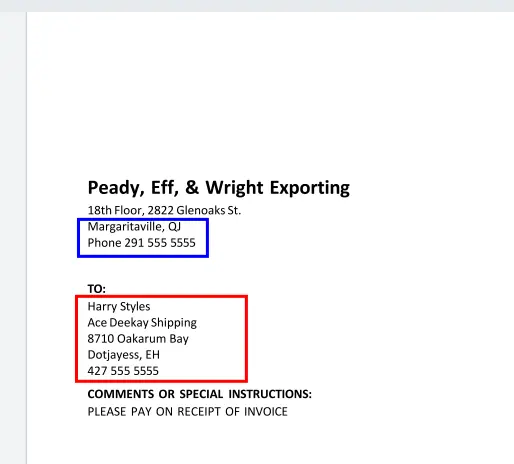
Figure 8 - An example of multiple colors used to mark text for redaction.
The list of marked text items can be seen in the Redaction Panel. If this is not visible, then click on the icon in the Redaction tool bar.
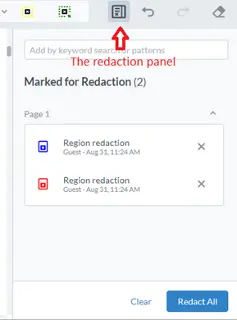
Figure 9 – The redaction panel, listing items marked for redaction.
At this point any area marked for redaction can still be deselected.
When the list is correct, click on Redact All
You will be asked to confirm redaction.
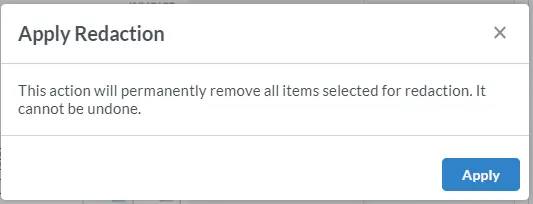
Figure 10 - The confirm redaction dialog.
After clicking Apply, the areas that were highlighted will be blacked out, and any underlying text will be removed.

Figure 11 - The result of redacting regions of the PDF.
Manual editing is a great start, but it could become tedious if the document is extremely long. To avoid that, text-based redaction is also possible.
Text Based Redaction
Text based redaction supports selecting text by searching for keywords or patterns. One example would be to redact a person’s name in, for example, a legal document.
Although it is a trivial example, let’s redact the name Carrie from the PDF.
In the Redaction panel enter the word ‘Carrie’ in the search box and press return.
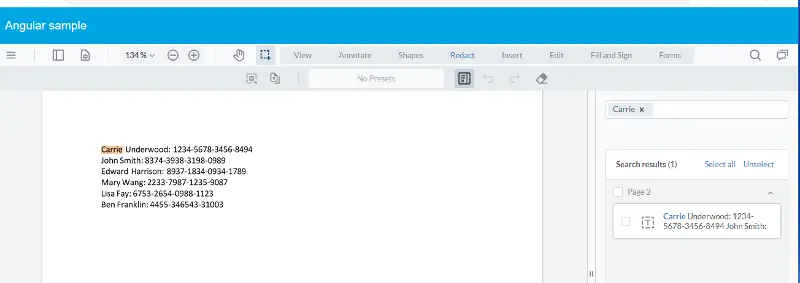
Figure 12 - The result of searching for specific text within the PDF.
The entire text of the document will be searched, and every instance of ‘Carrie’ (in this case just one) will be highlighted.
Ready-to-Use Search Patterns - Emails, Phone Numbers and Credit Card Numbers
We have seen that it is possible to search for specific text, but what about searching for types of text, for example phone numbers of credit card details? That would be very painstaking to do by hand.
Thankfully, the Redaction search box supports searching for some common patterns – emails, phone numbers and credit card numbers. These are ready to use as soon as you add the Redaction option to a WebViewer.
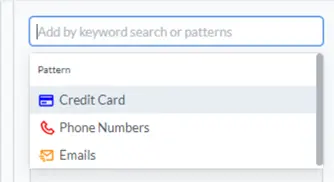
Figure 13 - The built in search patterns.
One of the really great things about this mechanism is that it will even search for text that is not visible.
Let’s look at an example. Imagine that we have a Word document that contains confidential credit card information, and someone had the bright idea of ‘hiding’ two of the credit card numbers – one by giving it white text, and the other by obscuring it behind a text box. To a casual viewer, those items are no longer visible. Trying to hide information in this way might seem ridiculous, but similar techniques – black text on black background, and obscuring behind black text boxes in Word - come up regularly in Google search results for ‘How to Redact text’.
Another place where redaction can easily fail is when the information to be redacted is somewhere other than the main text, for example within a comment.

Figure 14 - Examples of how confidential text can easily be missed during redaction.
Apryse does a great job of finding these areas of text.
Click on the search box and choose Credit Card.
In just a few moments the credit card numbers, even those in comments and that were not visible, are found and marked for redaction.
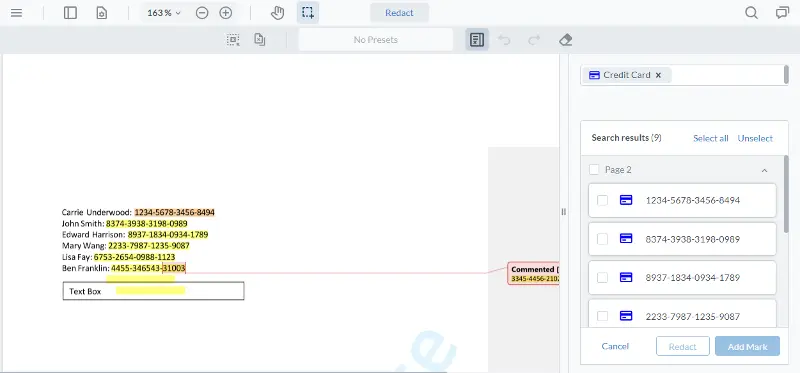
Figure 15 -The areas of text recognized as containing credit card numbers in various formats, including non-visible text, and that within comments.
Having been identified, they can then easily be redacted.
Not only are they marked with a blackout box, but the underlying content is removed so that copy and paste does not return anything unexpected.
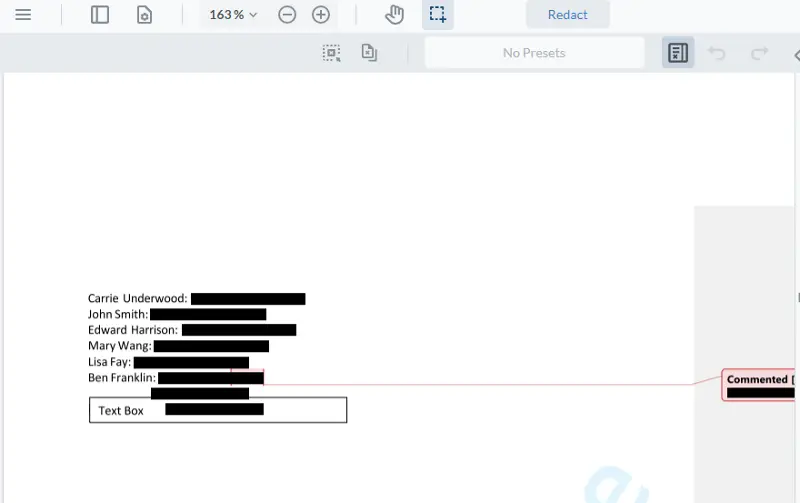
Figure 16 - The document after redaction has been applied.
You can imagine how hard it would have been to have found that sensitive data, which was not visible, by hand, and Apryse did it with almost no coding effort on your behalf.
Regex Based Searching
Let’s take it a step further and create a Regex to search in a more general way.
Imagine we want to find ALL the names in the document. We can do that by entering a Regex that searches for the pattern ‘[Name] [Name]’ followed by a colon.
There are several ways to create such a Regex. In this case let’s use [a-zA-Z]*[ ]{1,3}[a-zA-Z]*[:]
If we paste that into the search box, the names are selected on the document's second page.

Figure 17 - The result of searching for names using a Regex.
Unfortunately, that Regex is over-aggressive on the first page.
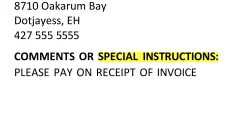
Figure 18 - Overly aggressive selection of text by the Regex.
We can solve that quickly by reviewing each area of matched text and only marking and redacting those selected areas that are actually names. This gives us the power to search for content easily, while still having control over fine-tuning of the results.
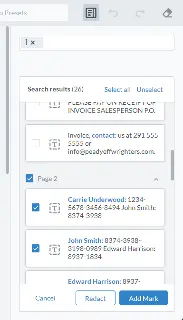
Figure 19 - The redaction pane. Each matched area can be marked for redaction, or ignored.
Redaction of Office Documents
We have already seen how redaction can be easily performed on PDFs, but what about other document types?
Apryse supports the editing of many document types including the Office file formats .docx, .xlsx, and .pptx. These formats do not natively support redaction. However, with a single additional line
loadAsPDF:true,
we can make our sample code seamlessly convert these document types to PDFs, which can then be redacted.
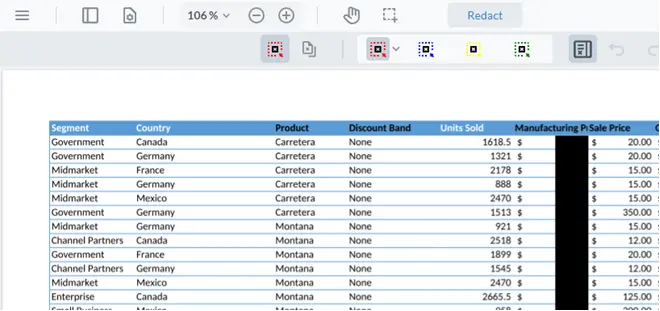
Figure 20 - Part of a spreadsheet, opened as an .xlsx file that has had data redacted.
You can imagine just how much time that will save.
Conclusion:
The Apryse WebViewer is already a great solution for viewing, editing, and manipulating PDFs.
With just a few extra lines of code, the WebViewer can be extended to provide a powerful redaction capability supporting manual, text-based and pattern-based redaction, which will even remove content that is not visible within the page.
With its ease of implementation, and the quality of redaction that it generates, Apryse is the go to place for dealing with redaction.
When you are ready to get started, see the documentation for the SDK to get started quickly. Don’t forget, you can also reach out to us on Discord if you have any issues.


