Home
All Blogs
Custom Digital Signatures with Azure Based Certificates – Setting up the Azure Environment
Roger Dunham
Published February 14, 2025
Updated May 18, 2026
8 min
Custom Digital Signatures with Azure Based Certificates – Setting up the Azure Environment
Roger Dunham

Summary: In this article, we’ll explore how to digitally sign a PDF using a cloud-based key stored in Azure Key Vault, leveraging a digital signature SDK.
Introduction
PDFs are everywhere, used for documentation, invoices, contracts and many, many other things. When working with contracts though, how can you tell whether a “signed” document was actually signed by the correct person, and that no changes have been made to the file since?
That is where Digital Signatures come in - providing a secure, verifiable, and tamper-proof way to ensure the authenticity and integrity of documents.
This is the fourth article in a series about using Digital Signatures with the Apryse SDK. Previously, we have seen how to create a digital certificate for testing, use that locally to digitally sign a file, then see the resulting signed PDF within Xodo PDF Studio and show when something has changed in the file.
In this and the next article we will look at how to digitally sign a PDF using a cloud-based key – in particular one that is stored in an Azure Key Vault.
Setting up the Azure Key Vault is a little complex, so we will go through that step by step. The important things to note though are:
- The Certificate (and the public key that it contains) can be downloaded from the cloud.
- The Private Key cannot be downloaded from the cloud.
- The process of calculating the digital signature is performed within the Azure, using data passed to it from the sample code. The entire PDF is not uploaded – just the “Digest” which is generated from it.
In this article, we will look at how to set up the Azure Environment to contain the elements that are needed to generate the digital signature. The actual process of using code to implement that functionality and apply the digital signature to the code will be covered in the next article.
Prerequisites
Get yourself an Azure account and log into the Azure Portal.
The Azure UI may change over time. This article was written in January 2025, and the screen shots were taken at that time.
Azure supports dozens of tools and other resources – which makes it hugely powerful, but also hard to find things when you get started. Thankfully it has a handy Search bar, which will quickly let you find the things that are used in this article.

Figure 1 - With so much functionality available within Azure, the Search box is going to be your friend!
Step 1 – Create a Resource Group
Before we can store a certificate within Azure, we need to create a Resource Group where it will be hosted, so let’s do that.
Enter “Resource Groups” into the Search box which will show you the list of those, if any, that already exist. Click Create to start the process of defining a new Resource Group.
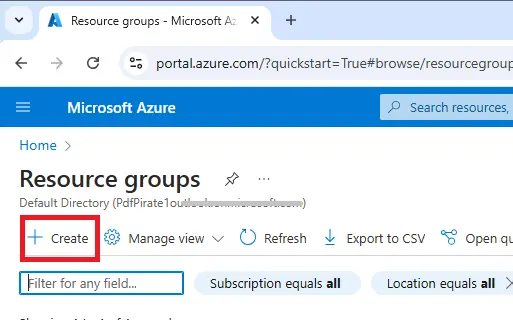
Figure 2 - From the list of Resource Groups click on Create
Next give the Resource Group a name – for this article I am using “PDF-signing-test”.
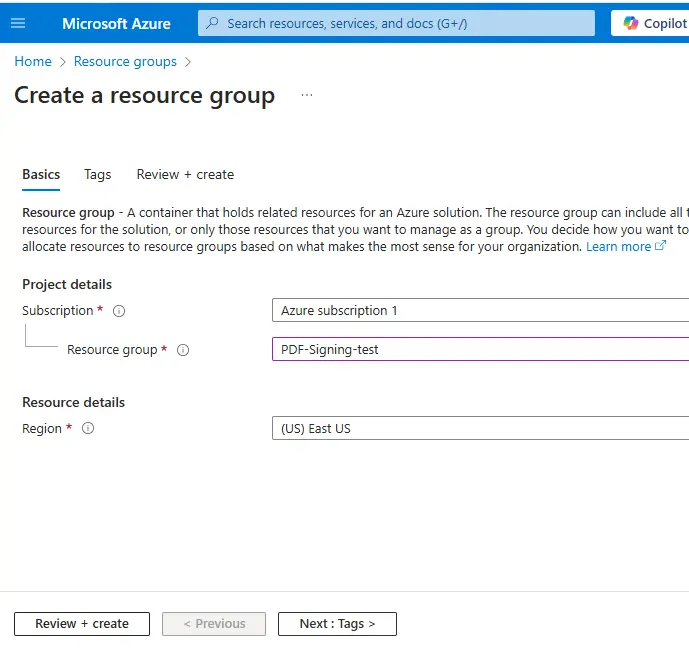
Figure 3 - The first step in creating a Resource Group
There is also the option to add tags to the Resource Group to help you to organize your resources, but for now we can skip doing that. Azure will then validate the data you entered, then click Create.
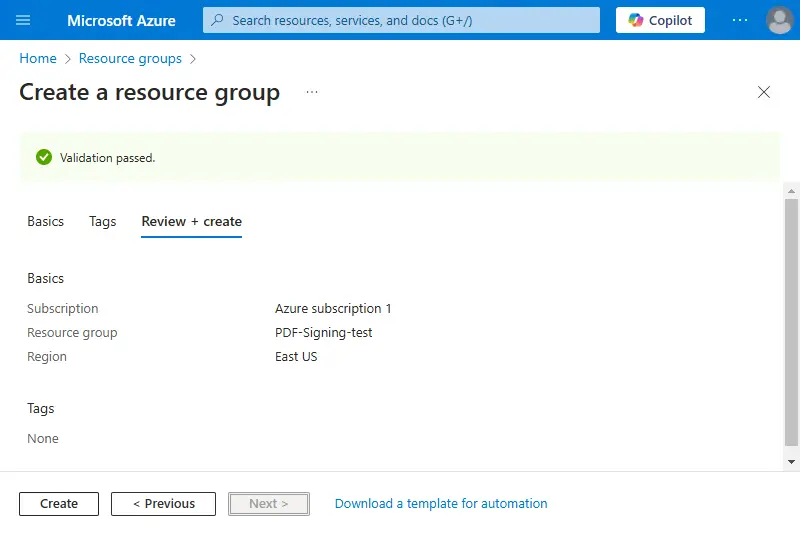
Figure 4 - Everything is ready to actually create the Resource Group
After a few moments, the Resource Group will appear in your account.
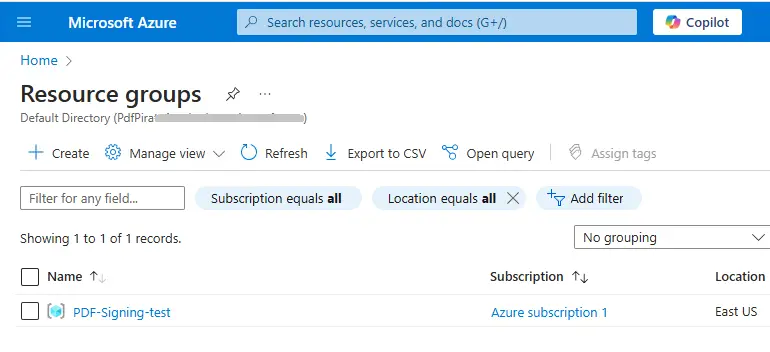
Figure 5 - The new Resource Group is now available.
Step 2 - Register a Cryptography Client Application
When we get to writing code (which we will do in the next article), we will need to have something running within Azure that is able to use a Digital Certificate to actually sign data that is passed to it. This “something’ is a Cryptography Client, which we need to create and register in order for it to be accessible from our code.
Select App Registrations (you can search for it in the Search bar of Azure if you need to), then click New registration.
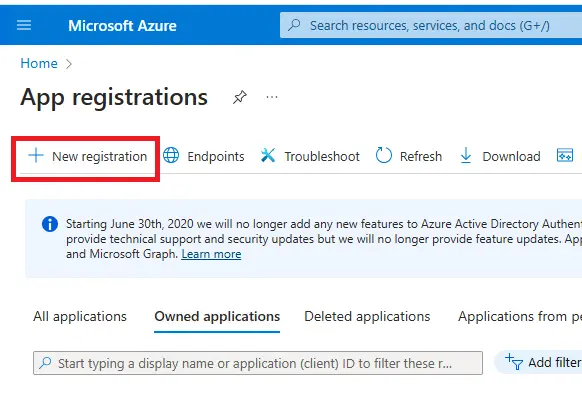
Figure 6 - Click on New registration to start the process of registering a new application.
Next choose a name for the Cryptography Client – for now we will use “DigitallySignPDF”, but you can call it whatever you want. That name won’t be used from our code and is used only for display purposes within the Azure Portal.
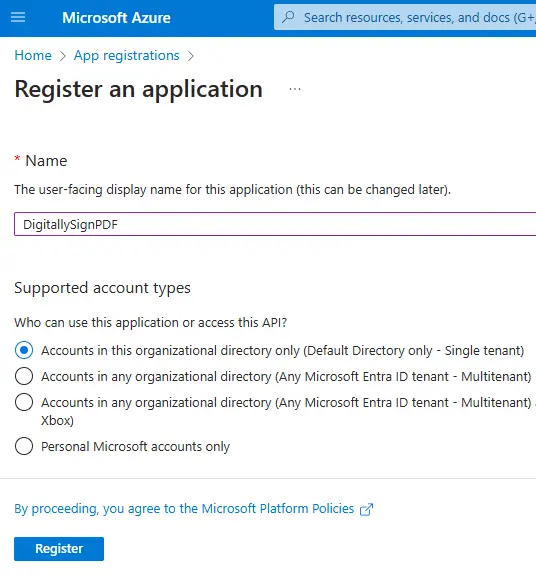
Figure 7 - Choose a name for the application
When you are ready, click Register. After a few moments, you will see some details for the application, including the “Client ID” and the “Tenant ID”. We will need those in the next article, so record them somewhere.
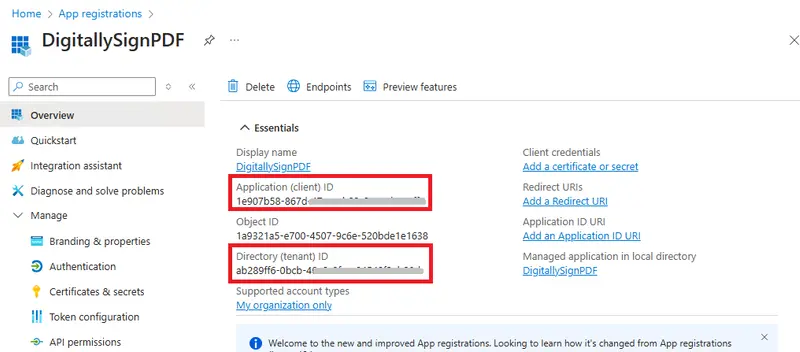
Figure 8 - You will need to record the Application (client) ID and the Directory (tenant) ID. Your values will be different from these.
Since we want to have control over who can use the app that we have just registered (after all, we are using it to Digitally sign documents on our behalf), we need a way to identify that the application that we will create is allowed to use it – that is done with a secret. You can create one by clicking Add a certificate of secret.
When you are creating the secret, you can also specify a description and validity period. The length of the validity period is up to you – but 6 months is recommended.
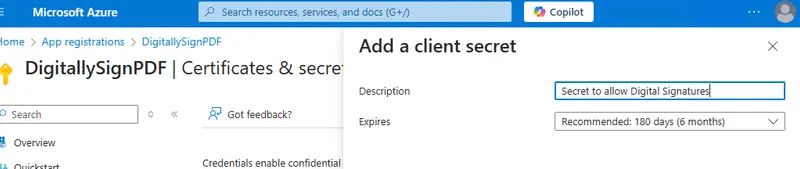
Figure 9 - Specifying the description and validity period for the new secret.
Once the secret has been created, you should copy it and keep it secret (the clue is in the name), since it is, in effect, a password. Anyone with that secret can pretend to be you, so protect it accordingly.
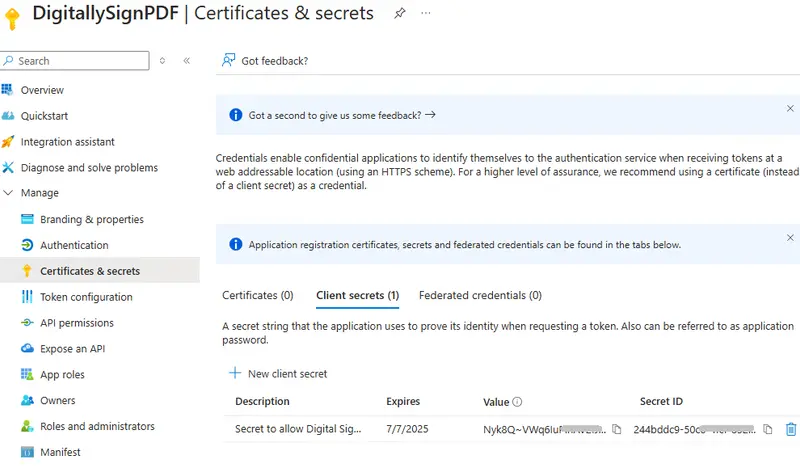
Figure 10 - you can now see the secret of the service.
Step 3 – Create a Key Vault
Having a service that can be used to digitally sign data is not much use if there is no digital certificate available. Before we can import the certificate, we need somewhere that it can be stored – and within Azure, that is a “Key Vault”.
Azure Key Vault is a cloud service that securely stores and manages secrets, such as passwords, certificates, and API keys – exactly what we need.
In order to create a Key Vault, search for “Key Vault” in the Azure search box. This will start the wizard needed to create one. Enter the Resource Group where you want the Key Vault located (we will use “PDF-Signing-test” that we created earlier) and choose a name for the new vault (we’ll call it “PDF-signing-key-vault”).
For now, we will just use the Standard Pricing tier. If you want to use an HSM backed key, then you will need to select the Premium tier. We won’t cover that in this article though.
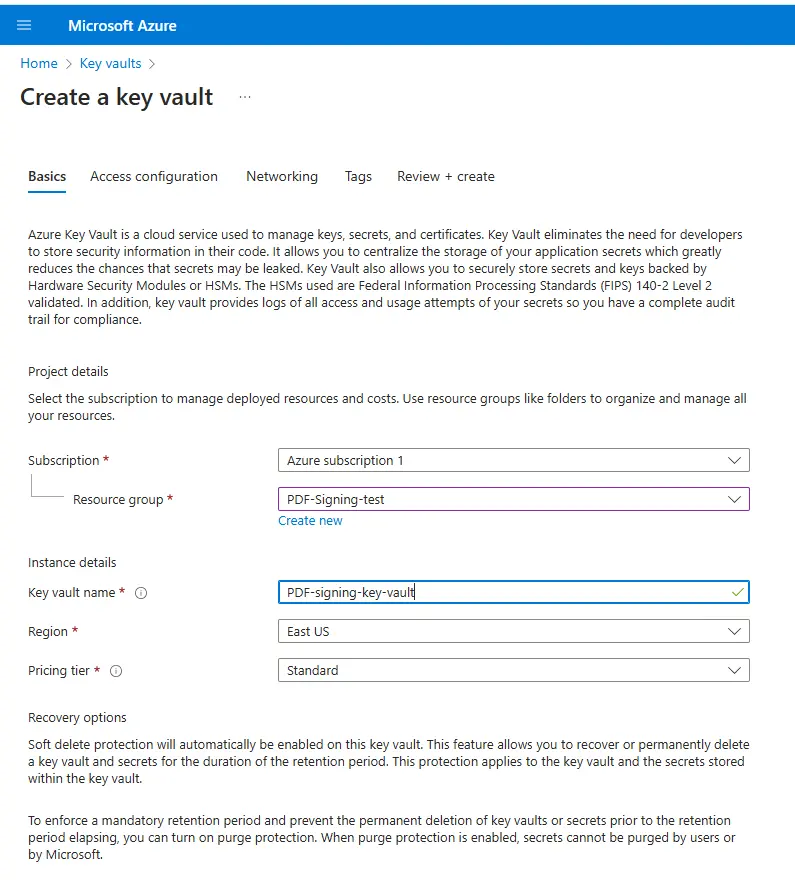
Figure 11 - Choose the Resource Group and specify a name for the Key Vault
Click Next and this will take you to a pane where you can specify Access Configuration.
Microsoft recommends role-based access control, but for this article we will use the Vault access Policy, which is a little simpler to get started with.
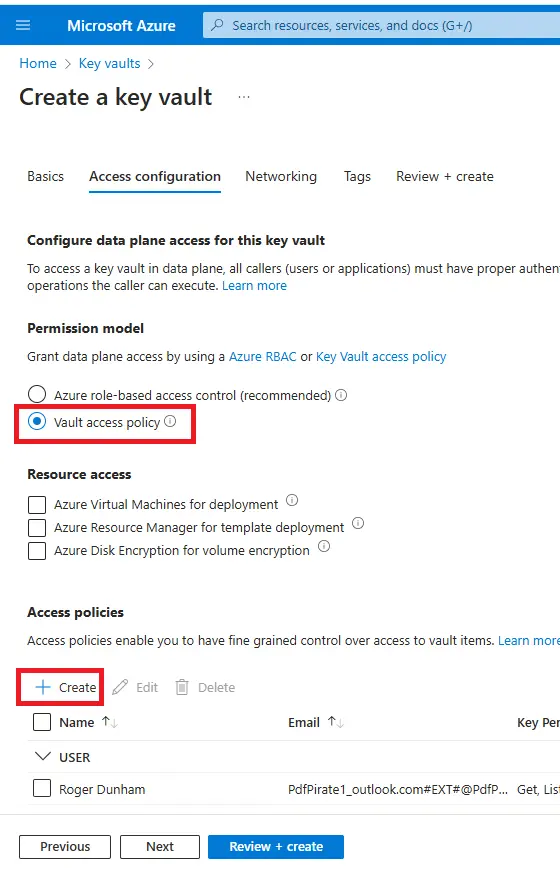
Figure 12 - The default Permission Model is role-based and use that if you wish. But for this article we will use the Vault access policy.
As we have already created the Cryptography Client app that will be using the Key Vault, we will specify the Access Policy now by clicking Create.
If you skipped that part, then you can update the access policy at a later time once you have created the Cryptography Client.
Step 3a -Set up the Access Policy for the Key Vault
You need to specify what the service is allowed to access, and that should be based on the minimum number of things that are needed in order for the service to perform its work. While you could enable access to all Cryptographic Operations and Certificates, that is providing more access than is needed for this article; in fact, we will only need the service to be able to Sign data and Get certificates.
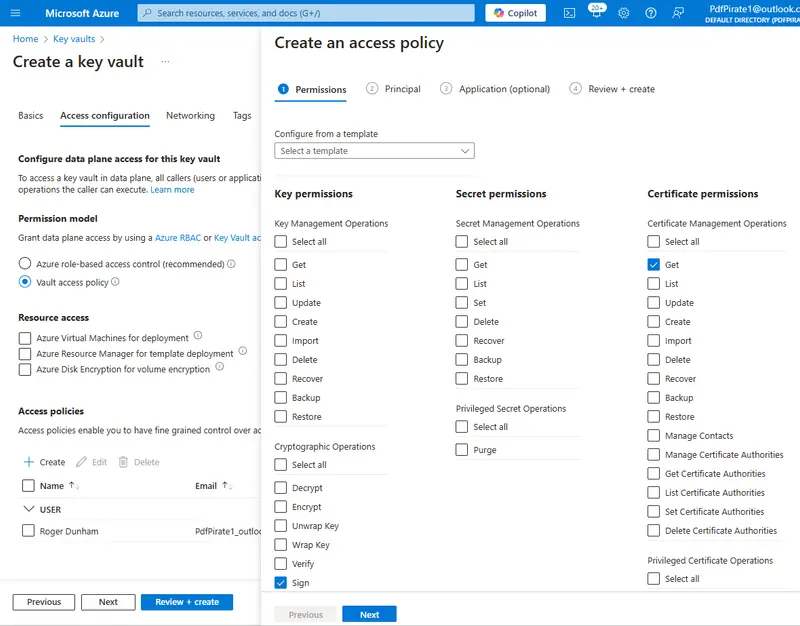
Figure 13 - Only the Sign Cryptographic Operation and Get Certificate Permission need to be selected.
Now click Next and it will ask you to specify the Principal. This will be the Cryptography Client app that we just registered which we called “DigitallySignPDF”.
Enter “Digi” into the search box and that service will appear in the results.
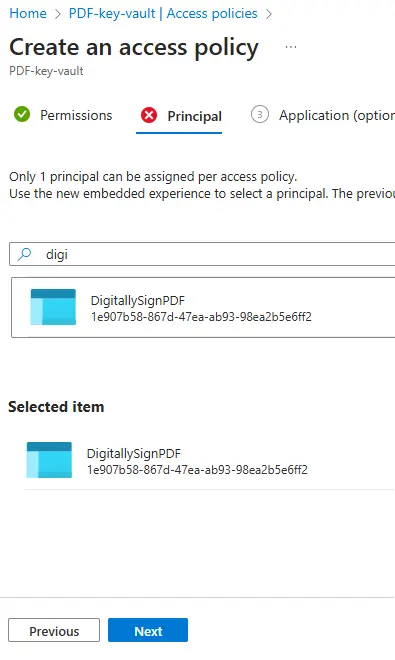
Figure 14 - Find the service that you just registered; select it then press Next.
Select “DigitallySignPDF” and click Next.
After a couple of clicks, you will ultimately be ready to “Review + create” the Access Policy.
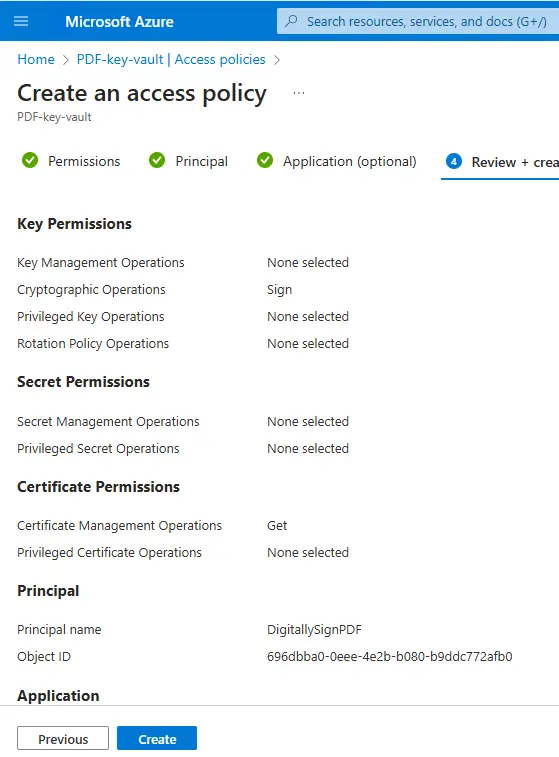
Figure 15 - The Access Policy ready for creation.
If everything is as you expect, then click Create and in a few moments, you should be able to see the Access Policy in the Key Vault wizard.
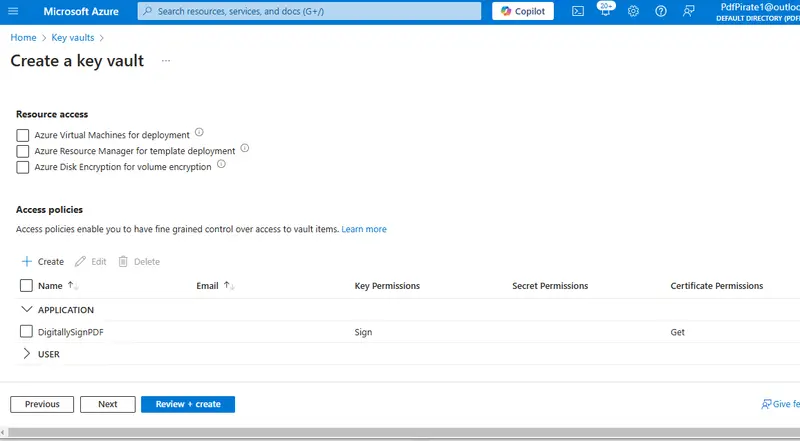
Figure 16 - You can see the permissions that have been enabled for the Digital Signing application.
We haven’t actually finished creating the Key Vault yet, so you will also need to click Review + create, check that everything is correct, then click Create. After a short time, the deployment will complete.
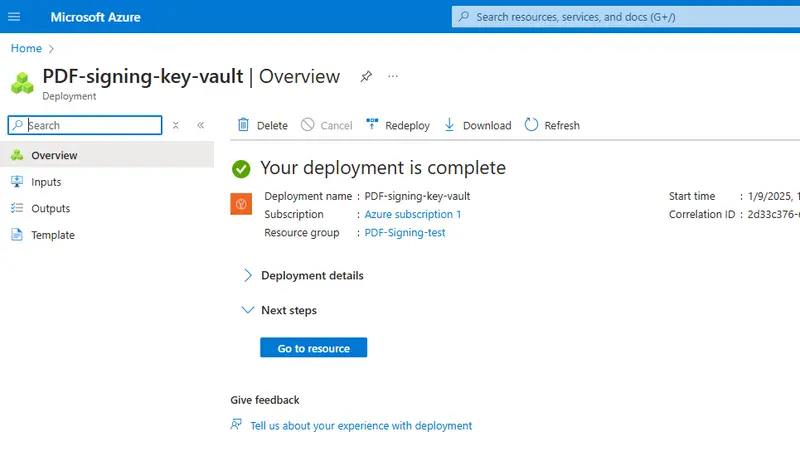
Figure 17 - Deployment of the Key Vault is complete!
Once deployment is complete, click Go to resource, and you can see the properties of the Key Vault. Record the value for Vault URI – as that is how we will access this vault's contents in the next part of the process.
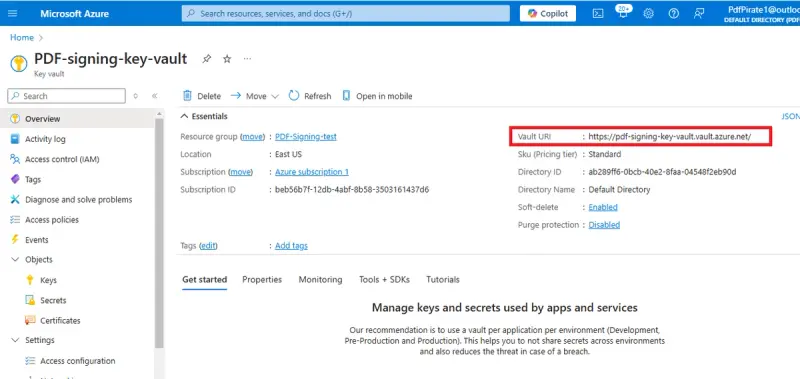
Figure 18 - The properties of the newly created Key Vault. You will need to record the Vault URI.
Step 4 - Import a certificate
We’re almost there, but we still need to import the Digital Certificate that we will use to sign our PDF.
We can either generate one within the Key Vault or import an existing one.
Click Certificates then Generate/Import.
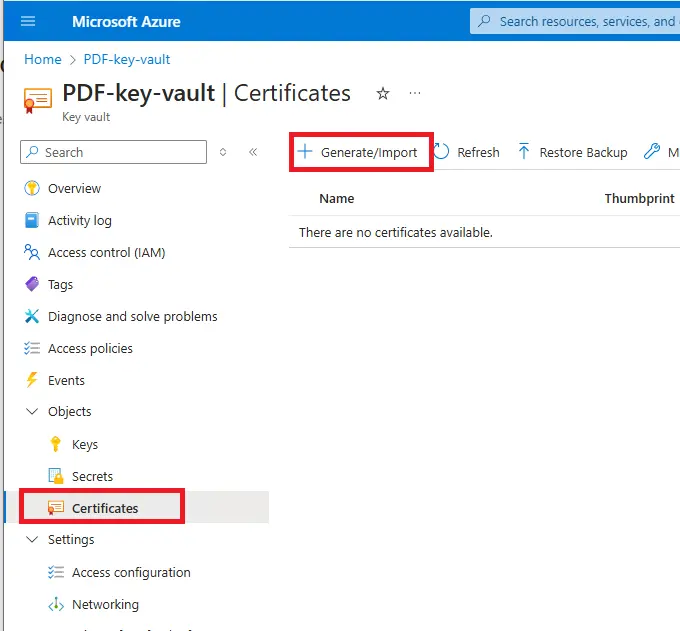
Figure 19 - We will import an existing certificate so click on Generate/Import
For this article I’m going to use the certificate that we created in Part One of this series. You will need to give it a name and record the name that you use. For this article I will call it “BlogCert”.
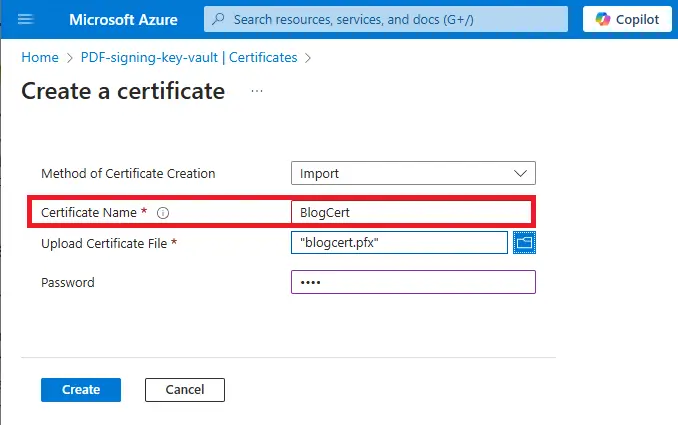
Figure 20 - Importing an existing certificate. Alternatively, you could generate a new one.
Once you click Create, the certificate will be added to the Key Vault.
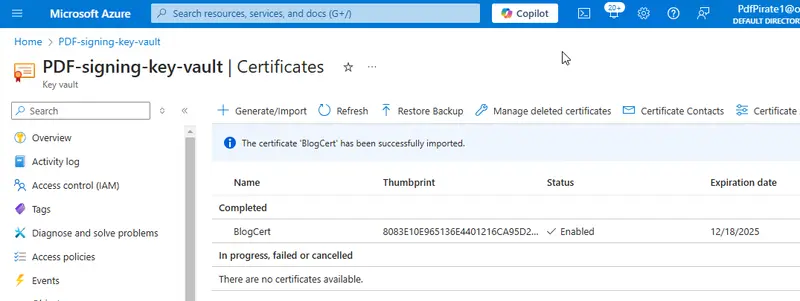
Figure 21 - You can now see that we have the certificate imported into our Key Vault.
If you click on the data for the certificate, then you will be shown the available versions of the certificate, and various details for the certificate. You will need to record the Key Identifier.
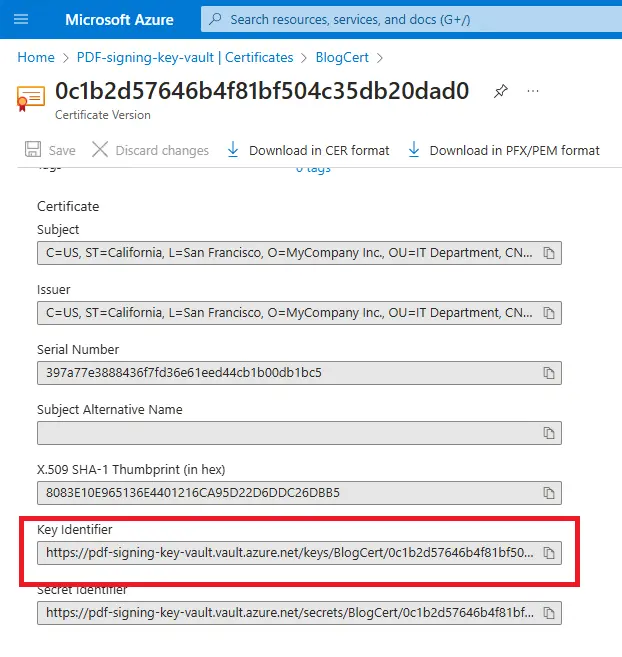
Figure 22 - You will need to record the Key identifier for the certificate.
Step 5 – Write down the information that will be needed by the app used to sign the PDF
That’s everything done in Azure.
In the next article we will use these Azure-based resources. In order to do that, we will need to collect together some data that uniquely identifies them.
There are six pieces of information that you need to record.

Figure 23 - The information that you will need to collect
Great, that’s everything that we need to do in Azure. In the next article we will use these resources to create a Digitally Signed PDF using the Apryse SDK.
Summary
There are a few steps to getting Azure set up to allow creation of Digital Signatures using a Digital Certificate hosted on Azure. Don’t be put off though - many organizations will have IT staff that will find this a cinch, and if not, then the steps covered in this article will help you get to the point where everything is in place, ready to sign your PDF.


