Garry Klooesterman
Senior Technical Content Creator
Published July 03, 2025
Updated May 18, 2026
6 min
How to Automate PDF Form Filling with Salesforce Record Data
Garry Klooesterman
Senior Technical Content Creator

Many Salesforce users would like an automated flow to populate fields in document templates with Salesforce data — whether to send auto-filled letters to customers or quickly sign their internal documents, like contracts.
This post considers how to use the Salesforce app and WebViewer API to add and programmatically fill form fields as part of an automated workflow. We’ll follow the Create Text Field example for creating text fields and text widget annotations using JavaScript.
First, let’s look at some key features of WebViewer.
Viewing: View MS Office documents, PDFs (including PDF Portfolios), images, and other file formats in Salesforce.
Annotating & Collaborating: Highlight, comment, underline information, draw shapes, and chat on the document.
Redaction: Search for and permanently remove sensitive content such as names, phone numbers, addresses, and other personally identifiable information.
Digital Signatures: Add secure signing capabilities such as signature field assignment, signature creation, collection, and validation.
DOCX and XLSX Editing:
- DOCX Editor – Edit and create DOCX files, apply styles, adjust fonts and sizes, add bulleted and numbered lists, and more.
- Spreadsheet Editor – Seamlessly view XLSX files with the structure and integrity of file preserved.
Accessibility: The modular and customizable WebViewer UI meets WCAG 2.1 AA accessibility standards, ensuring an inclusive experience.
Now we’re ready to start our project, so let’s dive in!
Streamline your Salesforce workflows with Apryse WebViewer. Enhance security and simplify development.
Getting Started
To get started with WebViewer and Salesforce:
1. Clone our sample Lightning Web Component project on GitHub.
2. Download WebViewer.
Setting up Salesforce DX
We recommend using Salesforce DX when deploying this app to your scratch org or sandbox. For quick intro tutorials, those new to the tool can visit the Quick Start: Salesforce DX Trailhead Project or the App Development with Salesforce DX Trailhead modules.
Setup steps include:
1. Enable Dev Hub in your project.
2. Install the SFDX CLI.
3. Install Visual Studio Code + Salesforce Extension.
Optimizing WebViewer Source Code for Salesforce
Now you need to optimize Apryse WebViewer code for Salesforce. Extract the WebViewer.zip you downloaded earlier into a folder and run this npm script:
$ npm run optimizeYou will encounter the following prompts. Answer y/n as indicated:
Note: Make sure you answer the following prompt with n:
Optimize: Will you be converting all your documents to XOD? ... [y/n]: nAfter answering y to “Do you need to deploy to Salesforce?,” the script produces .zip files no more than 5 MB in size, allowing you to upload them as static resources.
Cloning and Deploying the Repository
Next, you need to clone our sample salesforce-webviewer-prepopulate project. To configure the sample and get it running, follow these steps:
1. Clone the webviewer-salesforce GitHub repo:
git clone git@github.com:PDFTron/salesforce-webviewer-prepopulate.git
cd salesforce-webviewer-prepopulate
2. Copy all the zip files generated after running the npm optimizing script from the output folder webviewer-salesforce into the force-app/main/default/staticresources folder of your newly cloned project.
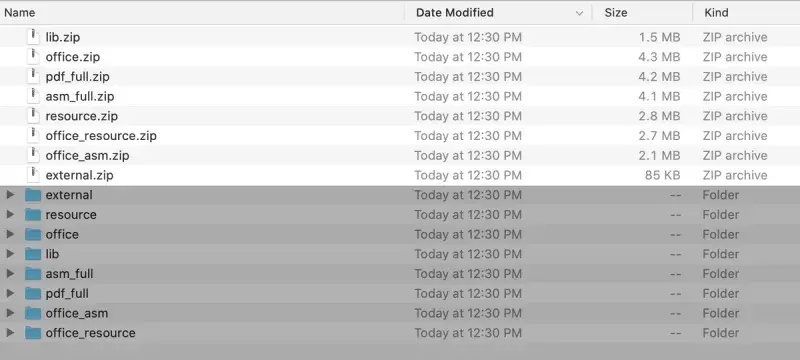
Figure 1: Folder structure.
The files you will need to copy from the “webviewer-salesforce” directory.
3. You can add your WebViewer license key in staticresources/myfiles/config_apex.js file or add it in your WebViewer constructor by passing l: "LICENSE_KEY" option.
WebViewer({
  l: ‘LICENSE_KEY’
})
4. If you haven’t done so, authenticate your org and provide it an alias (DevHub in the command below) from your terminal (macOS) or cmd (Windows). Execute the following command as is.
sfdx force:auth:web:login --setalias [your-alias] [--instanceurl https://test.salesforce.com for sandboxes]Alternatively, you can authenticate from VS Code:
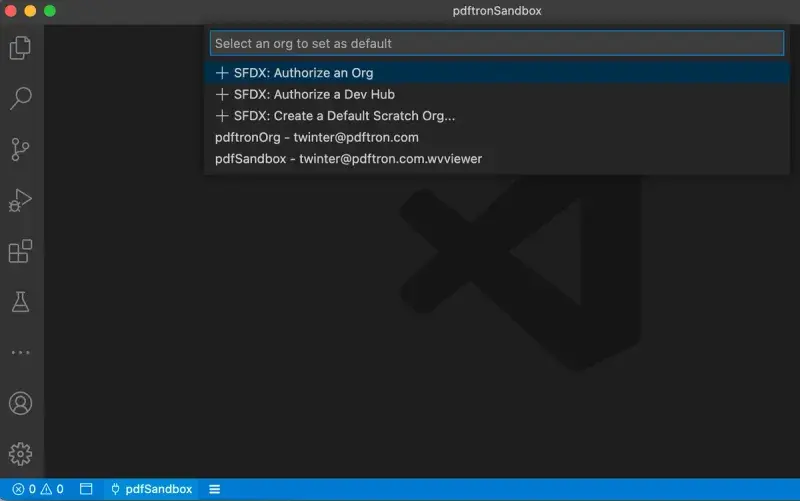
Figure 2: Authenticating from VS code.
5. Enter your org credentials in the browser that opens. Type dev hub in the quick find search and toggle to enable as shown in the picture below.
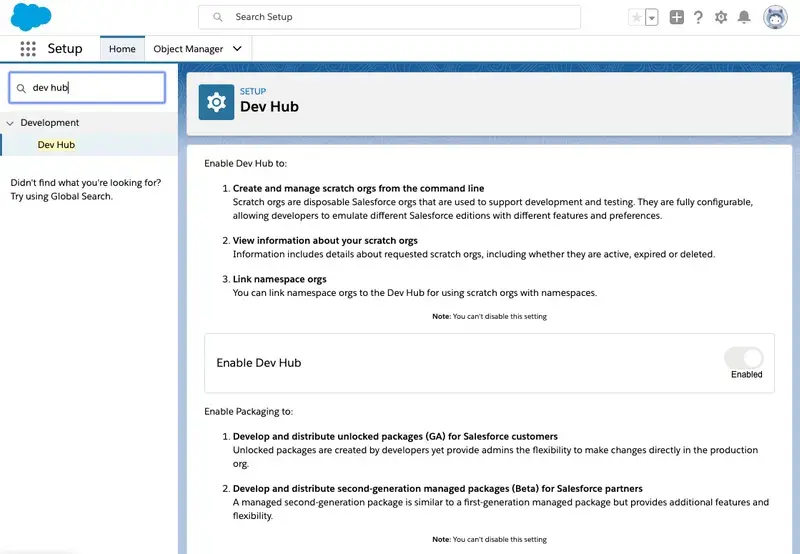
Figure 3: Dev Hub
6. Create a scratch org using the config/project-scratch-def.json file, set the username as your default, and assign it an alias by replacing my-scratch-org with your own alias name. Alternatively, you can also deploy to your sandbox and skip this step.
sfdx force:org:create --setdefaultusername -f config/project-scratch-def.json --setalias my-scratch-org7. Push the app to your org:
sfdx force:source:push -f [-a your-alias if default not specified]Or right-click + Deploy Source to Org.
8. Open the org:
sfdx force:org:open [-a your-alias]9. Navigate to the Object you would like to use for editing your record files. Click on the gear wheel and select ‘Edit Page’ to open the Lightning App Builder.
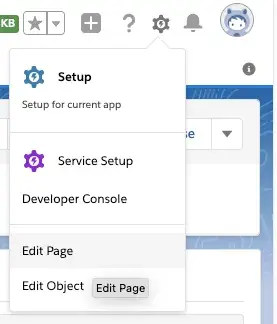
Figure 4: Options menu.
Now select where to launch the Lightning Web Component from and drag and drop the pdftronWebviewerContainer component there.
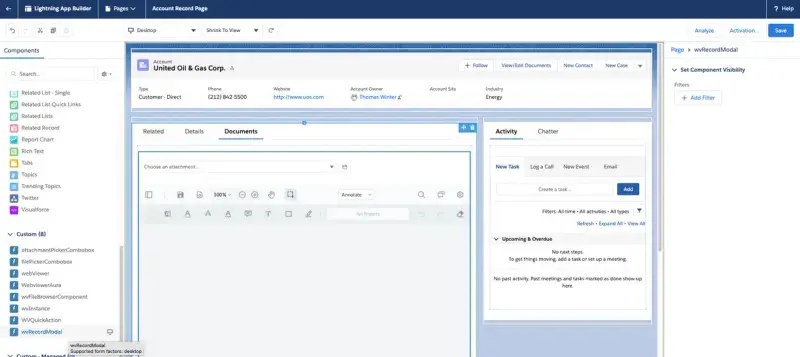
Figure 5: Selecting where to launch the Lightning Web Component from.
Uploading the Sample PDF
You can use the Sample PDF provided in the /staticresources/ folder of the repository for testing this sample. After adding your pdftronWebviewerContainer to a record page, upload the sample PDF file to your records Notes & Attachments or Files.
Drawing and Filling Fields on the Document
Once your document opens in WebViewer inside Salesforce, you can then use JavaScript to draw form fields over top and populate these fields with data! You can hook into the documentLoaded event or execute code based on your custom events.
To pass Salesforce data to WebViewer, leverage our previously created ContentVersionWrapper and include any needed object data like so:
Once you have your wrapper class set up and ready to go, query for ContentVersion data and your sObject data in the same method and pass them to your wrapper. In our sample, we grab Account record data from the current record like so:
You can now modify the payload passed to WebViewer and include your account data:
Finally, in your config_apex.js file, you can now process the Account data. In our sample, we are using a for … of loop to iterate through Object.entries(account) to bulkify this sample for our Salesforce context.
Next, we are using Annotations.WidgetFlags to determine which fields are required or multi-line. As we iterate through account record fields, we dynamically create WebViewer’s counterpart Annotations.Forms.Field for each form field we want included. In the same iteration, we use the WebViewer field to create a Annotations.WidgetAnnotation and dynamically place it on our form.
This approach works well for creating new fields and filling them. When updating existing fields with a value, you can also all annotManager.getFieldManager().addField(field); which either creates a new field or updates an existing field by name.
How to Communicate with the WebViewer iframe
To better understand how you can interact with the WebViewer iframe, you can read documentation about config.js files here.
Check out some of our previous guides to learn more about WebViewer use cases in Salesforce.
- Opening Documents Stored in Salesforce
- Saving Annotations in Salesforce
- Import, Export PDF Annotations in Salesforce
- How to View, Edit, Annotate and Redact Salesforce record attachments
File Size Limitations
You can review this segment to learn more about file-size limitations.
Setting Worker Paths in Config.js
Optimizing the original WebViewer source code for the Salesforce platform means that we will also have to set a few paths in config.js. Get more details in our Salesforce as a Lightning Web Component blog.
Wrap up
For more on what you can do with Salesforce and WebViewer, see our Salesforce documentation section.
Feel free to check out our demo! You can get started now or contact our sales team for any questions. You can also check out our Discord community for support and discussions.


