Thomas Winter
Published March 03, 2021
Updated May 18, 2026
How to Collaborate on and Review Video Files in Salesforce
Thomas Winter

Today, more and more businesses use video as a means to educate, connect, and market to target audiences, thanks to the rapid spread of new ways of creating and sharing videos online.
Our WebViewer Video, designed to integrate into any Salesforce application, provides a new way to view, annotate, and collaborate on video files in the browser. With its full range of markups and commenting tools for video, you can use WebViewer Video for onboarding and training, collaborating with customers on video, and many other creative use cases across the entire Salesforce platform.
This code-along provides samples and steps to get you started with WebViewer Video in a Salesforce application. For video storage, you can use Salesforce or an external storage solution. For this example, we load video stored on AWS S3.
Getting Started
To get started with WebViewer and Salesforce, just clone our sample Lightning Web Component project on GitHub. The sample includes our most recent WebViewer 7.3 source code -- though you can visit the download section for older versions.
Setting up Salesforce DX
We recommend SFDX for deployment to your developer org, scratch org, or sandbox. Read more about development with SFDX here:
We also recommend installing the following tools for our code along.
- Install the SFDX CLI
- Install Visual Studio Code + Salesforce Extension
Optional: Optimizing WebViewer Source Code for Salesforce
Those who use our sample repository, including WebViewer 7.3, may skip this step. Others who want to work with a different version of WebViewer can download them here. You will then need to optimize the code for Salesforce. To do this, extract the WebViewer.zip you downloaded earlier into a folder and run this npm script:
$ npm run optimize
You will encounter the following prompts. Answer y/n as indicated:
Note: Make sure you answer this prompt with ‘n’:
Optimize: Will you be converting all your documents to XOD? ... [y/n]: n
After answering “y” to “Do you need to deploy to Salesforce?”, the script produces .zip files no more than 5 MB in size, allowing you to upload them as static resources.
Copy all the zip files generated after running the npm optimizing script from the output folder webviewer-salesforce into the force-app/main/default/staticresources folder of your cloned project.
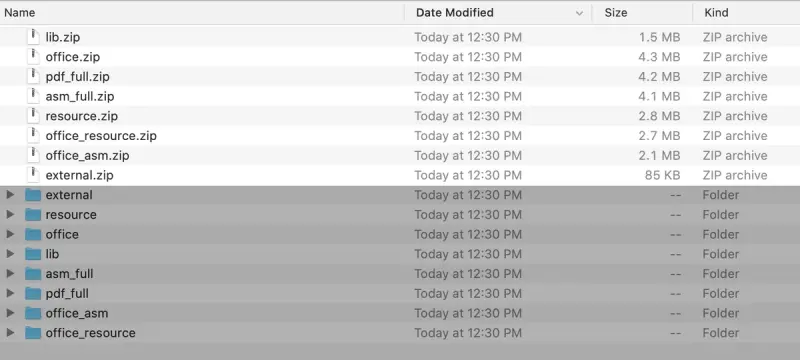
Figure: The files you will need to copy from the “webviewer-salesforce” directory.
Installing the Sample LWC App using Salesforce DX
License
After cloning the repository and ensuring WebViewer is set up correctly, you can include your license key by following the steps below.
- If you would like to remove the PDFTron watermark, add your WebViewer license key in
staticresources/myfiles/config_apex.jsfile or add it in your WebViewer constructor by passingl: "LICENSE_KEY"option.
WebViewer({
  l: ‘LICENSE_KEY’
})
- If you haven’t done so, authenticate your org from VS Code:
Enter your org credentials in the browser that opens.
Right Click on your force-app/main/default folder + SFDX: Deploy Source to Org.
- To open the org, type the following command in your VS Code Terminal:
sfdx force:org:open [-a your-alias]
Use the -a flag to specify which org you would like to open. You can omit this flag to open your default org, which is set automatically in your previous authentication step.
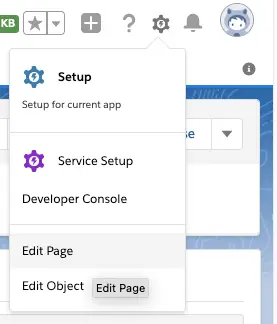
- Navigate to the Lightning Page you would like to use for editing your record files. Click on the gear wheel and select ‘Edit Page’ to open the Lightning App Builder.
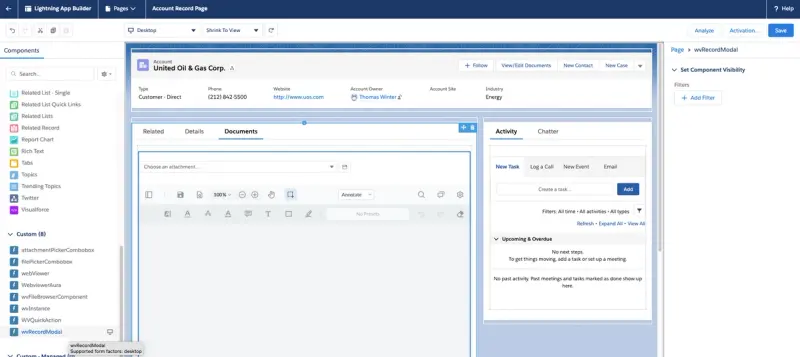
Now select where you would like to launch the Lightning Web Component from and drag and drop the pdftronWvInstance component there. As a final step, update your config_apex.js file.
Next, you need to point your config_apex.js file at your main.js script:
script.src = '/resource/1614618671000/myfiles/main.js';
That’s it! You should now see an instance of WebViewer Video playing a sample video on your Lightning Page like so:
Implementation Details for Developers
Implementation details for WebViewer Video are similar to standard WebViewer’s -- outlined here -- though there are key differences to keep in mind.
Initializing WebViewer for Video
First, you need to include main.js from the WebViewer Video source code. A link to the npm package is here. review the Loading as a script tag section.
The following sample demonstrates how to load this external script in our config_apex.js.
Note: script.src needs to point at your main.js file. Make sure you update the code.
Afterwards, you can initiate loading the script and attaching WebViewer Video to the DOM by calling the above function in your viewerLoaded event:
Getting the Codebase for WebViewer Video
This step is optional; the GitHub repository already includes all the files you need. To pull the latest WebViewer Video codebase, run npm install from your project folder. The post-install script will copy the required main.js file to your static resources. If you wish to change versions, you can do so by locating "@pdftron/webviewer-video" in your ./package.json file and changing the value to your desired version. You can find the npm package for WebViewer Video here.
How to Communicate with the WebViewer iFrame
You can read how to enable communication with the WebViewer iFrame using config files here.
You can also check out our other blog posts for more hands-on examples of using WebViewer within Salesforce:
- How to Automate PDF Form Filling with Salesforce Record Data
- How to View, Edit, Annotate and Redact Salesforce record attachments
Video Storage
You may store your video files wherever is most convenient. We recommend using a storage solution such as Amazon S3 and a custom Salesforce object to store the S3 links. If you decide to store video within Salesforce, you should keep in mind the limitations depending on what org type you are using. You can read more about these limitations here.
Setting Worker Paths in Config.js
Lastly, since the file-size limit on the Salesforce platform is 5MB, we will also have to set a few paths in config_apex.js to our optimized build files. You can find that guide here.
Wrap up
If you are interested in learning more around Salesforce + WebViewer, see our Salesforce documentation section or watch our pre-recorded webinar on integrating WebViewer into Salesforce. You can also follow this video to learn how to set up WebViewer Video using Node.js. We’re constantly rolling out more Salesforce+WebViewer-related content. So keep an eye on this space for more!
Any questions or feedback? Get in touch.