Roger Dunham
Published March 21, 2025
Updated May 18, 2026
Digitally Signing a PDF using a Hardware Key – Part 2. Using the Apryse SDK and C#
Roger Dunham
The ability to be able to authenticate that a PDF originated with a particular person and that it has not been changed since it was created is essential when dealing with contracts, invoices, and a host of other document types that PDFs can be used for.
This is one of a series of articles looking at how you can use the Apryse SDK to create a digital signature to a PDF that is backed by a digital certificate. This process adds a layer of trust to the document essential within a range of industries.
In the previous article we looked at how to set up a YubiKey in readiness for using it to digitally sign a PDF. In this article we will look at how to use the Apryse SDK to take information from the YubiKey and add it to the PDF as part of the digital signature.
There are many other ways to digitally sign a PDF, whether with a locally available digital certificate or one that is hosted on Azure, so feel free to check out those articles too.
You can get the source code for this sample from GitHub.
What is a YubiKey?
A YubiKey is a hardware-based device that can be used for a wide range of authentication processes. Check out the previous article for more information about them, and how to add a digital certificate to one.
Using the Digital Sign Samples
The Apryse SDK is available in many programming languages and for multiple platforms including Windows, macOS and Linux. It ships with a wide range of sample code that covers a plethora of functionality – whether that is PDF creation, redaction, conversion from Office to PDF, or vice versa, or any of the other things that the SDK supports.
For this article we will use the C# (.NET core) version of the Apryse SDK, but If you prefer an alternative then it is also available in several other languages including C++, Java, node.js and Python.
If you have deleted the samples or are using one of the languages where they are not included, then you can download the Apryse samples directly.
The Digital Signatures sample covers lots of different scenarios – for example creating a digital signature with just a few lines of code. For this article, though, we are only interested in the “Custom Signing” method. We will take the original code from the sample and extend it so that it uses a digital certificate hosted on a YubiKey rather than one that is accessible directly from the machine where the code is running.
I strongly recommend that you try out sample as it ships before you try to use a digital certificate on a YubiKey. It’s easy to work with the Apryse SDK, but it is possible to put files in the wrong place and run into configuration issues – so make sure that the foundations are sound before trying something complex!
Once you have the basic “Custom Signing” example working, the next step of using a YubiKey is only a minor change since much of the process is the same.
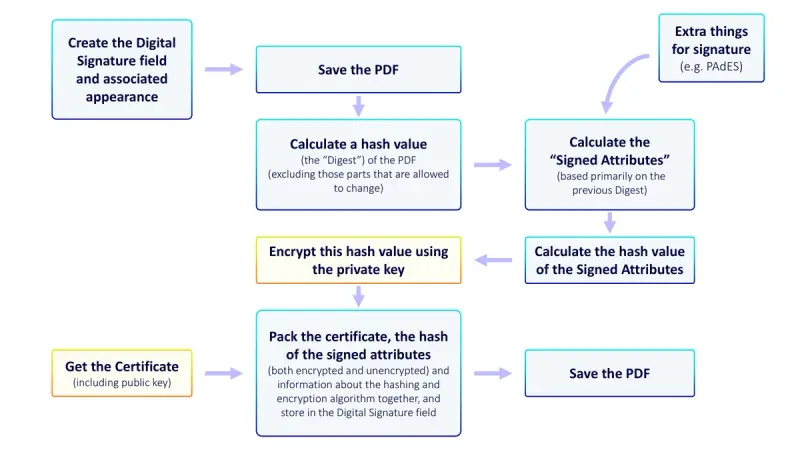
Figure 1 -The basic process for adding a custom digital signature. Only the yellow boxes differ if the digital certificate is on a YubiKey.
The primary differeence between having a digital certificate hosted on a YubiKey compared to it being available lcoally is that the private key is not available. As such the process of encrypting the “Digest” has to be performed on the key. This is very similar to what happens when usign an Azure based key.
Don’t worry if that sounds complicated – we will walk through it a little later in this article.
Working with a YubiKey
If you haven’t already set up your YubiKey with a digital certificate, then the previous article in this series explains how to do so.
You will also need to install some libraries that allow .NET to interact with the YubiKey. These can be found using NuGet.
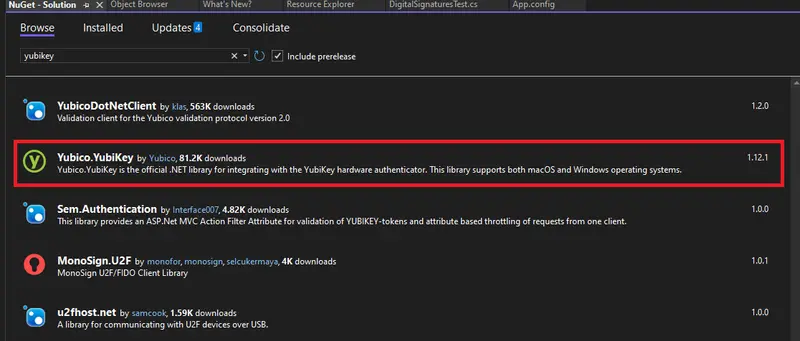
With that package installed it is then possible to find the attached YubiKey, then use that (assuming there is one) to create a PIVSession which allows us to interact with the YubiKey.
Getting the certificate
Once you have the PIV session available, getting the certificate is a cinch – you just need to pass in the slot number(0x9C) where it is located.
// Get the certificate with public key.
var cert = piv.GetCertificate(0x9C);
Next there is a little wrangling needed to marshal the X509Certificate2 which the YubiKey returns into the Apryse specific pdftron.Crypto.X509Certificate type.
// Marshal into the type needed by Apryse
var signer_cert = new pdftron.Crypto.X509Certificate(cert.Export(X509ContentType.Cert));
It is also necessary to build up the certificate chain that will be needed to prove the chain of trust required when verifying the signature.
For production, I would refactor the code into a separate method, but for the purpose of this article I’m keeping everything together to help explain the steps of the process.
Signing the PDF
The process of “signing”, when we get to it, involves taking a “digest “of the PDF and encrypting it using the private key associated with the digital certificate. The resulting encrypted value is then stored in the signature.
The digest itself is a collection of bytes based on the content of PDF (excluding a few parts of the PDF that are expected to change as part of the signing process).
Later, when the PDF signature is verified, the digest for the PDF is calculated again. The newly calculated digest is compared with the encrypted value stored in the signature (which is decrypted using the public key). If there is no difference between the two, it indicates nothing has changed in the PDF. On the other hand, if there is any difference, then the signature is invalid.
When using a YubiKey (or indeed Azure Key Vault) it is not possible to get direct access to the private key. As such the encryption must happen on the YubiKey itself.
The actual process of encrypting the digest is trivial – all that is needed is to specify the slot (0x9C again), and the data, then to store the encrypted value that is returned.
byte[] signature_value = piv.Sign(0x9c, data); Once again, there is a little data wrangling needed since piv.Sign expects data to be in a very specific format (and will throw an exception if it isn’t).
We also need to have some mechanism for authenticating that we can use the YubiKey. In production you would probably show a popup and ask the user to enter the PIN, but for the sake of this article we will hard code the values within a KeyCollector method (in this case “CallerSuppliedKeyCollector”.
(You can see that we are using the PIN of “654321” that we specified in the previous article.)
When piv.Sign() is called, it will automatically call ‘VerifyPivPin‘ and “AuthenticatePivManagementKey”. If either fails then a retry will occur (depending on how you have configured the YubiKey), and ultimately the call will succeed or throw an error, so unless the user can enter a valid PIN the document cannot be signed.
Finally, all that needs to be done is to combine the encrypted digest, the raw digest, the algorithms used to create the digest and the encryption, then store the result in the digital signature field and we have our digitally signed file.
If we put all of this together then the essential code for signing the digest is as follows:
With that all in place we can call the method, and after a few seconds a new PDF will be created that contains a valid digital signature.
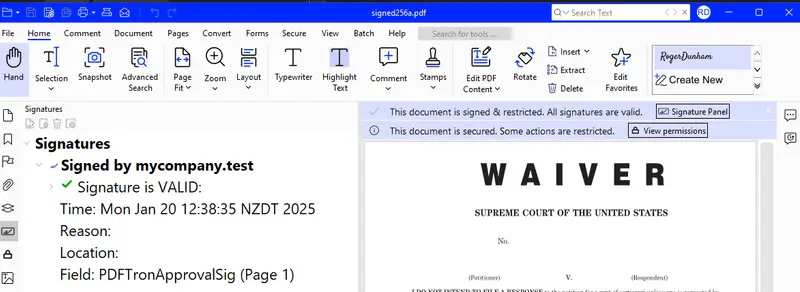
Figure 2 - The digitally signed PDF in Xodo PDF Studio.
If you used a self-signed digital certificate, then it is likely that the signature will be seen as invalid. That is a consequence of not purchasing a digital certificate from a trusted Certificate Authority.
That won’t be a problem if you followed through all of the articles in this series, as we saw in the third article how to configure Xodo PDF Studio to work with self-signed certificates – and that is the reason that we imported that certificate into the YubiKey rather than generating a new one.
Conclusion
Over this series of articles, we have seen:
- What digital certificates are, how to create a self-signed one (and why that leads to signature validation errors unless you explicitly trust it).
- How to digitally sign a PDF using a locally hosted certificate and private key
- How to set up Azure to store a certificate in a key vault and use that to digitally sign a PDF
- How to set up a YubiKey with a digital certificate and use that to digitally sign a PDF
The Apryse SDK offers much more than just digital signatures though, with a wealth of document processing functionality available.
There is also a browser-based component – Web Viewer that allows you to not just view PDFs, but also many other document types directly in the browser, as well as adding PDF and DOCX editing. In fact, you could set up a work flow to create a PDF from a template, then review and digitally sign it, all without leaving the browser.
The possibilities are huge!
So, grab yourself an Apryse trial license key and try things out. There’s a host of documentation for the SDK to help you get started quickly, but if you have any questions then you can also reach out to us on our Discord channel.