Roger Dunham
Published April 10, 2026
Updated May 18, 2026
8 min
Creating an MCP Server That Allows an AI Application to Run Your Code
Roger Dunham
Summary: This blog explores the Model Context Protocol (MCP), a standard that acts as a bridge between AI agents and complex real-world systems. Instead of writing custom code for every integration, like individual airline booking systems, you'll learn how MCP provides a consistent interface to make AI tools more scalable and maintainable. This article includes a step-by-step technical walkthrough on building and testing a simple MCP server, integrating the server with VS Code Copilot Chat, and preparing for advanced implementations, such as PDF data extraction using the Apryse SDK.
Introduction
Just a few years ago, AI Agents and LLMs were barely heard of. Today they have become so ubiquitous that I don’t even need to define what they are.
But have you considered how they work?
I’m not talking here about tokens, vectors or context; I’m talking about how they know how to work with other tools, whether that is for booking airline tickets or getting data from PDFs.
In the context of booking airline tickets, you can imagine that every airline probably has its own system, and terminology, for how to search for, and then book flights, including options such as seat selection, and dietary requirements.
If you were building an AI based tool that searches for and books flights, you might start by writing code to talk directly to each airline. But very quickly you’d run into a problem: every airline has its own systems, its own rules, and its own way of sending and receiving data. You’d end up having separate code for United Airlines, another for Wizz Air, another for British Airways, and so on, an approach that becomes impossible to scale or maintain as the number of integrations grows.
This is where a Model Context Protocol (MCP) server helps. An MCP server sits in the middle as a bridge between your AI tool and the real-world systems it needs to use. Instead of the AI needing to understand every airline’s unique approach, the MCP server provides a consistent, standardised interface. As long as the MCP server knows how to talk to each airline behind the scenes, the AI only needs to know that it can ask to “search for a flight,” “book a seat,” or “choose a meal.” The MCP server takes that request and routes it to the right airline system in the right format. The AI becomes simpler, more powerful, and far easier to maintain, while each airline remains free to run its systems in the way that works best for them.
In this article, we will look at how to physically implement a simple MCP server, and over a number of steps, see how we can use that to allow an AI tool to interact with your code.
In the next article, we will get the AI tool to interact with the Apryse SDK making a wealth of PDF handling functionality available.
In this article though, the steps we are going to look at are:
- Create a simple MCP server that exposes a function for adding numbers together.
- Test that the MCP server is working.
- Use that MCP Server from Copilot Chat in Visual Studio Code.
- Implement that code in a separate server.
- Update the MCP server to use the server.
In the next article in this series, we will look at how we can extend what we have learned and create a tool that extracts information from a PDF.
A Word on Versions
AI and MCP are extremely fast evolving areas of technology, so it’s important to know the versions of tools that I used.
The code for this article was written on a Windows 11 machine using Node 22.22.
It also used @modelcontextprotocol/sdk v 1.26.0
Initial testing was done using MCP Inspector v0.20.0 (and then v0.21.0)
Testing with Copilot Chat in VS Code used Claude Haiku 4.5
Step 1: Create a Very Simple MCP Server
Before we try to use MCP with Apryse, let’s make sure that we know that we can create something simpler. For a start, we will define just a single tool, one that adds numbers together. For fun though, we will make it add them together badly, always adding an offset to the result.
While that’s not a very useful tool in production, it is great for testing, since we can verify that the chat agent used our tool and not some other tool that it knew about.
In a new folder let’s initialize a new Node app using node init -y.
Next, install a library that lets us work with MCP.
npm i @modelcontextprotocol/sdkNow create a Node.js file, which I’ll call mcp-adapter-v1.js.
There are a few things that we need to note.
Tool Registration
We are specifying a name “add_badly”, giving it a title, and describing what the tool does.
Input Schema
We have specified a schema that describes the input parameters that the tool expects to be given, in this case two numbers. I’ve defined the types using the zod, a library used to define, validate, and infer types for data at runtime. Zod is installed automatically as a dependency when you install @modelcontextprotocol/sdk.
Expected Output
For this example, we have specified that the output will be a string.
content: [{ type: "text", text: String(sum) }] The output could be much more complex, but it is good to start with simple examples.
Transport Mechanism
Once we get things set up, our AI application needs to be able to communicate with the MCP server. There are two options Streamable HTTP or stdio.
For this sample (and because our MCP server will be running on our own machine) we are using the “STDIO” transport option. Under the hood, that works by sending text messages using the operating system’s built in “standard in” and “standard out” mechanisms, the same mechanisms that are often used for logging messages to the console.
const transport = new StdioServerTransport();
await server.connect(transport);
That makes things easy to set up but means that if you want to debug the code, then you need to use “console.error()”, since the typical ”console.log()” is already in use.
Implementation of the Tool
Finally, in our sample, we need to specify what the tool does.
For now, we will process the data within the MCP code. That’s a great way of debugging. In a few minutes, we will get a separate process to do the work.
The current implementation is:
It’s just adding two numbers together, along with a further, arbitrary, 0.02, and returning the result as a string. That’s not a very useful tool for production, but it’s a great way of testing the architecture. We can see at a glance that the result from this tool should always have that offset, so if that is missing, the processing was done by something other than this code. We’ll see why that matters in a minute.
That is just about as simple as we can make our MCP server, and it is ideal for initial testing.
Step 2: Test That the MCP Server Works
As we are taking small steps, let's check that our MCP server works using a tool that is designed for that task @modelcontextprotocol/inspector.
We can run using “npx” and including the name of the file (“mcp-adapter-v1.js”) and how to start it (“node”).
npx @modelcontextprotocol/inspector node mcp-adapter-v1.jsNote: Make sure that you are in the folder where the file is located, otherwise MCP inspector will open, but you won’t be able to connect to the file.
After a moment or two, the console will tell us that the MCP inspector is running and give us a link to it.

Figure 1: The MCP Inspector has successfully started. You can click on the lock (with the MCP_PROXY_AUTH_TOKEN) to see it.
Let’s click that link. It will take you to a page where you can see the Transport Type, and the command and webpage that need to be called to start the server.
Click Connect.
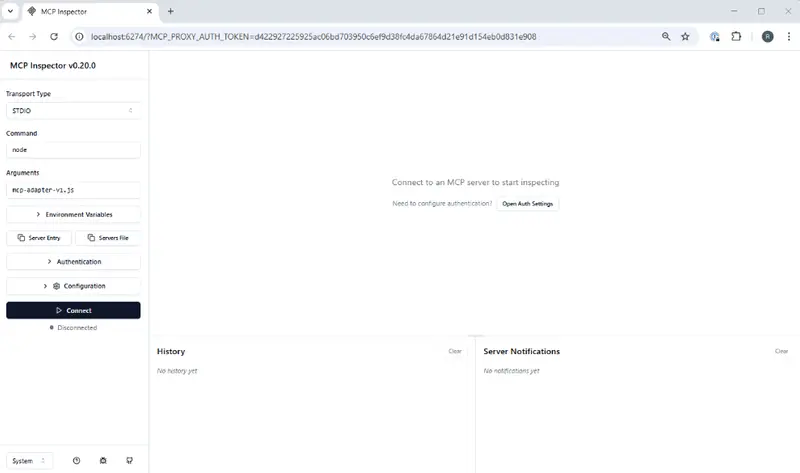
Figure 2: The MCP Inspector when it starts. We need to click “Connect” before we can see things working.
It will take a few moments to spin up the MCP server, then it gives the option to list the tools that are exposed by the server.
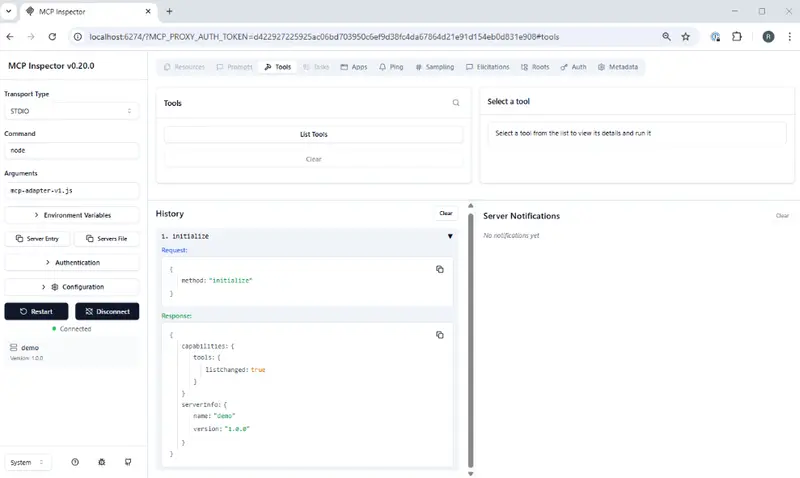
Figure 3: After connecting to the MCP server, there is an option to see the tools that are available. You can also see the communications that occurred between the MCP Inspector and the server.
Now click List Tools.
At the moment, there is only one tool ”add_badly”. If you select that, then you get information about parameters that are expected. In this case, there are two numbers shown in numeric input elements.
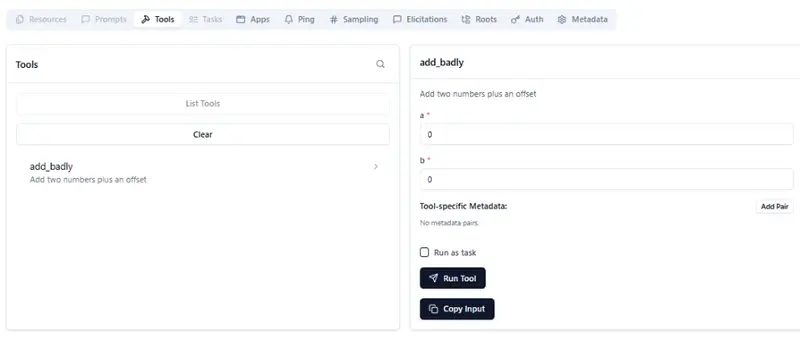
Figure 4: If you click on List Tools, then you will see what tools are available. Clicking on one of them lets you see the expected parameters.
Let’s enter a couple of numbers, say 5 and 6, then click Run Tool.
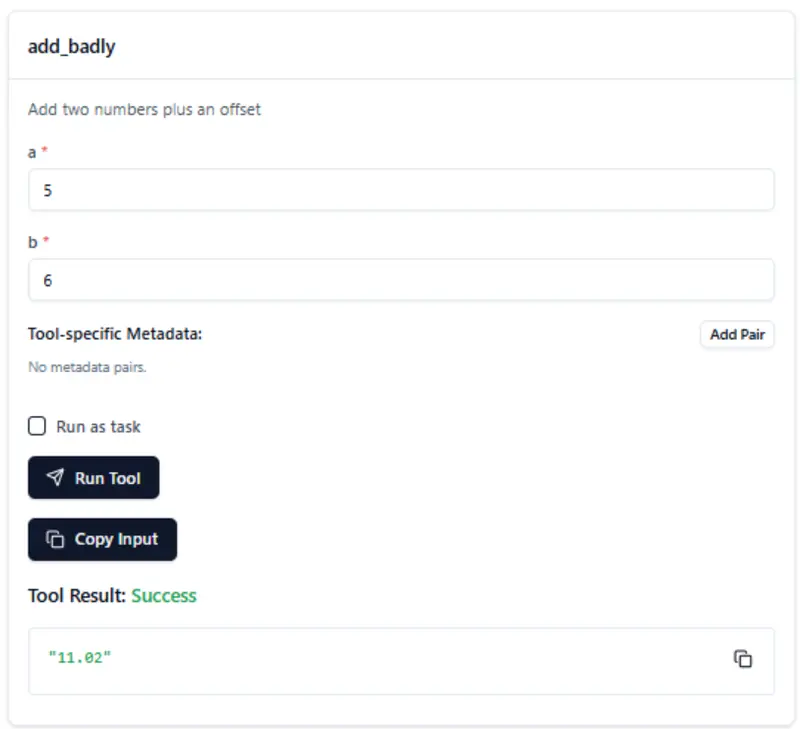
Figure 5: When you click Run Tool, the parameters are sent to the MCP server, which processes the function and returns the result.
When the tool returns, the Tool Result shows ”Success” and the value of ”11.02”. We can also be certain that we are calling the code in our MCP server, since it is unlikely that anyone else created a tool that adds numbers together in this specific way!
Step 3: Using the MCP Server From a Copilot Chat in VS Code
Things are going great so far!
We have an utterly pointless tool, which adds numbers together in an unusual way, that we can access only from a test application.
Let’s take the next step by connecting to the MCP server using Copilot Chat in VS Code.
While we know exactly what our MCP server does, the user of MCP servers that you do not know can be a huge cybersecurity risk. If you don’t trust the people that created an MCP server, then do not use it.
I’m using Windows so, within VS Code, I can open the command window using Shift+CTRL+P.
There are several options to work with MCP servers. For example, I can browse, and install, from a large list that is available online.
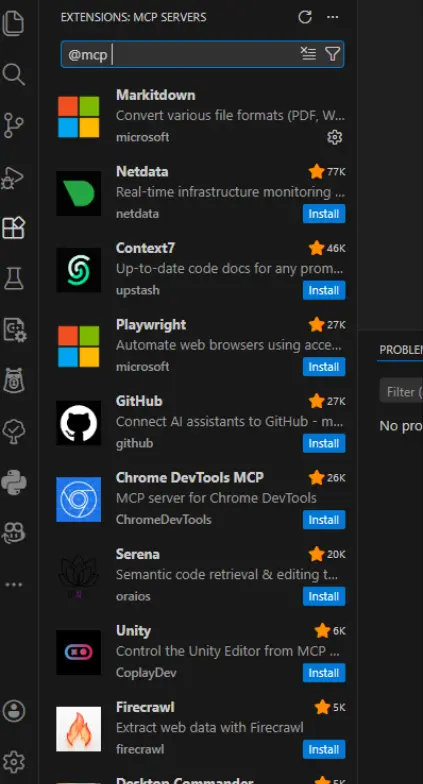
Figure 6: Just some of the many MCP servers that can be installed.
We don’t want to do that though. We want to add the MCP server that we created.
Click Command (stdio).
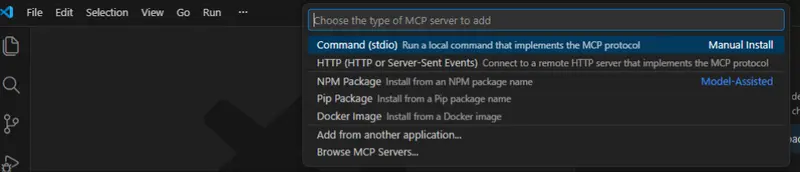
Figure 7: The command window in VS Code allows me to Add a new MCP server. For this article, I need to specify that it is “stdio”.
You can then manually enter how to start that server. In this case, by entering “node” and the path to the file, just as we did previously.

Figure 8: You can add an MCP server by specifying how to start it.
Once you have defined how to start the MCP server, it will be assigned to an ID.

Figure 9: You can now enter the ID for the server.
Once you confirm that you want to proceed, you will be asked if the server should be available globally or just within the workspace. (I chose global.)
That’s everything set up.
Now, within Copilot Chat, you can ask “Add 3 badly to 5”. Copilot will search through its list of MCP servers for a tool that matches that prompt, decide which is best, and then run the code. It may need to ask your permission to proceed.
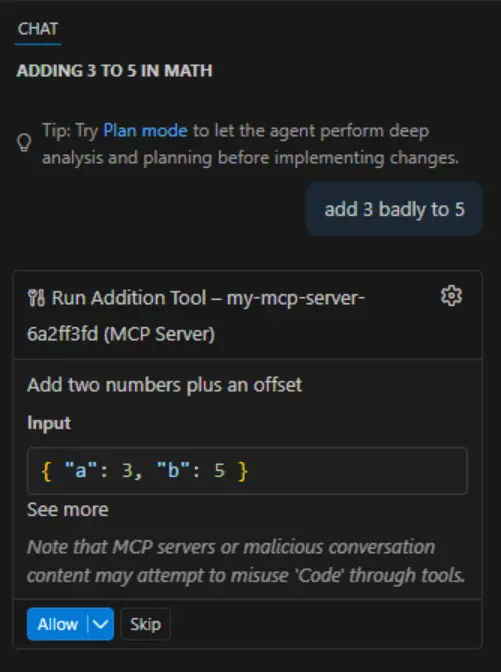
Figure 10: Copilot has found which tool to use and verifies that you want to run it.
Once you click Apply, Copilot calls the tool that we defined. It doesn’t need to know how to do it, or the details of where the functionality is, it got everything that it needed from the MCP server.
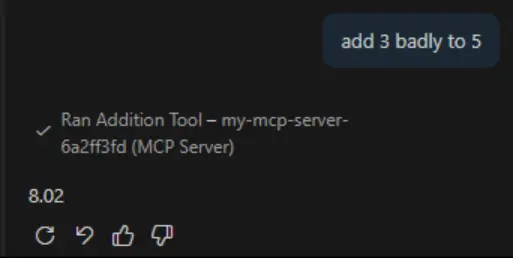
Figure 11: The final result shown in Copilot Chat.
Awesome! Just as we would expect, if you “badly add” together 3 and 5, you get 8.02!
This is where putting that offset into the result is really useful, you could potentially have multiple tools that add numbers together defined by different MCP servers. It would be hugely frustrating to try to track down a bug in your code, only to find out that Copilot was using an entirely different tool.
Step 4: Implementing the Functionality in a Separate Server
So far, the MCP server is both defining the expected input parameters and running the implementation. It’s nice that it works, but not really what we want to end up with.
Let’s create a new project also in Node which will contain the “real” code that we want to use.
npm init -y
npm install express
Next, add a file called index.js that contains the following code.
When we run this code, we will be exposing an HTTP Endpoint (http://localhost:3000/add-badly), which does the same processing as previously, albeit with a subtle change. Now the offset is just 0.01 (just as before so that I can verify exactly which code is being called).
Save that code, then start that server by navigating into the folder and calling:
node index.jsAs this is a step-by-step, let's make sure that the endpoint works before we try anything more complex. We can do that by calling the endpoint directly with something like ”curl”.
As I’m using Windows, I need to open a new terminal window (either CMD or PowerShell) send the following message, specifying values for “a” and “b” (in my case 10 and 42).
curl.exe -X POST "http://localhost:3000/add-badly?a=10&b=32" After a moment, we should get a response shown, and it should include our new “offset” of 0.01.

Figure 12: We can now test our code using curl. Note that with this server, the offset is 0.01 (which is expected).
If you don’t get the expected result, then you need to resolve that before you move on.
It is really easy to not notice that the server started on a different port, because 3000 was already in use.
Step 5: Update MCP to Use the Dedicated Server Code
Next, we need to change the implementation of the tool that we have defined. Instead of being handled directly in the MCP server, we now want the server to pass the request onto our new HTTP server.
Note: Make sure that the declared return type (in this case “text”) matches the value’s actual type.
We have changed where processing is done but from the AI application’s point of view, nothing has changed. That is because the MCP server is providing a bridge to the details of the updated implementation.
Let’s use the MCP inspector to test our new configuration.
npx @modelcontextprotocol/inspector node mcp-adapter-v2.jsNote: For this article, I created a new mcp-adapter (v2), rather than just updating the original one, so this command is not just a cut and paste of the earlier command.
Just as before, MCP inspector starts, I can connect to my new adapter, see the tools available, and test that the tools work.
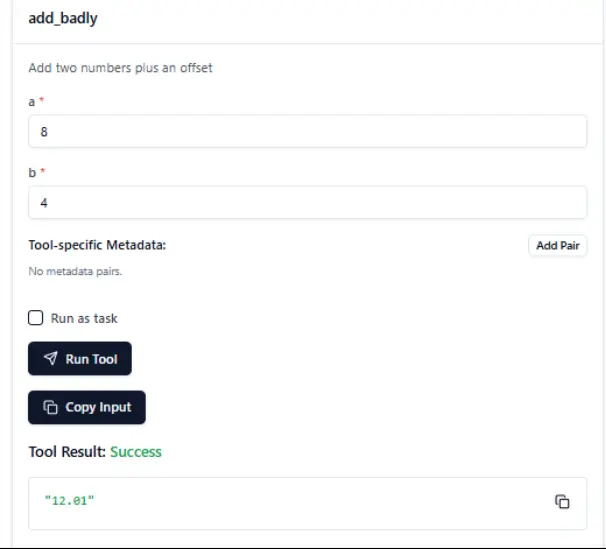
Figure 13: After restarting the MCP server, we now get the numbers added badly from a server running on port 3000.
Now, though, when the actual processing is done by the server running on Port 3000 (we know that has happened since the offset is now 0.01, rather than 0.02, which was the case with the original implementation).
And of course, once Copilot Chat knows about the updated MCP server, we can also get it to call the new code.
Figure 14: Having updated the MCP server, Copilot Chat is now getting its results from an HTTP endpoint.
What Next?
So far, we have seen how to create an MCP server, how to connect to it from Copilot Chat, and how to implement a function to do some work.
We haven’t looked at PDFs at all so far. We are going to look at how we can do that in the next article, where we will use the Apryse SDK to create tools that the AI application can use.


