Roger Dunham
Published April 17, 2026
Updated May 18, 2026
8 min
Using an MCP Server to Allow AI to Work with PDFs Using the Apryse SDK
Roger Dunham

Summary: This article, the third in a series, demonstrates how to extend an MCP server and HTTP server to integrate Apryse SDK functionality into AI applications. It covers implementing a document processing server to count PDF pages and convert HTML to PDF, then bridging it with an MCP server for AI tool utilization.
Introduction
This is the third in a series of articles about how to make the functionality that is available within the Apryse SDK available to your AI application.
In the previous article we saw how we can create an MCP server that allows an AI application (such as Copilot Chat within VS Code) know about and use “tools” that you have created.
So far, we have only created a very simple tool that adds two numbers together as a proof of concept.
In this article, we will build on what we have seen and extend our MCP server and HTTP server to expose functionality from the Apryse SDK.
We’ll start off with a trivial example and then show how we can do something more complex.
So, we will:
- Count the number of pages in a PDF uploaded to an endpoint.
- Convert HTML into PDF and return the PDF.
We could do much more as well as the Apryse SDK is hugely powerful.
By the end of this article, you will be well on the way to being able to ask your AI chat tool to summarize a multiple-section PDF, add in customer feedback, and create a single consistent document.
But let’s not get ahead of ourselves.
There are multiple ways to implement this architecture, but in this walkthrough, we’ll use two separate Node-based servers, each with a distinct role.
The first is the Document Processing Server—a conventional HTTP server that exposes REST-style endpoints and performs the actual work. This is where the Apryse SDK runs, handling tasks such as loading files, converting documents, generating PDFs, and performing any other heavy lifting your application needs.
The second is the MCP Bridge Server—a dedicated Model Context Protocol server that sits between your chat-based AI tool and the Document Processing Server. Its job is not to do the work itself, but to expose MCP tools that internally call the Document Processing Server’s endpoints. In other words, the MCP Bridge Server translates AI tool requests into real API calls, returning clean, structured results back to the chat application.
While I’m using Node, everything shown in this article could be implemented using Python if you prefer working with that language.
Source Code for This Article
You can get the source code used in this article from this GitHub repo.
Using the Apryse SDK to Get the Page Count in a PDF
Extending the Document Processing Server to Count Pages
Let’s start by creating a method for counting the pages in a PDF. We’ll make it possible for the PDF to be locally available from the file system or specified as a URL.
We’ll need to install @pdftron/pdf-node (which contains the Apryse PDF functionality), as well as multer (to handle file transfers) and dotenv (so that we can store the Apryse license key in an environment variable separately from our code).
We then need to add a new endpoint 'pdf-page-count'.
There are a few things going on here.
- The Apryse SDK needs to be initialized by calling PDFNet.initialize(APRYSE_KEY). We’re doing that using a singleton pattern via await ensurePdfNetInitialized();. That means that the function is only called once. You will need to get a trial license key from the Apryse Website. We are also freeing PDFNet when the server shuts down using await PDFNet.shutdown(). You can see that functionality in the GitHub sample code.
- The endpoint expects that a file will be passed to it. When that happens, it is copied into temporary storage. There is also some code to delete the temporary file when we are finished with it.
- A PDFDoc object is created by calling PDFNet.PDFDoc.createFromFilePath(tmpFilePath);.
- The number of pages is found for the PDFDoc object.
- If everything has gone well, then the function returns a block of JSON including the page count and some metadata.
If we start the server using Nodeserver.js , then now we have an endpoint where if we pass in the path to a PDF (or the URL) then we will get back the number of pages. We can test that using curl.

Figure 1: We can now count the number of pages in a PDF using our action endpoint. In this case, the PDF had 22 pages.
If we wanted, then we could create an app that utilizes that endpoint directly. That’s a perfectly valid use case. However, for this article, we are interested in getting an AI application to do that work.
As we saw in the previous article, we could just tell the AI application exactly where the endpoint is, but it’s much better to do that using an MCP server. That provides a standard way of defining tools and abstracts the implementation.
Setting Up the MCP Server to Support Counting Pages
We created a simple MCP server in the previous article. We now just need to register the new tool that we have implemented, giving a name, a title, and a description.
We also need to specify an “input schema”. In this case, it specifies that either a path to a local PDF or a URL must be passed to the function. It even gives us feedback if we fail to do so.
Next, we need to define the implementation. Since the PDF may be either a local file or a URL, we need to get a buffer that contains the data from the PDF, whether it was fetched from the URL or loaded from the file system.
That buffer is then passed to the function that calls the endpoint on the Document Processing Server.
When that function returns, the page count information is extracted and passed back as text.
There’s a fair bit to that, but much of the code is error handling and prep, rather than the actual code that does the work. Once we have that set up, we now have a tool that an AI Chat application can use.
Before we do that, let’s try things out in the MCP Inspector. We saw how to do that in the earlier article.
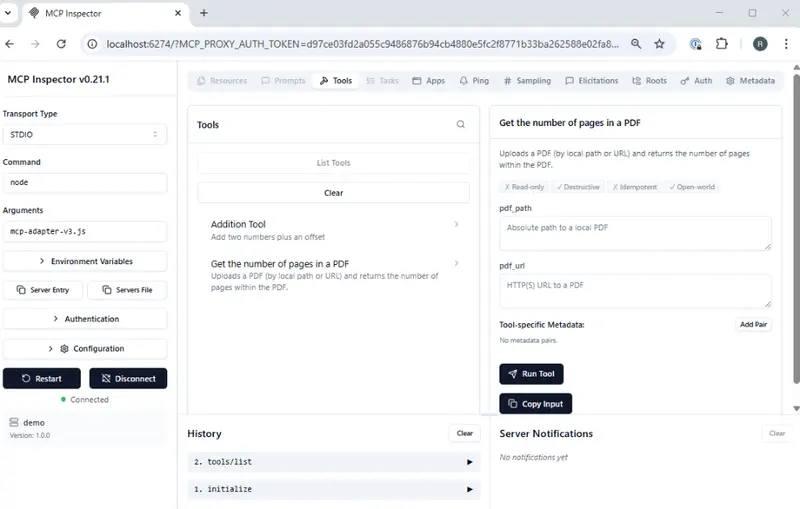
Figure 2: MCP Inspector showing the tools that we now have available.
Just as before, the MCP inspector uses the tool input schema to update its UI. When we select the “Get the number of pages in a PDF” tool, it allows us to enter either a “pdf_path” or a “pdf_url”.
We’ll test that with a local PDF (a document called “blue.pdf”) which has 12 pages.
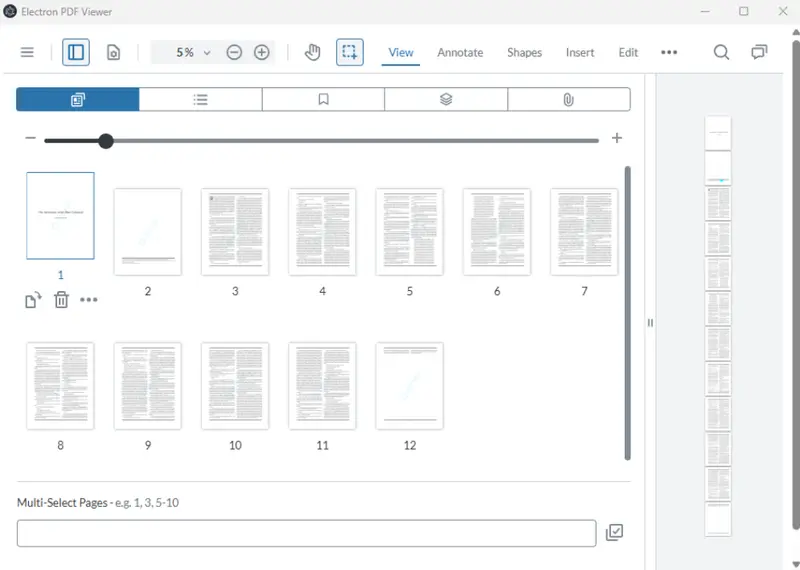
Figure 3: The sample document in a WebViewer based app. It has 12 pages.
Let’s add the path to the file, then click on Run Tool.
After a moment, the result appears telling us that the document has 12 pages.
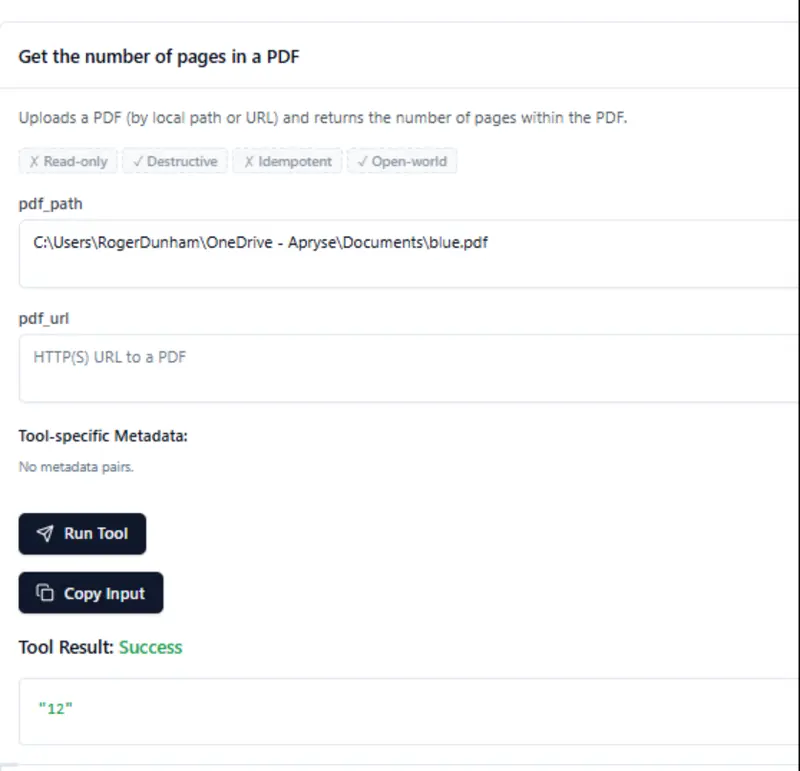
Figure 4: MCP Inspector creates fields where we can enter parameters that the tool needs. When we run it, we get the number of pages in the PDF, in this case 12.
Awesome! Our code is working.
Now let’s head back into Copilot Chat with VS Code. As I’ve created a new MCP server, I’ll let Copilot know about that (or if I had just edited the existing one, then I might need to restart it).
Now we can ask “What tools do you know about for counting the pages in PDFs?”, and it knows what to do.
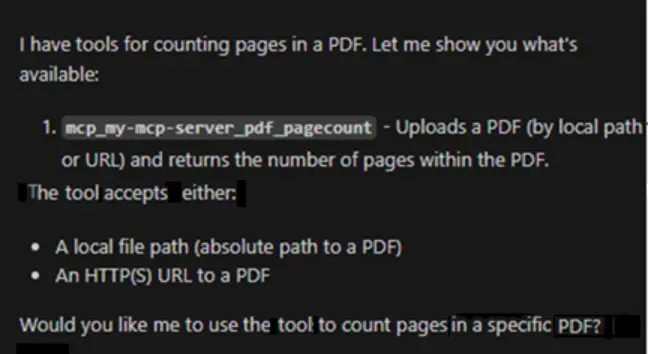
Figure 5: Copilot Chat now knows how to count pages within a PDF.
That means that we can now get Copilot to do something more complex, such as getting the number of pages in two separate PDFs then adding them together.
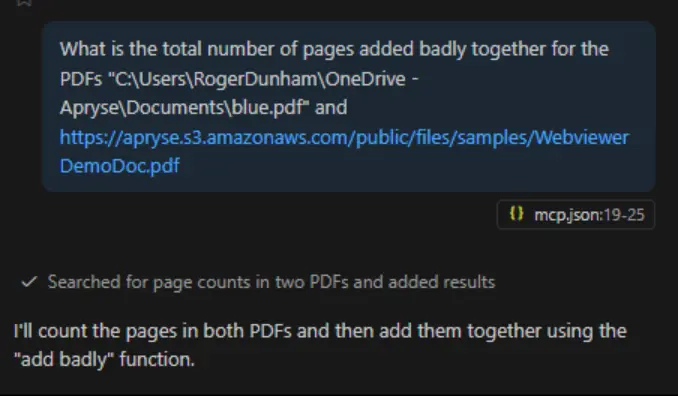
Figure 6: Copilot can now do more complex things, chaining together multiple tools to solve a problem.
Copilot will think about this for a moment, then get the page counts as requested, then decide, for itself, to use the “add badly” function that we created previously.
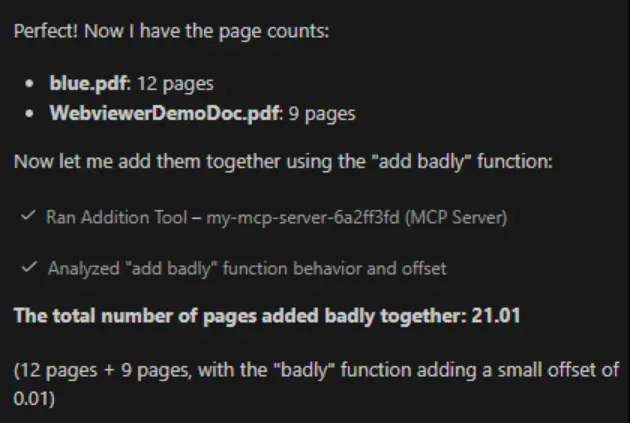
Figure 7: Copilot can now use the tools that we have created. You may need to authorize it to do so.
Without any extra effort on our part, Copilot worked out that it should use the tool that we had created to get the number of pages in each PDF, then use our (rather artificial) tool for adding those numbers together.
In the earlier article, I explained that I wrote a tool that adds numbers together in a specific, slightly incorrect, way, so that we could be sure that Copilot was using our tools and not some other tool that it knows about]
It’s good practice to verify the results that AI generates. If you manually open and look at those two PDFs, then we find that one has 12 pages, and the other has 9. Copilot gave us exactly the answer that was expected. Awesome.
So, Where Next?
Great question, it could be just about anywhere!
For now, though, let’s add one more thing to our HTTP server—the ability to take a URL, and create a PDF from the HTML.
Using the Apryse SDK to Convert HTML into PDF
Setting Up the Document Processing Server
Since we are using the Apryse SDK, it’s easy to create PDFs from HTML. We just need to download and install the HTML2PDF module. That is one of a number of add-on modules that are available that offer “advanced functionality”. Others include Advanced Imaging (which lets you work with a whole range of image formats), Structured Output (which converts PDFs to Office) and Data Extraction (which allows you to extract tabular data, structure and form fields from documents).
The HTML2PDF module is shipped as a zip file. I extracted the contents and placed them into a new folder “libs/HTML2PDFWindows” in my project.
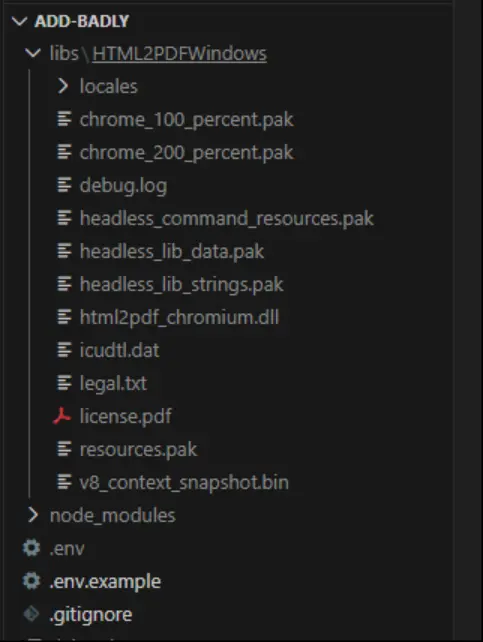
Figure 8: The contents of the HTML2PDF module, copied into a new folder in my project.
Now I just need to add a new endpoint “convert-url”, which will leverage the HTML2PDF converter.
This is a little more to it than just counting pages in an existing PDF. I won’t go into details, so you might like to look at the documentation that explains more about how HTML to PDF conversion works.
You will, however, need to let PDFNet know where to find the HTML2PDF module. We do it by calling setModulePath.
await PDFNet.HTML2PDF.setModulePath('libs/HTML2PDFWindows');Note that, generally, there should not be a leading slash in that path.
We could test this out with curl, but let’s go straight to setting up the MCP server so that it can make this endpoint available.
Setting Up the MCP Server to Support Converting HTML to PDF
Just as before, we need to register the tool, giving it a title description and input schema.
And we need to specify the actual tool handler. I’ll just include the happy path code here, to keep things simple. For production, you would need to handle the various errors or other responses.
We’ve specified the endpoint, passed in the URL, then extracted the arrayBuffer from the response, and returned that to the calling application as a Base64 Encoded string.
Let’s see that working in the MCP Inspector.
We just need to connect to the server, choose our new tool, enter a URL, and then click on Run Tool.
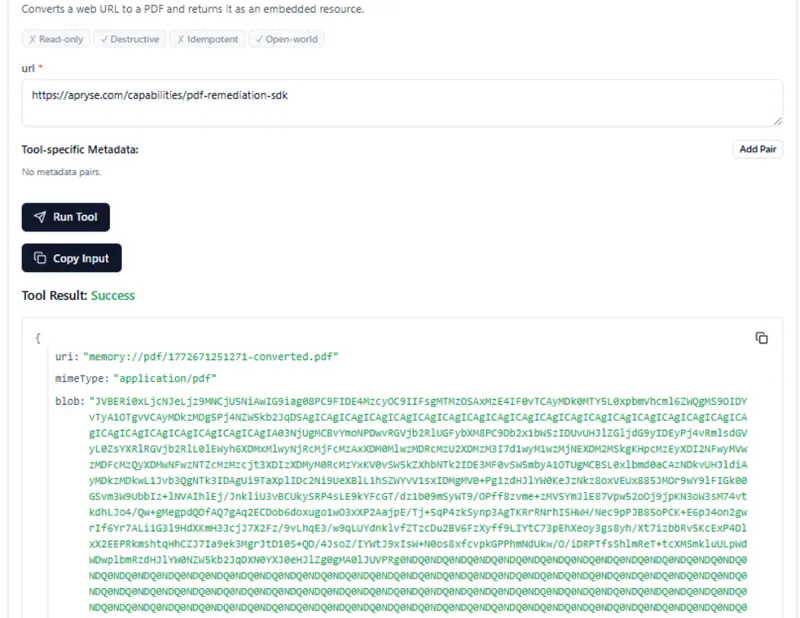
Figure 9: MCP Inspector showing the result of converting an HTML page into a PDF. The data for the PDF is shown here as a Base64 encoded string.
It returns a Base64 encode string. That’s OK; the AI Agent will know how to decode that.
If you want to prove that it works, then you can copy that string into a text file, extract the bytes, and save the PDF manually.

Figure 10: If you want to check the output, then you can save the base64 encode string, convert that to bytes and save the result as a PDF.
If you do that, then you can see that we really did create a PDF from the URL.
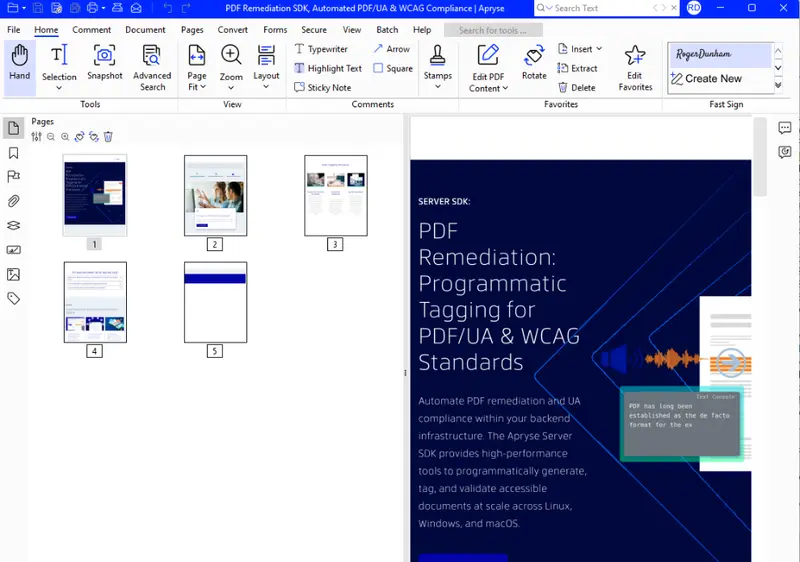
Figure 11: The PDF that was created from the URL by our action endpoint.
Great! MCP inspector can access the code that uses the Apryse SDK.
Where Next?
And we have still only scratched the surface of what is possible. For example, we could extend what we have seen and:
- Remove PII from the PDF.
- Convert the PDF into a Word document.
- Extract structured content from documents.
- Programmatically create new documents by passing in a template and a set of JSON data.
- Add annotations.
- Merge documents together.
The list goes on and on.
To make this functionality available to an AI Chat tool, you just need to create a document processing service that exposes an endpoint, and an MCP server that describes how to use the endpoint.
Once you have done that, you can let your Chat agent know about the tools that are exposed, and then you can ask it to do things such as “There is a commissioned report with 6 sections, where the customer wants a key takeaway page inserted before each section and relevant customer feedback pulled in to support whatever those key takeaways are.”
The Chat agent, could then use a mixture of the tools that it already knew about (such as for working with databases), with the new ones available from an MCP server to develop a workflow that:
- Splits the PDF into the 6 body sections.
- Uses Smart Data Extraction for document structure extraction to understand the content of each section.
- Gets the key points of each section.
- Pulls the most relevant customer quotes, feedback, or usage data tied to that section from a database.
- Creates a new PDF based on the key points and customer information using Apryse Document Generation (“Doc Gen”).
- Inserts the new summary PDF in front of the section that it relates to.
- Creates a single merged PDF as the finished report.
With no other interaction, the AI application can then create a polished report that contains the extracted information.
That truly is awesome.
If you’ve got any questions, then you can contact me at blog-feedback@apryse.com.