Roger Dunham
Published May 08, 2026
Updated June 30, 2026
8 min
From Ink to Insight: Handwriting Recognition with the Apryse SDK
Roger Dunham
Summary: The Apryse SDK 11.12 update introduces on-device Intelligent Character Recognition (ICR), allowing developers to convert handwritten notes and forms into digital text without using cloud services. This article explains how ICR handles irregular handwriting and provides a quick Node.js tutorial for integrating secure, private text extraction directly into your applications.
Introduction
Handwritten content shows up everywhere: forms, notes, annotations, and even whiteboards. While it’s rich in meaning and often quick to create, it’s traditionally difficult to search, analyze, or integrate into digital workflows.
Handwriting recognition, also known as Intelligent Character Recognition (ICR), changes that.
With the new handwriting recognition capabilities in the Apryse SDK, released in version 11.12, developers can now convert handwritten content into machine‑readable text directly inside their applications, without sending files to external services or compromising data privacy.
In this article, we’ll explore:
- What handwriting recognition is (and why it matters)
- How Apryse approaches handwriting recognition
- A simple end‑to‑end example using the Apryse SDK
What Is Intelligent Character Recognition?
ICR is a form of optical character recognition (OCR) designed specifically to interpret handwritten text, rather than printed fonts.
Unlike traditional OCR, handwriting recognition must handle:
- Irregular letter shapes. There is variation in the way that a single person writes the same letter, let alone the huge variation between how different people do so.
- Connected or cursive writing.
- Variations in spacing and alignment.
- Mixed content (handwriting + printed text).
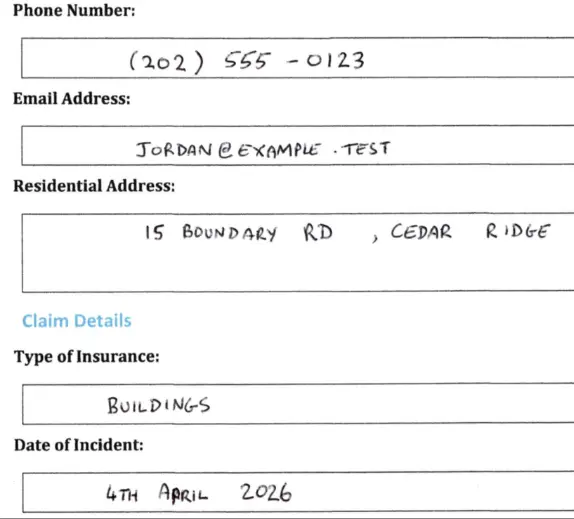
Figure 1: Part of a sample document. While the printed text is extremely constant, the handwritten text varies significantly. There are five "2"s, all of which are different, even though they were created by the same person. The word "April" also looks odd, like a fixed typo. Just some of the things ICR has to deal with.
To work with such diverse documents, handwriting recognition relies on machine‑learning models trained on large, curated datasets of handwritten examples. These models infer characters, words, and layout structure, even when the handwriting isn’t perfectly neat.
Handwriting Recognition with Apryse
The Apryse SDK provides an integrated OCR and ICR pipeline that supports handwriting recognition directly within your application.
Key benefits include:
- On‑device processing: No cloud dependency and your data stays where you control it.
- High accuracy for mixed documents (typed + handwritten).
- Multi‑language support (limited to Latin alphabets and primarily trained on English language documents).
- Structured extraction: Text remains tied to page locations.
This makes it ideal for industries that require security, compliance, or offline processing, such as legal, healthcare, government, and finance.
A Simple Handwriting Recognition Workflow
At a high level, handwriting recognition with Apryse looks like this:
- Load a document (PDF or image).
- Enable the Apryse SDK.
- Run handwriting recognition.
- Extract recognized text.
- Use the results however you need (search, export, analytics).
Let’s walk through a practical example.
Example: Handwriting Recognition Using the Apryse SDK (Node.js)
The sample document we will use is a fictitious Insurance Claim Form that contains handwritten entries that we need to extract.
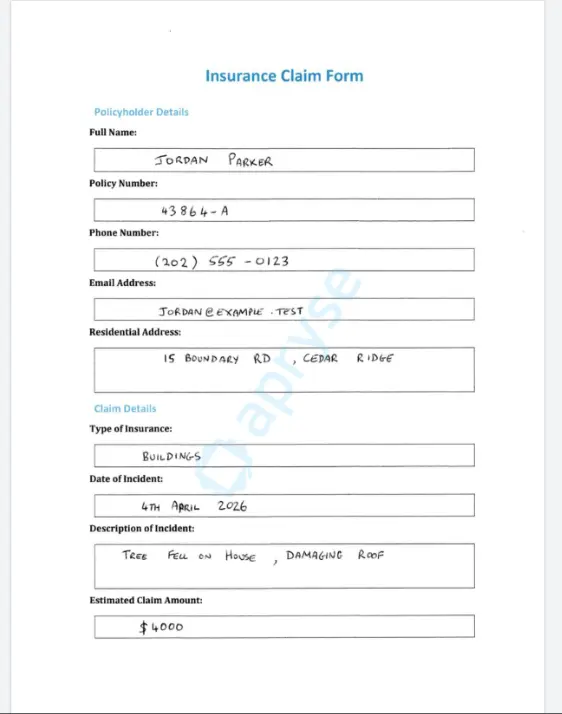
Figure 2: The sample document that we want to extract data from.
We’ll put together some simple code that will allow us to create a searchable text layer.
The code is based on one of the samples that is available for the Apryse SDK. You may like to look at those to see what other options are available.
For now, though, we will just look at the simplest mechanism—extracting all the text from a single page PDF.
For this article, I have used Node.js:
- Apryse SDK version 11.12
- Node 24.15.0 LTS
- Windows 11
Similar results should be found with other, supported versions of Node, other languages, and also macOS and Linux.
Setup
1. Create a new folder and initialize a new Node project.
npm initNote that if you just use the defaults, then the entry point will be called index.js, and a CommonJS project will be created. If you choose to create an ES Module project instead, then you will need to modify the code in this article slightly.
2. Create a file called “index.js”.
3. Download and install the Node Apryse SDK library.
npm i @pdftron/pdfnetYou will also need the Handwriting ICR Module, which is a separate download.
There are dedicated downloads for Windows, macOS and Linux.
Once it has downloaded, extract the archive (or zip file) into a location of your choice. I chose to place it in the same folder as my index.js file.
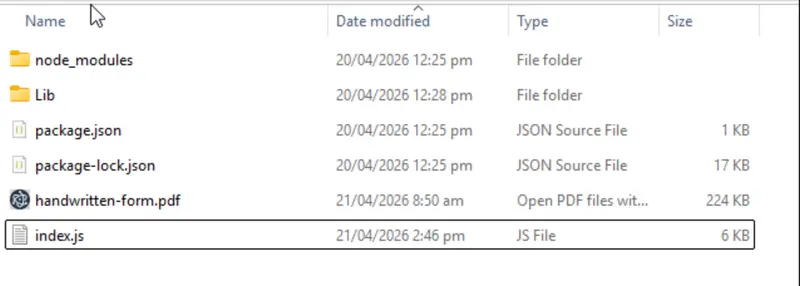
Figure 3: All the prerequisites are in place. The Apryse SDK is in the node_modules, and the HandWritingICR module is within the LIb folder.
I’ve also, to keep things simple for this article, put the file that I want to extract handwritten text from (called ‘handwritten-form.pdf’) into this folder.
We’re now ready to start writing code in the index.js file.
Import the Apryse SDK
First, ensure the Apryse SDK is imported.
I’m also going to need an Apryse license key. For this article, I’ve placed that into an environment variable.
const { PDFNet } = require('@pdftron/pdfnet-node');
const licenseKey = process.env.APRYSE_SDK_KEY
Let the SDK Know Where to Find the HandwritingICR Module
Within a function, which I’m calling icr_simple, I need to let the SDK know where the HandwritingICR module is, which we do by specifying the path to the folder using addResourceSearchPath.
In my case, I placed the module in the same folder as my index.js file. If you put it somewhere else, then you will need to adjust the code.
PDFNet.addResourceSearchPath('./Lib/');Load a Document with Handwritten Content
Next, create a PDFDoc object from the file that contains the handwritten text (which, for this example, is called ‘handwritten-form.pdf’).
const doc = await PDFNet.PDFDoc.createFromFilePath('handwritten-form.pdf');We are now at the point where we can decide exactly what we want to extract.
Extracting All the Text in the PDF
Run OCR with Handwriting Recognition Enabled
We then use the processPDF function from the HandwritingICR Module to extract the text from the PDFDoc object. There are various options that could be used, but for now, we will just use the defaults.
await PDFNet.HandwritingICRModule.processPDF(doc);Save the Results
Once the processPDF function completes, all that remains is to save the resulting document. I’m hard coding the name “icr-simple-output.pdf”, but you would likely want to choose a more meaningful name and location.
In this case, I am also saying that I want the resulting PDF to be linearized, which is great if you need to download large documents. There are a number of other options available if you prefer.
// Save the result with hidden text applied
await doc.save(‘icr-simple-output.pdf', PDFNet.SDFDoc.SaveOptions.e_linearized);
Call the Method
Finally, we can call the function we just created using PDFNet.runWithCleanup, and passing in a license key. runWithCleanup is great as it will deal with releasing memory resources for us when the function completes. We’ll also add some basic error handling, and when we have finished, we will shutdown PDFNet.
That’s it.
If we run the code, then after a short time, a new file is created.
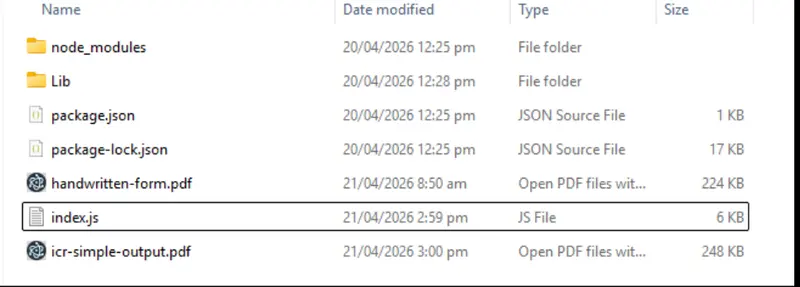
Figure 4: After a short while, the ICR'd PDF is created.
If we look at the new file in a PDF Viewer, for example Apryse WebViewer, then superficially it looks the same as the original. However, the handwritten (and printed) text is now selectable from a hidden layer, aligned with the original handwriting.
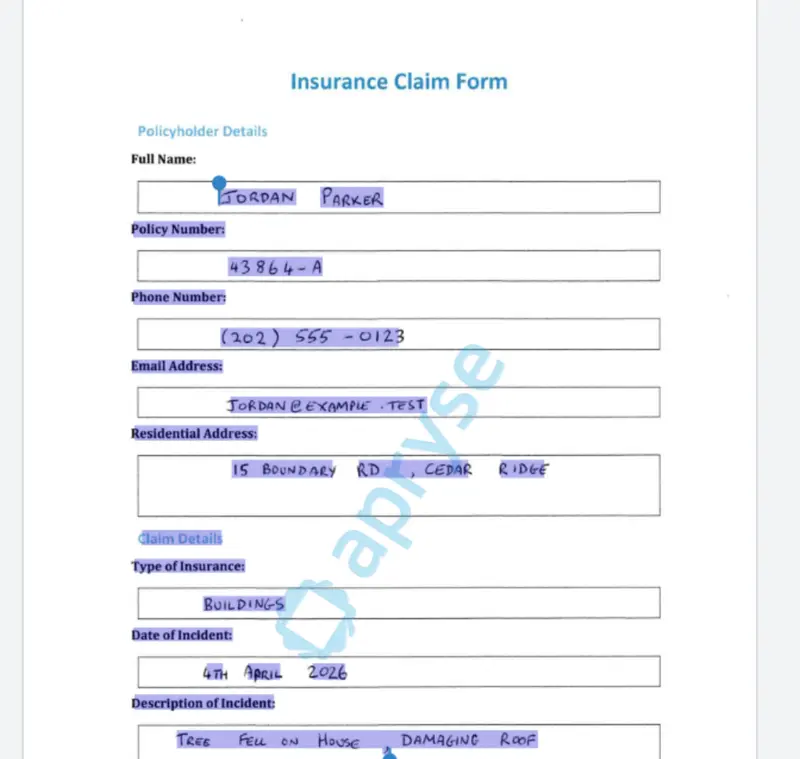
Figure 5: After processing, the handwritten text is now selectable.
That’s a great result.
Currently we are running ICR on the entire page, for both printed and handwritten text. ICR is processor intensive, so if we can avoid unnecessary work that would be great.
If we are working with forms, then we already know what the printed text is, so that is of little interest. We really only need to extract the handwritten text.
Extracting Text from Just Part of a Page
The Apryse SDK offers two specific options that allow you to control what is processed on a page-by-page basis. These are “Inclusion” and “Exclusion” Zones.
If one or more inclusion zones are specified, then anything not “included” will be ignored. If one or more exclusion zones are specified, then anything not “excluded” will be processed. You can even specify both inclusion and exclusion zones for the same page. The “inclusion zones” are applied first and represent the maximum amount of the page that could be processed. You can then remove specific areas from what would have been included (great for “gaps”, by adding exclusion zones.
Both zone types are specified as arrays of co-ordinates in PDF User space (that is, measured in points from the bottom left of the page).
We just need to know the location of the text boxes in the form and Apryse WebViewer can help with that (Smart Data Extraction and form field detection can do this automatically, but we will leave that for another article).
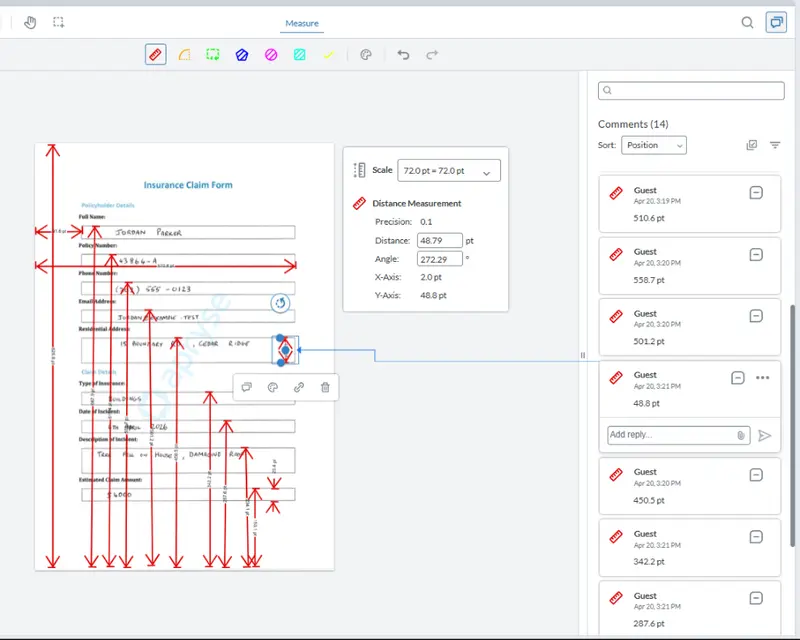
Figure 6: Apryse WebViewer allows us to measure the location of the text boxes from within a browser.
Once we have the locations for all the text boxes, we just need to create a HandwritingICROptions object and add an array of “InclusionZones.”
If we run the code now, then ONLY the parts of the page that are included in the InclusionZone array will be processed.
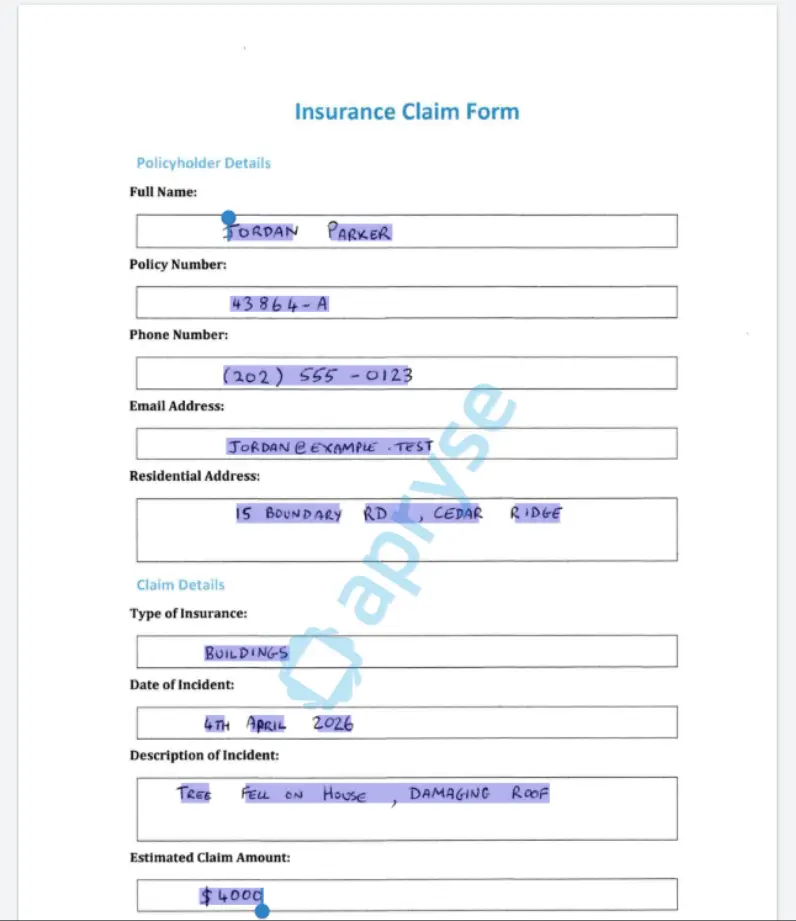
Figure 7: You can use Inclusion zones to extract handwriting from just specific parts of the page.
Extracting only the data that you are interested in can save significant time. In simple tests, it reduced processing time per page by 50%.
You can still search the handwritten contents, exactly what we might want to do.
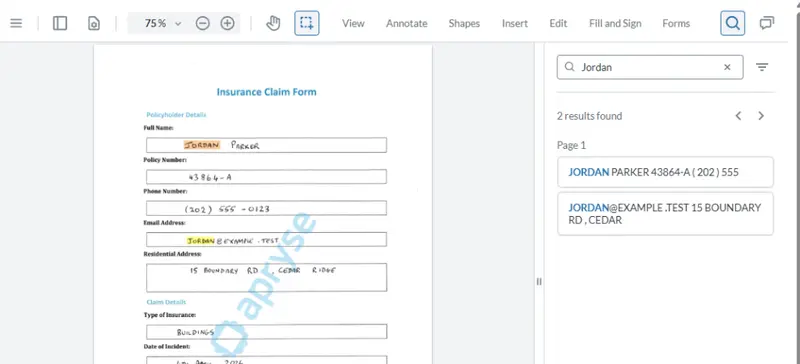
Figure 8: The hidden text layer allows you to search for words in the handwritten text.
Getting the Extracted Text as JSON
Being able to add a hidden, and searchable, text layer is one thing, but what if you want to use the extracted data for some kind of processing, whether that is using it to train an LLM, or to store it in a database?
The Apryse SDK still has you covered. The HandwritingICR module also allows you to get the printed and handwritten data as JSON.
If you wish, you can apply the JSON back to a PDFDoc object.
await PDFNet.HandwritingICRModule.applyICRJsonToPDF(doc, json);Extracting JSON from the file and immediately applying it back to the same file has the same effect as just calling HandwritingICRModule.processPDF(doc);.
But there's lots more that you could do.
Working With the JSON
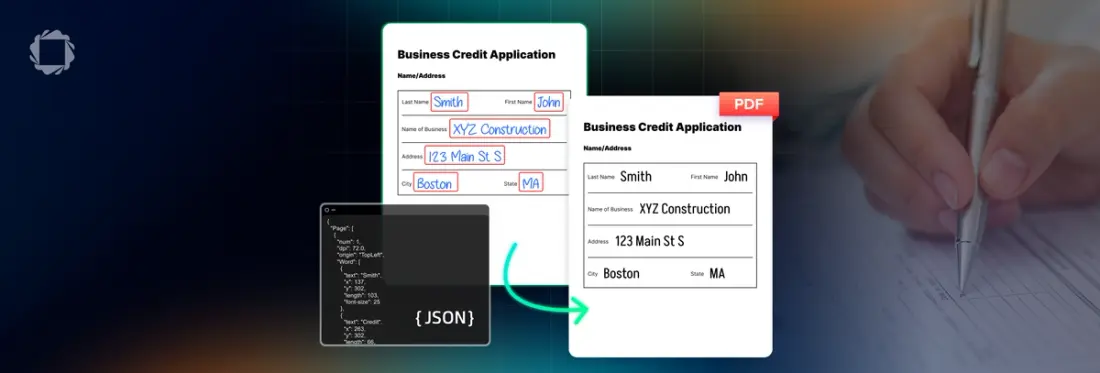
The JSON created by the HandwritingICR Module contains not just the extracted text but also information about the location and font size of the text.
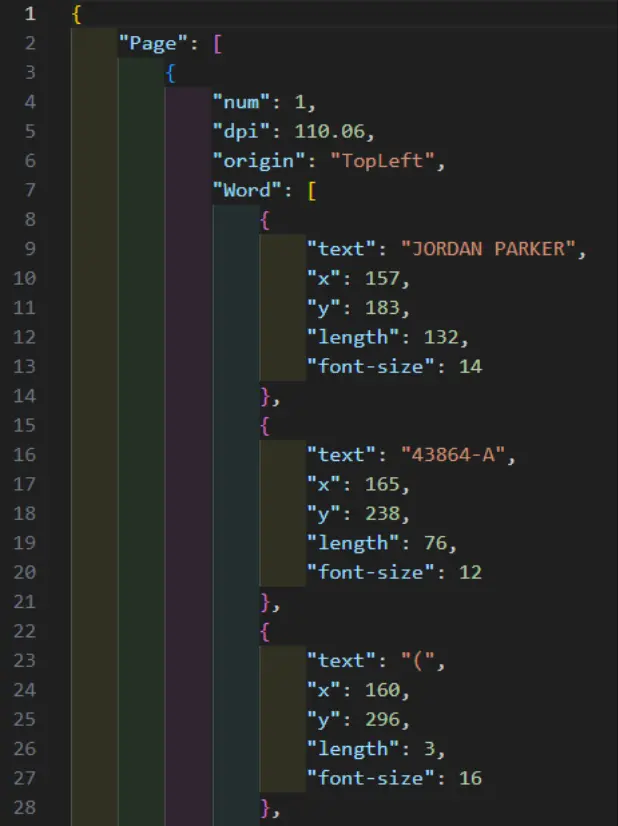
Figure 9: Part of the generated JSON.
You could use that data to train your own LLM or store it in a database, with a link back to the original document; helping you to make handwritten records discoverable and auditable.
You could even process the JSON in some way and apply it back to the original document or even apply it to a different PDF. Perhaps a “born digital” version of a handwritten form. If you then make the hidden text layer visible, you will get a fully digital and accurate version of a scanned form.
The range of possibilities is enormous.
What About Accuracy?
Any version of Character Recognition is imperfect, and sometimes even a human makes mistakes. The letter “O”, for example, can easily be mistaken for the number “0”. If, I’m honest, I can’t always read my own handwriting either.
The accuracy will depend to a large extent on the documents that you are processing. As such it is wise to verify at least a sample of your own documents to see how accuracy works for you.
If you have any control over the incoming documents, then:
- Use high‑resolution input (300 DPI or higher for scans).
- Scan as a lossless format (JPEG is not ideal for text; PNG or TIFF is much better).
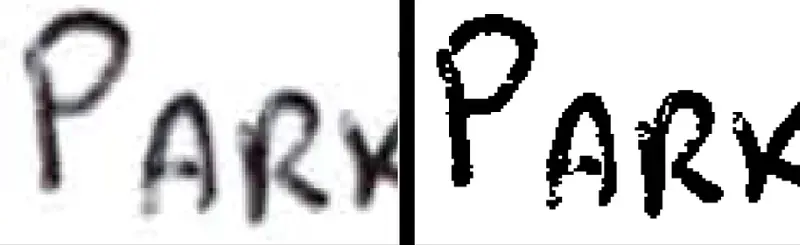
Figure 10: Both images were scanned at 300dpi. The left hand one was full color and also shows "speckling" – typical of JPGs. The right hand one is a monochrome TIFF.
- Expect some ambiguity with cursive or heavily stylized input. This is normal across all OCR systems.
Final Thoughts
Handwritten content no longer needs to live outside your digital workflows.
With the Apryse SDK’s handwriting recognition support, you can unlock information that was previously trapped on paper—securely, accurately, and entirely within your own application stack.
When you’re ready, Apryse gives you the tools to go from ink to insight.
If you have any questions about this blog, or there are other blogs that you would like us to write, then please contact us at blog-feedback@apryse.com.