Roger Dunham
Published June 26, 2026
Updated June 26, 2026
5 min
Showing What is Hidden
Roger Dunham

Summary: Scanned PDFs often contain invisible, OCR-generated text layers that make documents searchable but can quietly trigger data leaks, compliance failures, and search errors. This article explores why these hidden layers exist, how they introduce hidden security risks, and how to use Node.js and the Apryse SDK to programmatically expose them for better document integrity.
Introduction
To a reader, a PDF may look like a flat, simple document: words on a page, images, maybe a table or two. Under the hood, however, many PDFs have a layer that is not visible on screen.
That’s a common scenario when dealing with scanned documents. Typically, the OCR process results in the recovered text being applied as a hidden layer, aligned with the part of the image that the text relates to. As a result, you end up with a hidden layer (or layers) containing text that can be selected, effectively making a scanned image searchable which gives a great intuitive user experience.
There can be problems though:
- OCR is rarely perfect, so the hidden text may contain errors that are not obvious.
- If the document is edited after a hidden text layer is created, then the hidden text layer may no longer align with (or have the same text even with perfect OCR) as the visible image.
- If the document is OCR’d multiple times, then you can end up with multiple hidden text layers that don’t agree with each other.
This may sound trivial but can lead to more serious issues.
From a security and compliance perspective, hidden text can expose sensitive information that was assumed to be removed. If a document is redacted manually then PII may be removed from the visible layers, but leave underlying text intact. That has been a cause of well‑known source of data leaks, particularly in legal, financial, and government documents.
From a data quality standpoint, hidden text can interfere with downstream processing such as text extraction, search indexing, accessibility tooling, and AI analysis, producing duplicated, misleading, or contradictory results.
Finally, there are user‑trust and usability risks. When a PDF behaves in unexpected ways like highlighting invisible words or returning strange search results, it undermines confidence in the document’s integrity.
Understanding hidden text layers is therefore essential for anyone who creates, processes, or distributes PDFs at scale. They are not a flaw. In many cases, they enable critical functionality like accessibility and search. But without awareness and proper handling, they can quietly introduce errors, compliance gaps, and security issues that only surface long after a document has been published.
In this article, we will see how you can make hidden text visible. As a sample document, we will use the output from my recent ICR (Handwriting Recognition) blog.
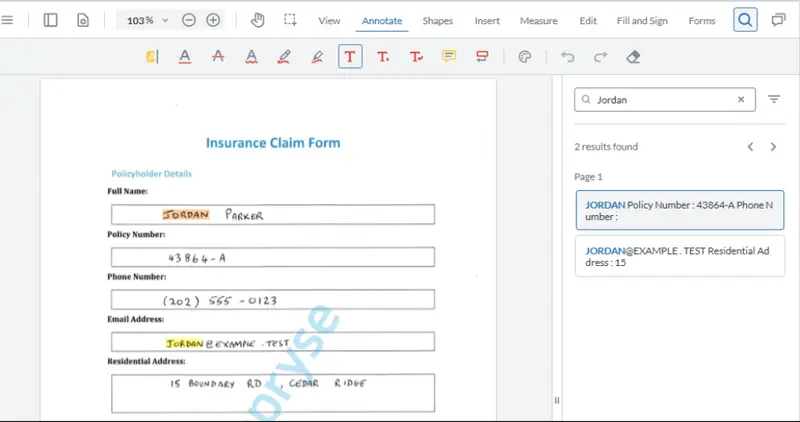
Figure 1: The sample document. Even though you can’t see the hidden text layer, you can search for text within it.
Why is the Hidden Layer Not Visible?
There are a number of ways that OCR can generate a hidden text layer. The two most common are:
- Use Rendering Mode “3”, which means that neither the fill nor the outline is drawn. Rendering Mode 3 is not OCR-specific. It’s a general PDF feature. OCR software just happens to use it often.
- Make the text fully transparent.
Making text transparent (you may also see the phrase “opacity” used, which is the inverse of transparency) is easy. For example, you can edit text in Xodo PDF Studio to have different levels of transparency.
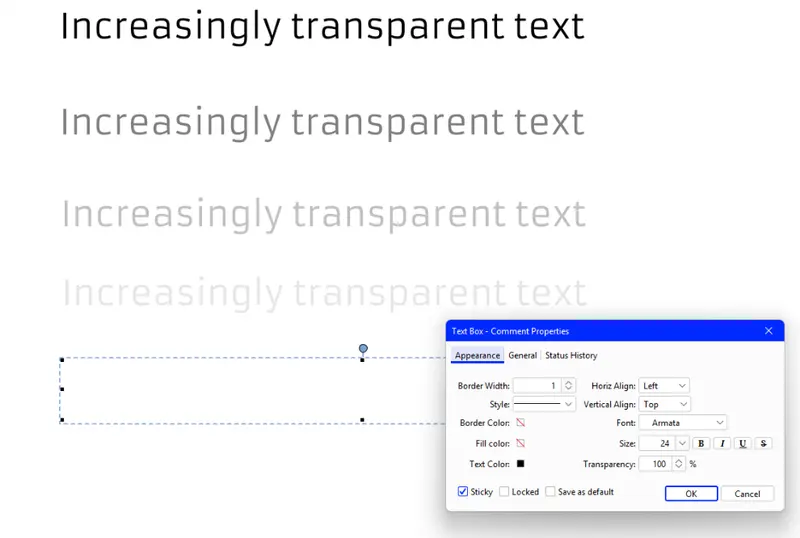
Figure 2: Text transparency is just one of the things that the PDF specification supports. In this case, the text is 0, 50, 75, 90 and 100% transparent, shown In Xodo PDF Studio. Sometimes the word Opacity is used instead.
The phrase “Hidden Text Layer” should not be confused with the use of “Optional Content Group” (OCG) layers. These layers have many uses, for example allowing the viewer to see or hide layers in a CAD drawing. Apryse is one of the few SDKs that support OCG Layers.
How Can I Make the Hidden OCR Layer Visible?
The Apryse SDK has a huge range of functionality. You can use it at a high level (such as DataExtractionModule.ExtractData) as well as at a low level such as working with PDF Elements, which we will do here.
For this example, I’m using Node.js, but you could write similar code in Python or C++, or any of the other supported languages that the Apryse SDK supports.
I haven’t included the boilerplate code (which you can find in the Getting Started Guide) so that we can focus on the specific code.
For this example, the code in showOCRdTextCaller is creating a PDFDoc by reading a file from (and saving the processed file to) a local path, but you could change the code to work with an existing PDFDoc (perhaps the output of an ICR or OCR process) directly.
It’s then passing the PDFDoc to the function ShowOCRdText, which makes a copy of the document, so that changes don’t get inadvertently saved.
How It Works
Apryse doesn’t store the OCR’d text directly as text on the page. Instead, it is stored as part of an xObject (often referred to as a Form).
The code iterates through each page of the document (in this case using getPage, rather than a Page Iterator, though either would work), and scans the page content for xObjects. For each xObject it finds, it delegates processing to ProcessXObject (which we will discuss in a moment). Any text that is page-level (rather than in a form) is not changed. Finally, the document is saved as a new, linearized PDF with a “_visible.pdf” filename.
The ProcessXObject function is where the real work occurs.
How ProcessXObject Works
The ElementReader iterates through each element on the xObject.
There could be many object types in the xObject, but the only elements that are of interest are:
- Nested xObjects (which result in the function being called recursively) and
- Text
In this example code, the text processing is rather naïve, with all text, whether visible or not, being treated the same way. You could make the code more complex to deal with other scenarios, but I want the essence of the code to be obvious.
For each text element, we get the GState (short for “Graphics State”.
const gs = await element.getGState(); The GState controls how the text element will display once it has been written back into the file. It supports many options, but we are just using a few of those.
We are doing three things to make the text visible. We’re setting the fill and stroke Opacity to 1.0, and setting the TextRenderingMode to Fill_Text:
That’s very much a belt and braces approach. We could probably get away with just setting the FillOpacity, but this code will also work if the TextRenderingMode had been set as invisible.
Finally, and great for debugging, we are setting the color of the text to red. That’s not quite as easy as saying gs.setFillColorWithColorPt(red), since we need to define what “Color Space” should be used. The Color Space (options include DeviceRGB, DeviceGray, or ICC‑based spaces) defines how the color values are interpreted as actual visible colors when text is rendered on the page. That’s a complex subject so feel free to dive deeper into it, but for now it’s probably enough to note that we have chosen to use the DeviceRGB color space, in which the color Red is defined as (1,0,0).
Finally, we apply the ColorSpace and FillColor to the GState associated with the element that we are processing.
await gs.setFillColorSpace(cs);
await gs.setFillColorWithColorPt(red)
All that remains is to write the content back to the xObject (using the ElementWriter) and move onto the next element until everything has been processed.
The final result is a PDF where you can see both the original document and what was in the hidden text layer, now made visible.
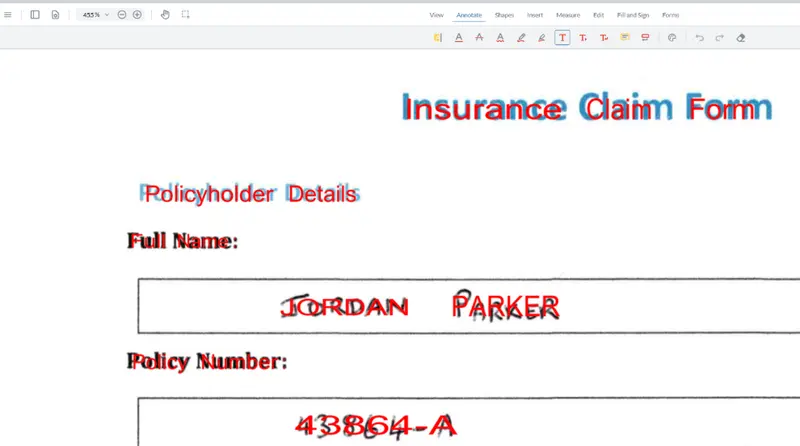
Figure 3: The final document with the hidden text now visible (shown in Apryse WebViewer). I chose to make it red, but you could make it whatever color you prefer.
Wrapping Up
OCR and ICR create hidden text layers, and it can be hard to understand what is going on and their accuracy. Apryse offers two different ways that you can see the hidden text, either from Xodo PDF Studio or by using the Apryse SDK to programmatically edit the visibility.
And there is so much more functionality, so grab yourself a trial license and try things for yourself.
If you have any questions, you can reach out to us on Support channel.
If you have any questions about this blog, or there are other blogs that you would like us to write, then please contact us at blog-feedback@apryse.com.


