Roger Dunham
Published March 03, 2026
Updated March 03, 2026
8 min
Creating a Web Application that Interacts with AI. Part 2: Interacting with the LLM
Roger Dunham
Summary: Learn about connecting a PDF chatbot to a Large Language Model using LangChain and Apryse WebViewer in part 2 of this two-part blog series.
Introduction
In the previous article, we saw how the modular UI of Apryse WebViewer can be used to create a tool that allows the user to interact with a PDF, and send questions about the document to a Large Language Model (an LLM), display the results, and provide citation links back from the results to the original PDF.
There’s a video that shows how to get the sample code working.
That offers a great solution for anyone working with documents, whether in finance, legal, insurance, medical or, in fact, any other field.
Not only does this system reduce the amount of data (and therefore the cost) sent to the LLM; it also improves data security. Furthermore, by using a browser-based solution, you end up with a tool that can allow you to create links from the "chat” answers, back to the page where the data was found – that saves time, and the need to open the PDF in a separate tool from the one that was used to ask questions of it.
The previous article described how the WebViewer Modular UI was leveraged to give a new “Chat” window. In this article, we will look at how we interact with the LLM.
You can get the source code for the sample from GitHub.
Under the hood, we are using LangChain to interact with the LLM. Don’t worry if you don’t know what that is, as we will talk about that in a moment, but first let’s consider the data that we want to send to the model.
What Data is Passed to the Model?
It’s possible to send a PDF to an LLM and ask questions about its contents. However, before you dive into that, stop and ask yourself a few questions:
“Does the simplicity of processing the entire PDF offset the greater cost and increased processing times?”
“Do you want to send PDFs containing sensitive data to a service running on a machine over which you have no control?”
“Did you know that sensitive data could exist in hidden layers, images, metadata, or elsewhere in a PDF?”
“If sensitive data becomes public, will your company be exposed to legal or business problems, or reputational damage?”

Figure 1: Uploading a PDF directly could mean that you send images that contain information that you wouldn't want to become public.
If you aren’t certain that the data is absolutely, totally, and completely secure, then you may want to consider just sending data extracted from the PDF to the LLM, rather than the PDF itself. That’s also faster and cheaper, and by removing blank pages, or those with confusing layout, you can often get better results.
The sample code therefore extracts just the text from the PDF. Apryse offers many ways to get contents from PDFs, but for this example, it is using the simple loadPageText method. The code iterates over each page of the PDF, extracting the text and creating a message that includes a <<PAGE BREAK>> identifier so that the LLM knows which text came from which page when creating citations.
It’s a fast and simple process, that works well with “born digital” PDFs. You could extend the code, if you wished, to do similar processing with scanned PDFs.
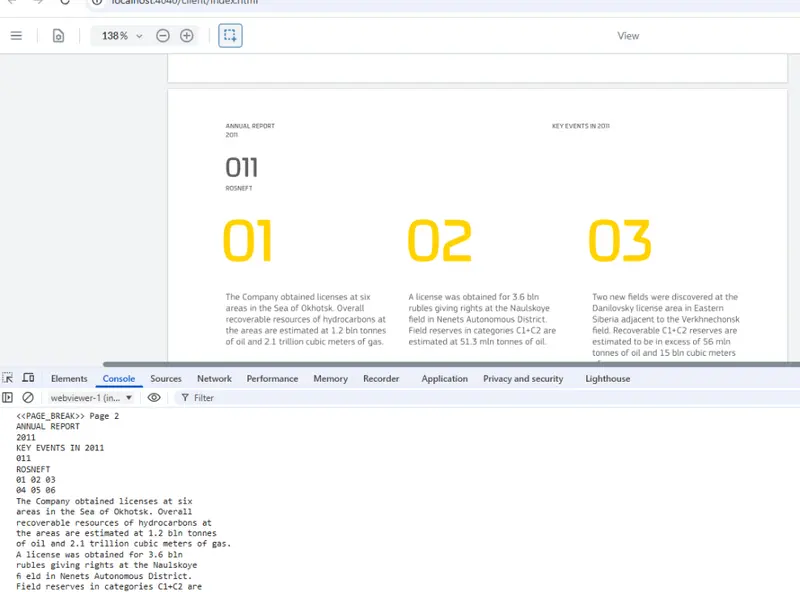
Figure 2: Part of the extracted text for page 2 of the sample document.
Furthermore, the mechanism used in this article, stores the page where text was located, but not where on the page it was. Once again, it would be possible to extend the sample to get that information by using the Smart Data Extraction add-on module.
Read more about using Smart Data Extraction with Apryse to get data as JSON.
Working with Confidential Data
If you are working with a publicly available PDF, then you don’t need to worry about the confidentiality of the data. But what about if we are working in healthcare, finance, or another industry that works with real people and where there is a need to protect their Personal Identifiable Information (PII)?
Although we aren’t sending the entire PDF to the LLM for processing, the extracted text could still contain information that is not intended to be public.
As an example, let’s consider a fictitious medical report, about someone who ends up with a piece of Lego in their ear (it happens more often than you might think!)
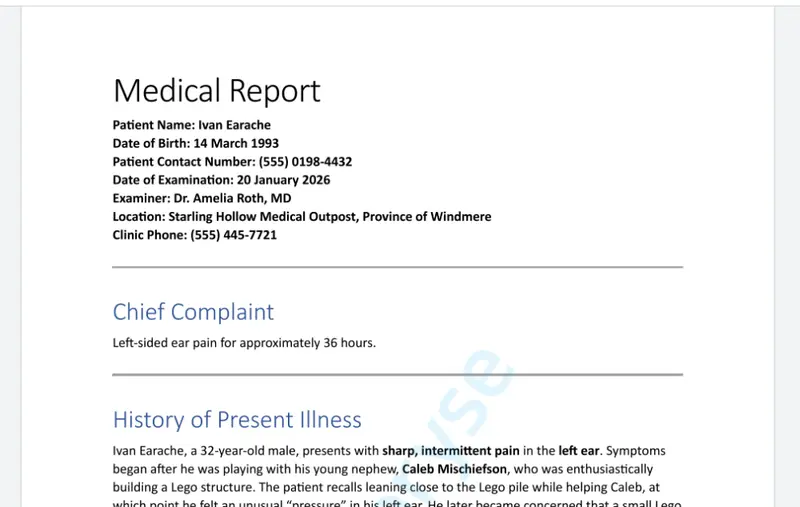
Figure 3: Part of a report describing a fictitious medical issue.
Now let’s imagine that we have a workflow that needs us to summarize both this report and thousands of others. That’s the kind of thing that LLMs are great at.
However, if the final summary is going to be public, then we would want to anonymize the data so that it contains no PII.
We could, of course, upload the PDF (or the extracted content) to the LLM, and create a prompt that includes instructions to exclude any PII in the responses.
Depending on the agent, that might work well.
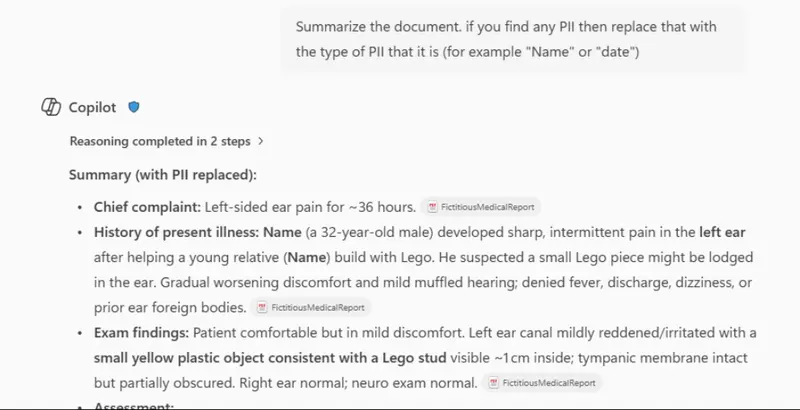
Figure 4: An example of using a prompt to anonymize PII. In this case, the results are good and PII is not returned.
However, for a variety of reasons, the PII removal might not be effective (in this case I had previously told the LLM to ignore hiding PII).

Figure 5: An example of a prompt failing to remove PII.
The securest way to avoid unintended PII publication is don’t send unredacted data to the LLM in the first place.
Our code makes that easy to do since we have access to the text that we are going to send.
We could redact the PDF itself, but it may be useful to see the unredacted version in our app.
Read more about how Apryse WebViewer makes it easy to redact PDFs.
Redaction via Simple Text Replacement
There are numerous ways that the PII could be handled. It could be blanked out, marked as “redacted”, or given a placeholder.
As an example, we will use a regex to search for patterns that suggest PII and replace matches with a descriptive string.
We could write a regex that searched for names based on a pattern but in this case, we will explicitly specify names that we want to remove.
We just need to pass the text to the function “redact” and then use the result.
Now, when we run the code, the sensitive data will be removed.
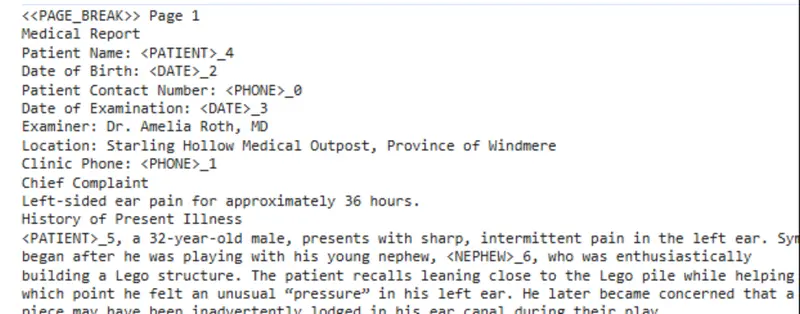
Figure 6: Part of the text that has been extracted from the medical report, with dates, the patient's name, and phone numbers replaced with placeholder text.
We can then pass that anonymized data to the LLM, ask questions, and still get meaningful answers back.
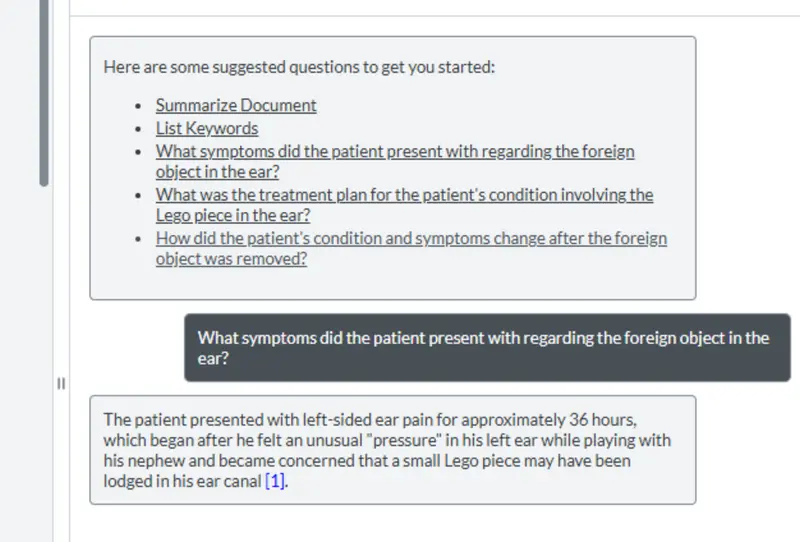
Figure 7: After redacting information, we can still query the remaining document content.
However, if we ask for the name of the patient, then the LLM is unable to answer, simply because the data was never uploaded.
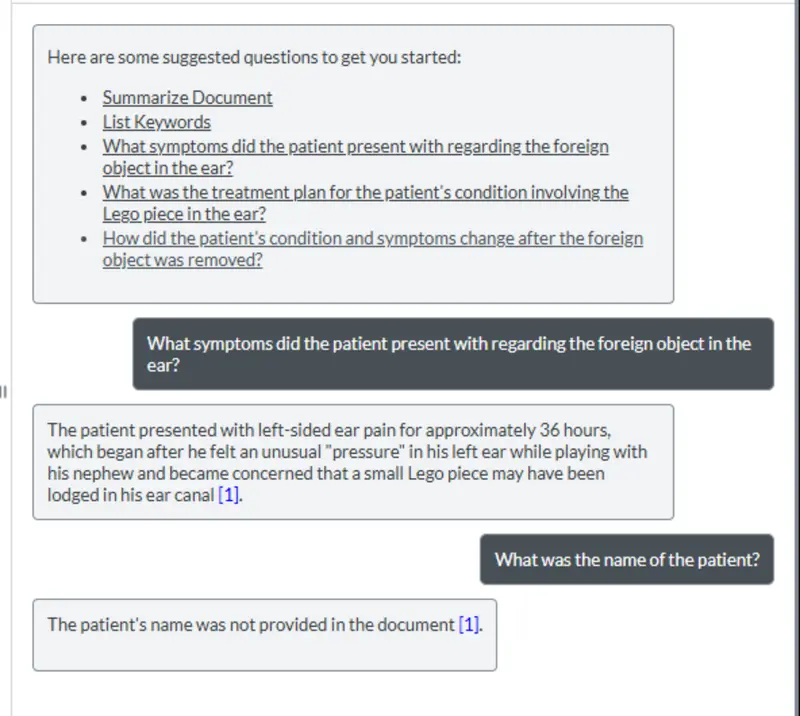
Figure 8: Since we redacted the data before uploading it to the LLM, there is no risk of the patient’s name becoming public.
That’s great! We can still get the answers that we need, but we have entirely removed the risk of PII “leaking” since we are never sending that to the LLM.
If we wanted more sophisticated PII detection and replacement, then we could use something like Microsoft Presidio running in a local Docker container. Once again, redaction occurs on infrastructure that you have control over.
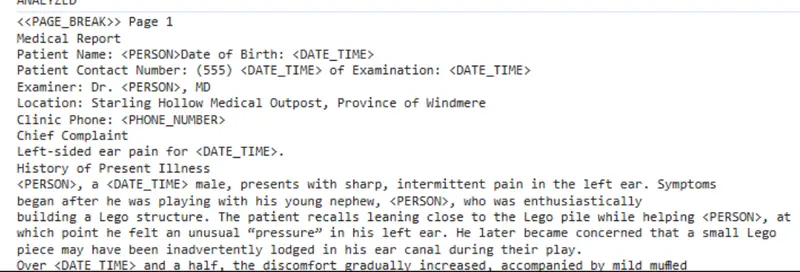
Figure 9: The result of anonymizing text using Presidio.
Regardless of how the redaction is done, Apryse has made it easy to get the text from the PDF, reducing processing costs, and giving you control over what data is sent to the LLM.
Creating the Prompt to Send to the LLM
The next part of the process involves building up the prompt that ultimately is to be sent to the LLM. This is, based on the type of question, the data that needs to be sent and any previous context. The prompt is then sent to a local server (in the sample code) which forwards the question to the LLM and waits for a response. We’ll see how the server handles that in a moment, but for now this is (part) of the code that is used by the client app.
Once the response is received, it is returned to the browser and displayed in the chat panel.
Figure 10: The question and response are shown in the custom panel. Nice work!
So now we have a prompt, anonymized data (if we want it), and all that remains is to actually pass the prompt to the LLM.
That still sounds hard!
Enter LangChain.
What is LangChain?
LangChain is an open-source toolkit that helps software developers easily work with large language models (LLMs) by acting as a “bridge” between an app and the AI. Instead of a programmer having to manage complex prompts, conversation history, or different model providers on their own, LangChain does that for you, so the app can simply send a request like asking a question or giving instructions and receive a useful response.
In this article, we will just look at a very small part of what LangChain can achieve; passing instructions to the LLM using the function invoke.
As your needs develop, you can extend the sample to take advantage of LangChain’s other functionality (such as searching the internet).
That means that just as with Apryse, you can stick with the same toolkit, rather than having to retool when you find a limitation as your requirements change over time.
Sending the Question to the LLM
Before we can do that, we need to initialize the LLM.
The details for initializing the LLM depend on which one is being used but are well documented.
The sample code that goes with this article uses OpenAI, and initialization requires a key (which you may need to pay for depending on the AI provider), as well as options for the model that is to be used, the “temperature” (which affects how “creative” the answer will be), and the maximum number of tokens. Typically, you would place those options into environment variables. I've added some fallback values in the code below.
Now it’s just a case of sending messages to the LLM, and returning the responses to the client app.
The first message typically contains a System Message that has instructions about the role that the LLM should take, and the way in which it should answer questions.
This is followed by a Human Message that contains the actual data that is to be processed.
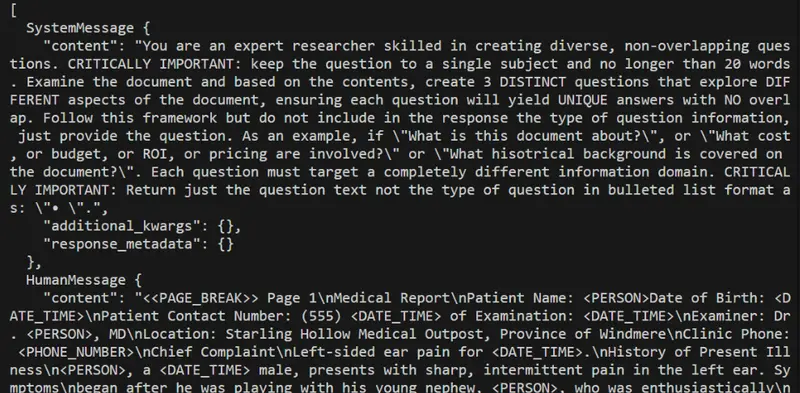
Figure 11: An example of the array of messages that will be sent to the AI.
If additional questions are asked about the same document, then the previous responses will be included in the array of messages sent to the LLM. This allows the new question to be understood within the context of previous answers.
That’s great if you want to ask the LLM to rewrite a previous answer, for example, removing references to gender and left/right handedness.
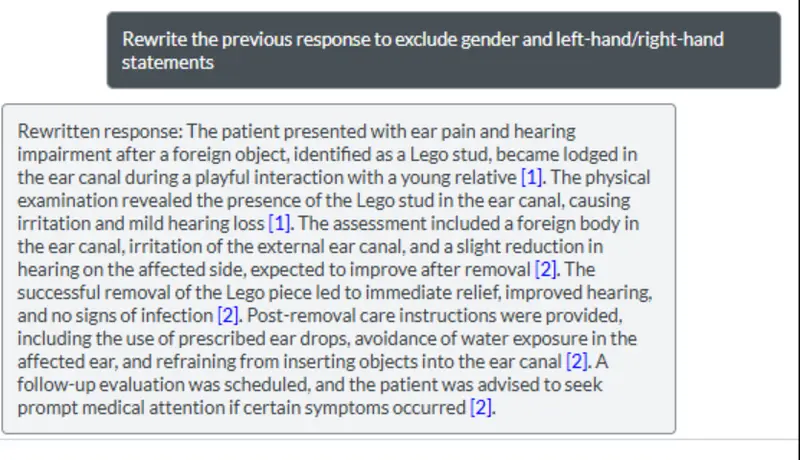
Figure 12: Sending previous responses back to the AI allows refinement of those responses.
Working with Other LLMs
The example code has been designed to work with OpenAI, but if you want to work with a different LLM, then LangChain makes that easy. You just need to import the new wrapper and initialize the LLM with updated values.
The process of calling Invoke, passing the prompt, and getting the response is the same.
Wrapping Up
We already knew that we could use an LLM to extract information from documents. We’ve now seen how we can use Apryse to extract data from PDFs (or other documents) and integrate that with the LLM to get results that can be displayed in Apryse WebViewer.
The ability to see the results in an intuitive environment is essential. It provides an easy way to have a Human in the Loop to review and quality check data as it is returned, reducing the risk of AI hallucinations resulting in poor decision making.
We’ve only just touched on what Apryse can do for you. In this case, we are using basic text extraction process (potentially coupled with on-prem redaction) and rendering the results in a way that you can see where they relate to in the document.
But there is so much more as WebViewer also allows you to work with CAD, Spreadsheets, and DOCX files, as well as supporting document generation and a host of other functionality.
And if for some reason you don’t want to use a UI, then the Apryse SDK offers a wide range of document processing tools that can be run on a server.
So, check out the documentation, grab yourself a license and try things for yourself, whether it is the source code that goes with this article, or any of the other samples.