Home
All Blogs
Creating a Web Application that Interacts with AI. Part 1: Setting up the Client-side Interface
Roger Dunham
Published March 03, 2026
Updated May 18, 2026
7 min
Creating a Web Application that Interacts with AI. Part 1: Setting up the Client-side Interface
Roger Dunham
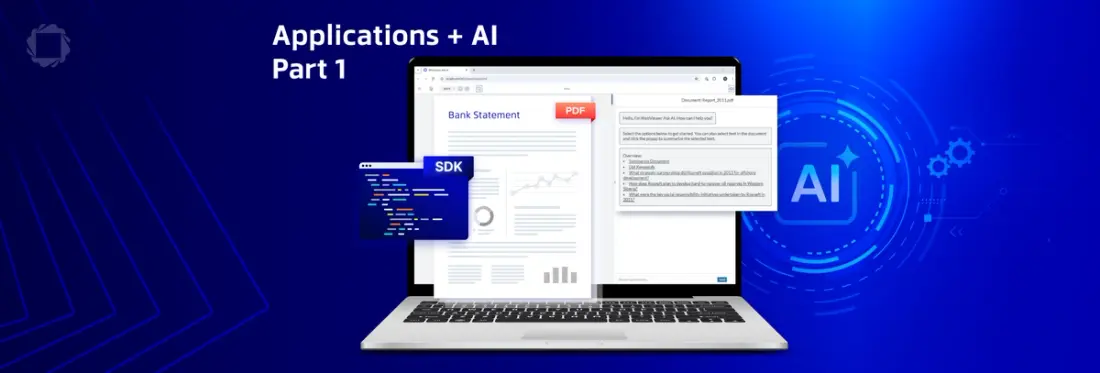
Summary: Learn how to build a PDF chatbot UI using React, Apryse WebViewer, Express, and OpenAI. Part 1 of this two-part series covers frontend setup and efficient PDF text extraction for AI interaction.
Introduction
Regardless of what field you work in; financial, insurance, medical, governance or any other, if you’re building document‑heavy applications then you will need a way for users to query, summarize, or interact with content more naturally.
There are many tools that can do that kind of work, but most involve uploading entire documents such as PDFs, DOCX files and spreadsheets to a server, based “somewhere” on the “cloud”.
There are a couple of problems with that:
- Uploading entire documents is expensive. AI companies typically charge based on the amount of data (“tokens”) that needs to be processed, so minimizing what is sent saves money (and is also faster).
- Uploading data to a remote server risks the data “leaking”. Controlling what is sent minimizes the risk – why send PII, for example, if that is not relevant to the response that you need?
In this article, we will see how you can use the Apryse Webviewer as not only a tool that allows you to see your documents, but also via the use of custom code, extract the text from the documents, potentially process it to remove PII, and then ask questions of it using an LLM.
Better still, by working within a single, customizable UI, you can edit the documents in a consistent and intuitive way, without the need to download the documents locally and open them in a separate application.
This is the first part of a two-part series of articles which document how to interact with AI to create a chatbot experience. When we are finished, you will be able to ask questions about a PDF and show the results within Apryse WebViewer.
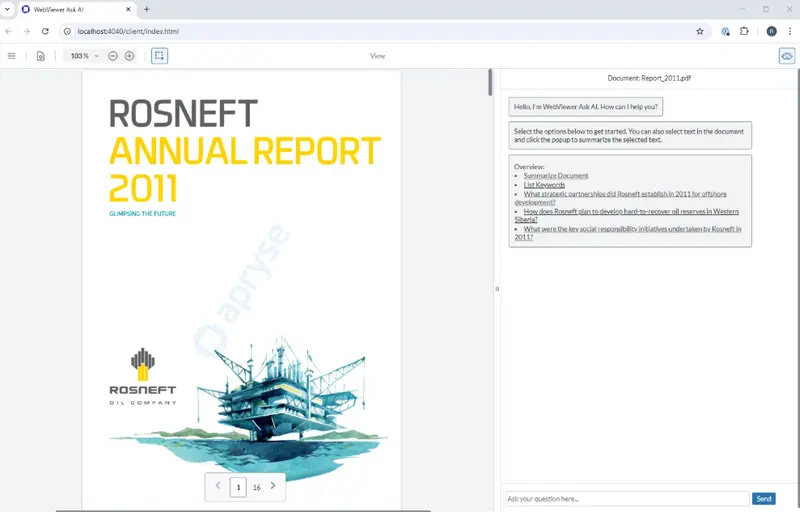
Figure 1: The final app, demonstrating how a PDF can be queried. Note that many of the default options have been removed.
The sample uses OpenAI, but it can easily be modified to use an alternative AI engine. The app uses React and WebViewer for the front end, with Express and Node.js for the backend.
The code has also been designed to minimize the number of tokens needed to get the information. The text content is extracted from the PDF, which is faster and cheaper than sending the entire PDF to the LLM.
The sample code is just part of the extensive repo that demonstrates a wide range of WebViewer functionality. Download the source code for the WebViewer Chat app.
There’s a video that shows how to get the sample code working.
In this article, we will look at how we set up the UI. In the next article, we will look at how we extract data from the PDF and interact with the AI via the backend.
Working with the WebViewer Modular UI
Apryse WebViewer is a powerful JavaScript-based library that allows you to view and edit documents. It handles PDFs, DOCX files, Spreadsheets, and other file types, and offers a huge range of functionality such as page manipulation, editing, redaction, digital signatures and so on. Better still, straight out of the box it has a WCAG 2.2 AA compliant user interface which complies with accessibility regulations such as European Accessibility Act (EAA), and Section 508.
For this workflow, though, we don’t need all the default functionality (for example, we don’t need to be able to redact text from the documents, or to be able to add measurement annotations). Thankfully, the Modular UI makes it a breeze to update the UI, so we will remove the default buttons that we don’t need.
We will then add custom buttons (including a flyout), and a custom panel, to allow us to have an AI conversation with an LLM.
Let’s see how that has been implemented.
Working with the Modular UI via a Config File
For this app, we have created a custom JSON file which defines the entire UI that we want. We’ve already removed the various components and buttons that we don’t need.
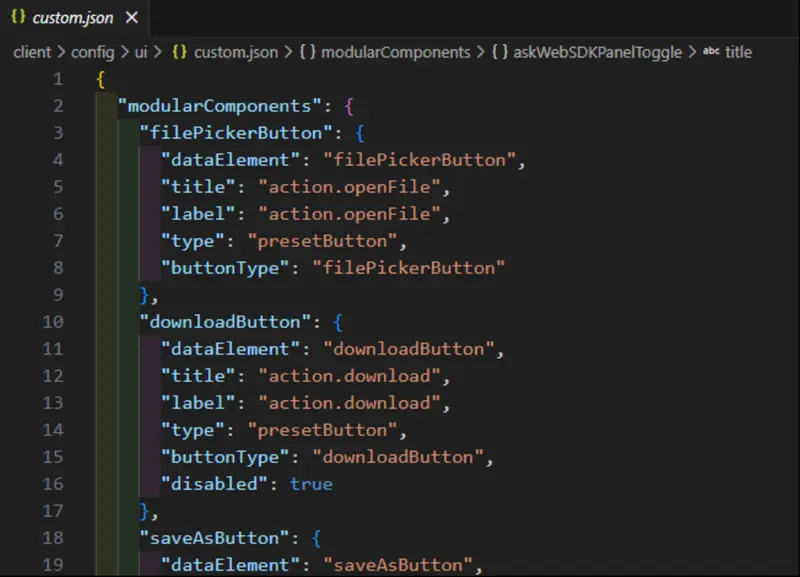
Figure 2: Part of the UI Config file. It defines the entire UI for the app.
Once WebViewer has initialized, we call a custom function importModularComponents, passing in the WebViewer instance object.
That fetches the UI config file from storage and updates the APP_SITE_NAME.
The WebViewer UI is then updated using importModularComponents, passing in a block of JSON and a functionMap (we’ll talk more about that in a moment).
If you remove that one line, then the default UI will be used.

Figure 3: The default UI for WebViewer, showing a range of menu items.
But with it in place, the UI we will get what we saw in Figure 1.
Diving into the Config File
Adding a New Panel
Much of the content of this JSON config is standard. That’s not surprising as it was created by exporting the default UI using instance.UI.exportModularComponents. What is unusual is that there is a custom panel called “askWebSDKPanel”.
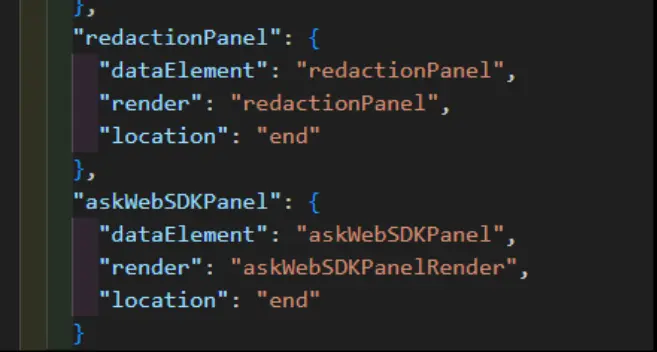
Figure 4: Part of the UI Config file, showing where the custom panel is defined.
The Modular UI specification requires that a panel must have a “render” function specified. That function can be one of the built-in ones (such as “redactionPanel”) or a custom one. In this case, we are using “askWebSDKPanelRender”.
However, the render function can’t be defined within the config file itself as that is a JSON file. Instead, it is located within the associated “Function Map” (the name of which was included in the importModularComponents function). We’ll see more about the Function Map in a moment.
Adding a Custom Button to a Popup
The config file also defines an extra button “askWebSDKButton” that appears when the user selects a block of text.
All that is needed to add the button is to add a new object to the textPopup array. The new object has the type of customButton, specifies the icon, title and dataElement and has an onClick handler (which will call “askWebSDKPopupClick”).
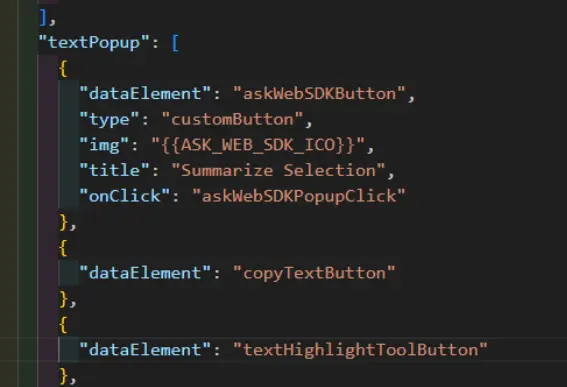
Figure 5: The part of the function map that creates the custom button in the popup, including what should happen when the user clicks the button.
We don’t need to write special code to make the button visible because that is handled by the textPopup. That textPopup appears when text is selected, and now when that happens, our new button is automatically shown.
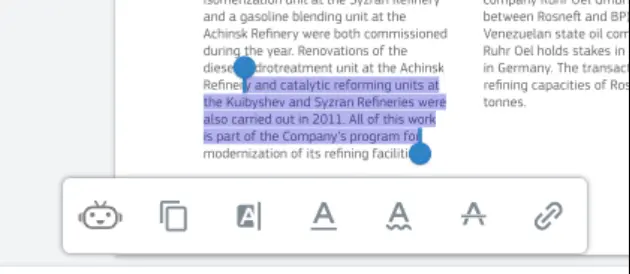
Figure 6: The custom button in the textPopup.
Once again, the definition of the click handler (askWebSDKPopupClick) isn't in the UI config file. Instead, it is specified in the Function Map.
I’ve mentioned that three times now, so I think it is time to look at it in detail.
The Function Map
The Function map is the way that WebViewer creates a link between the name of an event handler that is defined for a custom UI component, and the actual handler function. That might sound complicated, but it isn’t really.
If we look at the functionMap function, then there are just two things defined.
- How our panel should be rendered.
- What should happen when someone clicks on the custom button in the popup.
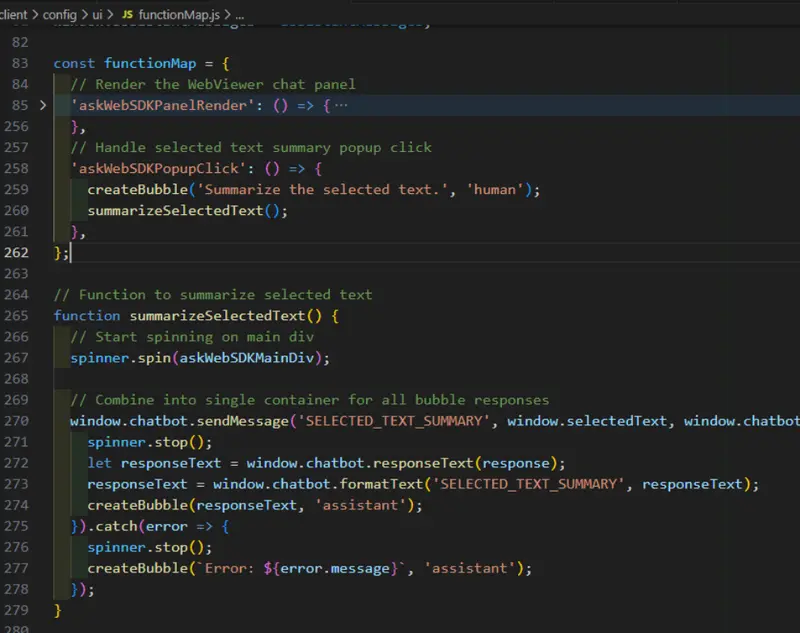
Figure 7: The functionMap which specifies how to render the new panel, and what to do when the user clicks on a custom popup. The rest of the code in the file is used by these two functions.
Let’s look at how those have been implemented.
The Render Function
The render function defines exactly how WebViewer should display the new panel.
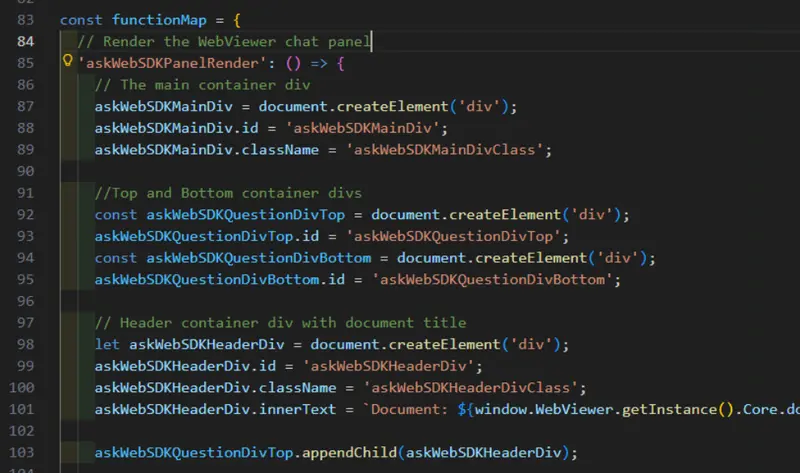
Figure 8: Part of the functionMap. In this case, defining how to create a custom panel.
The new panel could be trivial, but in this case, it is quite complex, defining not just the required HTML elements, but also the associated event handlers.
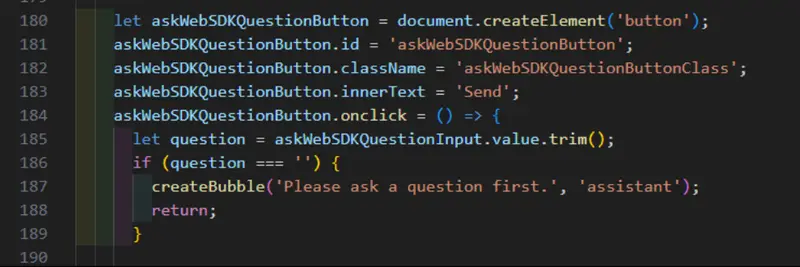
Figure 9: Part of the definition for the custom handler showing how an even handler can be added.
It even specifies the class name (for example “askWebSDKQuestionButtonClass”) giving us the ability to specify styling via CSS.
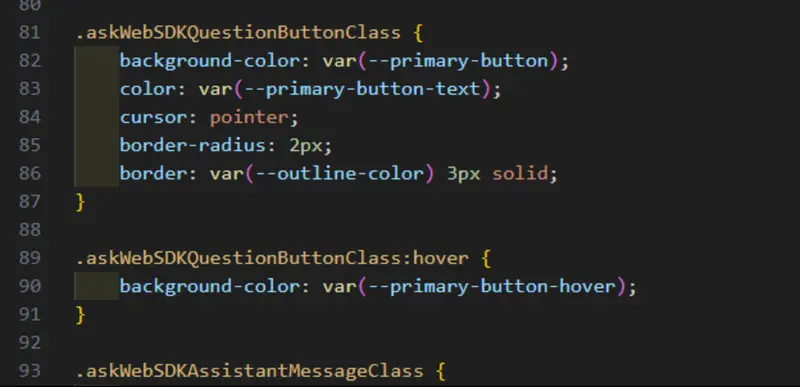
Figure 10: Part of the CSS file that specifies styling for the custom panel.
That’s much more sophisticated than just using the Modular UI to add a new button.
Adding a Popup Button
Talking of new buttons, we added a new button that appears when the user selects text.
We’ve already seen that we don’t need to implement making it appear. That happens automatically when we add it to the array of elements to display when the textPopup opens.
Figure 11: Our custom button which appears automatically when the Text Popup is displayed.
We do, however, need to implement what happens when the user clicks on the button. Our objective is to ask the LLM to summarize whatever text has been selected and display the response.
First, though, we need to store what the selected text is.
There are several ways that you could do this, but in this sample, we are listening to the selectionComplete event that is exposed by the Text Select tool.
When that fires, we get a list of quads which specify where on the page, and on which page, the selected text is located. Note that since a selection could cross multiple pages, the event could return multiple quads.
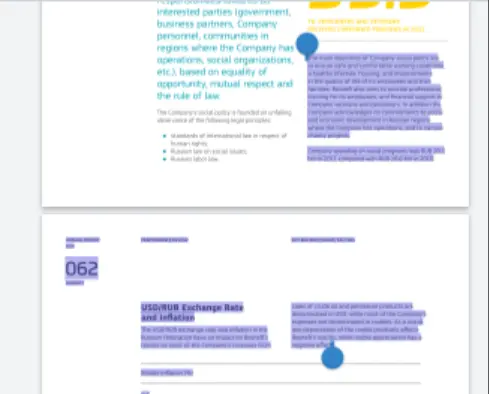
Figure 12: If the text selection spans page-breaks then multiple quads are returned.
We get the selected text for every page for which there was a quad, and store that in a string (called “clipboard”) with an identifier which says the page where it was found.
Including that page number information is ultimately used to allow us to create citation links back to the correct page in the document.
There is one more thing that needs to be done. We need to deal with the case where the user clicks away from the selection. WebViewer doesn't expose a dedicated “textUnselected” event, but we can work around that by clearing the clipboard every time that “textSelected” occurs.
  // Listen for text deselection event
  documentViewer.addEventListener('textSelected', (quads, selectedText,
    clipboard = selectedText;
  });
Now we just need to pass information to the chatbot and let it deal with sending a message to the LLM.
Final set up
Importing the Modular UI and Function Map makes the new panel (and button) available to WebViewer.
The last part of the solution is to make the panel visible. That’s done using instance.UI.openElements from the WebViewer API.
Since the panel might be visible already and we want a consistent state, we first close it, then reopen it. Finally, we set its width to 600 pixels via the API (we could also have achieved the same result via CSS).
So now when we run our code, we get a new popup and a new panel, both of which include custom functionality that allows us to use AI to query the document.
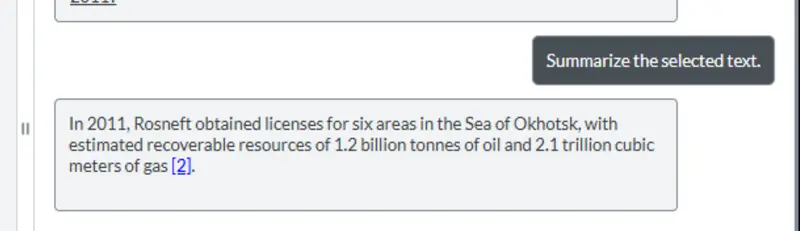
Figure 13: The custom panel showing part of an AI Chat.
A Word About CSS
With the introduction of WebViewer as a Web Component, there is now a shadow DOM. While it is possible to set the styling of elements in the shadow DOM from a regular CSS file, the easiest way to do so is to include the path to the CSS file as the css property when constructing WebViewer.
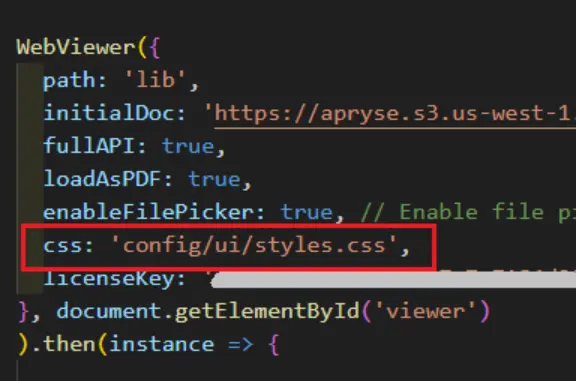
Figure 14: The code showing the path for the CSS file.
Wrapping Up
This sample is an awesome example of how you can use the Modular UI to not just tweak items in the WebViewer UI, but also to add new functionality.
Why not download the code and see how it works for yourself? While the sample code is primarily about using WebViewer to display data retrieved from an LLM, many of the concepts are generic and can be used in whatever workflow you have.
There’s lots of documentation for the Web SDK to help you get started quickly, and you can also reach out to us on Discord if you have any issues.
In the next part of this series, we will use the new panel to interact with an AI using LangChain.