Roger Dunham
Published August 21, 2026
Updated August 21, 2026

7 min


Showing Hidden Text in WebViewer
Roger Dunham

Summary: Scanned PDFs often contain a hidden text layer created by OCR or handwriting recognition (ICR), making it difficult for developers and users to verify data accuracy or troubleshoot extraction issues. While this text layer is invisible by design, the Apryse SDK makes it possible to bring these hidden elements to light. In this article, you will learn how to port server-side Node.JS code directly into the browser using WASM and the Apryse WebViewer, adding a custom UI button to instantly reveal invisible text for easy verification.
Introduction
PDFs are great. They are an information dense document format that is intended to look the same regardless of the machine where it is read.
Typically, PDFs are either “born digital”, with text content directly encoded within the PDF file structure, or they are created by scanning a physical document. Scanned documents that contain just printed text can be made “searchable” by using a tool such as the Apryse SDK to perform OCR (Optical Character Recognition) and create a hidden text layer.
With the release of Apryse 11.12 it is also possible to extract text from handwritten documents using ICR (Intelligent Character Recognition). That’s awesome if you need to extract data from patient intake or insurance claim forms.
But how can you tell whether the extracted data is correct? It’s not easy to know what is in that hidden text layer, simply because it is invisible!
Being able to do so enables developers and users to verify OCR accuracy, troubleshoot extraction issues, and better understand how text content is structured inside scanned or processed PDFs.
In this article, we will see how you can make hidden text visible within the Apryse WebViewer. As a sample document we will use the output from my recent ICR (Handwriting Recognition) blog. That was a form where we had used inclusion zones to just get the text from the parts of the form that contained handwriting.
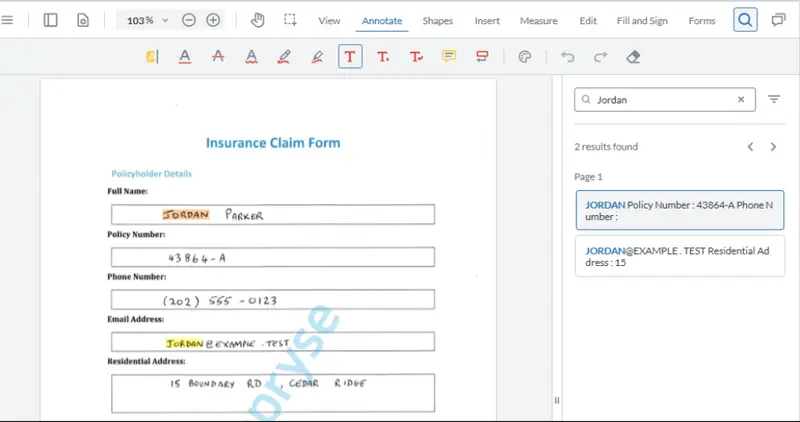
Figure 1: A PDF which contains handwriting that has been extracted as a hidden text layer, making the handwriting searchable.
There are several options supported by the PDF specification that can result in text being invisible. You can read more about this in my previous article that describes how to show hidden text using the Apryse SDK.
Making Hidden Text Visible in Apryse WebViewer
In the previous article, we saw how we can use the Node.JS version of the Apryse SDK to make PDF elements (the fundamental building blocks of PDFs) visible.
One of the great things about the Apryse SDK is that much of the functionality that can be used on a server is also available for use within the browser via WASM.
That means that we can take the code that we used for the previous article and port that very quickly for use within WebViewer.
In fact, the two biggest differences that I am going to make, are
- adding a button to the WebViewer UI so that the user can start the process of showing the hidden text in the currently loaded document and
- displaying the result back within WebViewer.
The code in this article isn’t complete and assumes that you have followed the steps to get started with WebViewer.
My code was written on Windows using React 18.3, using WebViewer 11.12. You should get similar results on other platforms and with other frameworks.
Step 1: Adding a button to WebViewer
WebViewer has a Modular UI which is WCAG 2.2 AA compliant and makes it really easy to customize the UI (if you want to do even more, then you can fork the open source UI and make whatever changes you need).
It’s possible to use a config file to define exactly how the UI should be laid out, but for now we will just add a single button to the main header.
The essential part is that we are defining a custom button and then adding it to the array of items within a Modular Header.
You can then start the code, and the new button is visible.
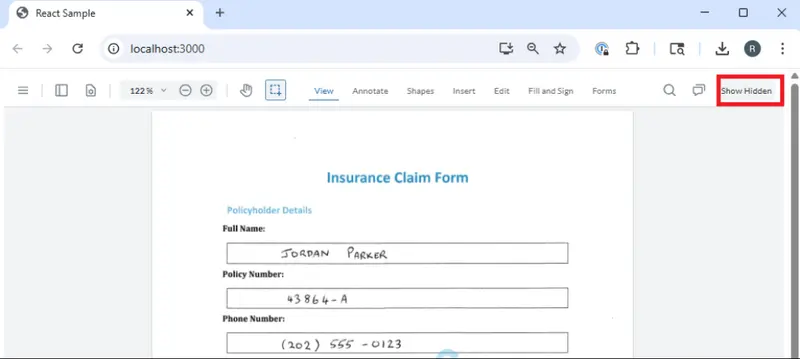
Figure 2: The Custom button added to WebViewer.
I’ve created a very simple button with text as a label, but you can add an icon or a wide range of styles.
Step 2: Making the hidden text visible
We are going to be using functionality from the PDFNet object that is part of WebViewer. To make that accessible, I’m going to create a useRef hook to store the WebViewer Instance, and another useRef hook that stores the currently loaded document.
Because we will use PDFNet, it is essential that we include fullAPI:true as a WebViewer constructor option.
Next, let’s create the event handler that will be used when the user clicks on the custom button that we created. This will need to be async, since many of the functions within PDFNet return promises, so we need to await them.
We need to have the PDFNet available as an object in order to use the functionality that the Apryse SDK offers. The easiest way to do that is to get it from the WebViewer Instance object (which is available via a useRef).
Similarly, we can get the document (docCurrent) loaded within WebViewer (if there is one) from the reference that was stored when the document was loaded.
If either PDFNet or the docCurrent are null, then we can’t continue.
docCurrent is a Core.Document object. PDfNet can’t work directly with that, so we need to get the PDFDoc that it contains. That is then passed to the custom function showOCRdText along with the PDFNet object that we have extracted from the instance.
showOCRdText is almost identical to the function that we used on the server. The only difference is that we are passing in a PDFNet object.
We’re making a copy of the PDFDoc object, then processing each page of the copy in turn, iterating through each of the elements on each page. If the element is a form (often referred to as an “xObject”), then we are passing it to the function ProcessXObject (which we will see in a moment).
There is an assumption here that we are only interested in manipulating text elements that are within an xObject. You might want to extend the code if you need to work with text (or other elements) that are directly part of the page.
I’ve also defined the color (red) and a colorspace (which maps how encoded color values are converted to actual display colors). We will use those values when we start processing the contents of the xObject.
We now pass the xObject, colorspace, color and PDFNet object to ProcessXObject.
Just as with the Server code, we are iterating through each element and rewriting it to the xObject. For any text objects that are found, we are making the fill and stroke fully opaque and setting the color using setFillColorWithColorPt(color), and we also need to set the FillColorSpace), and. We are also setting the Text Rendering Mode to ‘FillText” (that is not needed for PDFs that have been OCR’s by Apryse, but may be needed if you are working with documents processed by other libraries).
If instead of a text element, the element is an xObject then the function is called recursively with that sub-object.
There’s also a little code to ensure that reader and writer objects are correctly finalized, and that’s it.
Step 3: Displaying the resulting document in WebViewer
When the processing is complete, an updated PDFDoc returned. We can’t load a PDFDoc directly into WebViewer, but we can create an ArrayBuffer and load that, though we will need to include a filename or a file extension so that WebViewer knows what kind of data the ArrayBuffer relates to. In this example, we specify a file name of “visible-text.pdf”.
Step 4: Using the code
If we save the code and start the project, WebViewer will appear with our custom button. If we open a PDF that was processed by ICR and click on our Show Hidden Text button, then the document is processed and the extracted text “magically” appears.

Figure 3: You can see the text that was recovered, and where it was located within the document. Some characters, particularly punctuation, look a little odd, since they are stretched to make them intuitively selectable when hidden.
What happens next is up to you. You could for example remove the Download button, which would stop the file from being saved. That’s an easy thing to do with the Modular UI.
Alternatively, if you allow it to be downloaded, then those changes are still present.
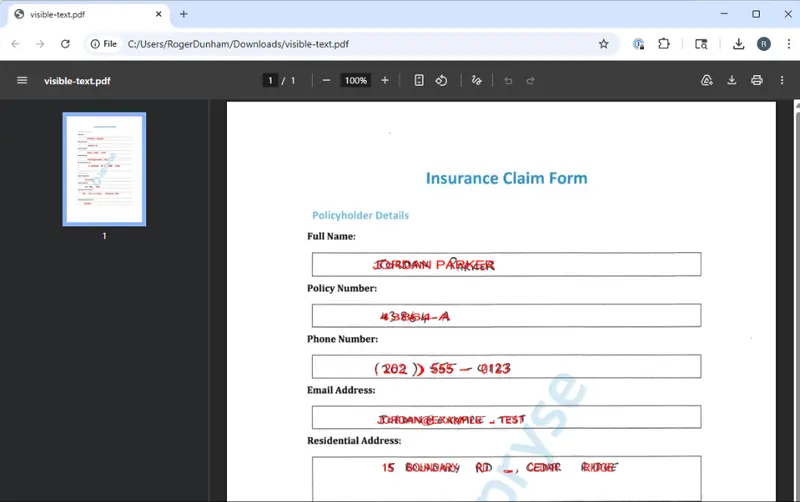
Figure 4: The downloaded document shown in Chrome.
The choice is yours.
Wrapping up
OCR and ICR create hidden text layers, and it can be hard to understand what is going on when reviewing their accuracy. It’s possible to make the text visible directly in Xodo PDF Studio. Alternatively, you can do so using server side code.
It’s also possible to use the same code that works on the server and process the files directly within WebViewer. This opens up a world of possibilities, and by keeping everything within the browser there is no need for files to be downloaded locally. That’s great if you have a workflow that requires a human-in-the-loop to review documents that have been automatically generated as a separate part of the process.
We’ve only touched on a tiny fraction of the functionality available in WebViewer, so grab yourself a trial license and try things for yourself.
If you have any questions, you can reach out to us on Support channel.
If you have any questions about this blog, or there are other blogs that you would like us to write, then please contact us at blog-feedback@apryse.com.